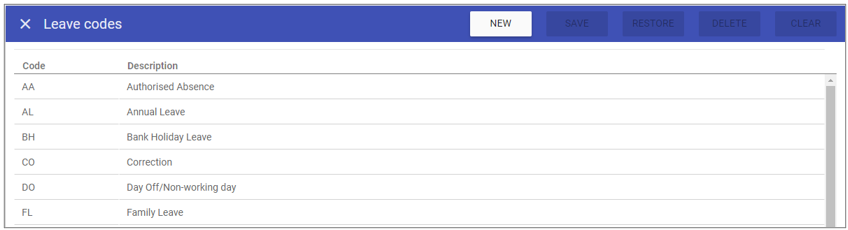
Leave Codes
Usage
This screen allows you to create new leave codes, as well as maintaining existing leave codes that are stored on the system.
Leave Code Maintenance
1. To add or edit details of a
leave code that has already been created,
select the leave code by double clicking on the required
leave code.
2. The selected leave code is highlighted in
grey and the fields that are available for editing are displayed.
 3. Add or edit the required details in the visible fields for the specific
leave code.
3. Add or edit the required details in the visible fields for the specific
leave code.
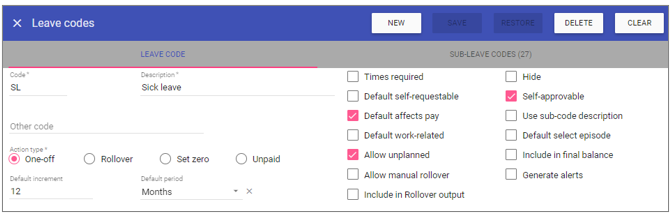
Code: Is the unique identifier for the
leave code set by the user.
Description: The name of the
leave code.
Other Code: Used to link to third party systems.
Action Type
One Off: This allows a leave to be set as rare usage, it must be set as unplanned and it does not rollover.
Roll Over: When set, any remaining balance is carried over to the next leave period upon completing the rollover.
Set Zero: When set, any remaining balance is not usable in next leave period upon completing the rollover.
Unpaid: This allows a leave to be designated as unpaid and, like
one-off leave types, must be set as unplanned.
Default Increment: The numeric value pertaining to the
default period.
Default Period: The number of
days/weeks/months/years that the rollover period for this leave code defaults to during workflows and addition to contracts.
Times required: If checked, you will need to enter a start time and end time when adding/requesting the leave. If unchecked, the start time and end time will default to when the first shift on that unit starts and when the last shift on that unit ends respectively.
Default self-requestable: When assigned this leave will either default to being self-requestable or not.
Default affects pay: For linking with 3rd party systems.
Default work-related: For linking with 3rd party systems.
Allow unplanned: Sets a leave code to allow adding via the unplanned leaves tab in
rotas (do not require an allowance or balance in each staff record).
Allow manual rollover: If selected will allow carry forward during contract changes made after the current rollover period.
Include in Rollover output: To exclude a leave code from the rollover, make sure there is not a tick in this box. Tick this if the leave code is required.
Hide: Allows you to hide redundant leave codes system-wide.
Self-approvable: Either allows or stops managers from approving leave requests of this leave code (does not apply in rota screens).
Default select episode: When selecting leave within a rota or within
staff requests, this will select the whole episode instead of just an individual day by default.
Include in final balance: If selected, any remaining leave of this type will be added as hours owed during the termination workflow.
Generate alerts: Left unticked, this will stop approved/refused alerts for certain leave codes such as sick leave.
4. Click on the SAVE button at the top of the screen.
Sub-Leave Codes
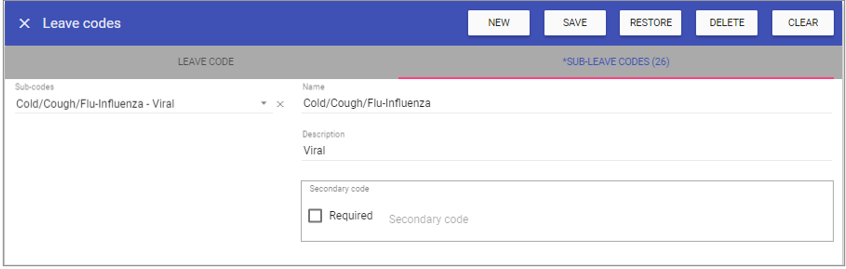 Sub-Codes: Is the unique identifier for the Leave Code set by the user.
Name: The name of the sub-leave code.
Description: Additional information for the sub-leave code.
Required: Whether or not a secondary code description is required for ESR only.
Secondary code: Enter the description of the additional secondary code, for ESR only.
Creating a New Leave Code
1. Click on NEW at the top right of the screen.
2. Fill in the details for the leave code.
3. Click SAVE.
NOTE: The leave code should now appear in the list of leave codes when accessing this screen.
Deleting a Leave Code
1. Select the leave code by double clicking on the required leave code.2. The screen will change to show the details of the selected leave code.
3. Click DELETE at the top of the page.
4. Click DELETE to the delete message.