Security Groups
Usage
The Access Codes page is used for modification to the password security of specific user accounts.

Security Group Maintenance
1. To add or edit details of a Security Group that has already been created,
select the Security Group by double clicking on the required Security Group.
2. The selected Security Group is highlighted in
grey and the fields that are available for editing are displayed.
 3. Add or edit the required details in the visible fields for the specific Security Group.
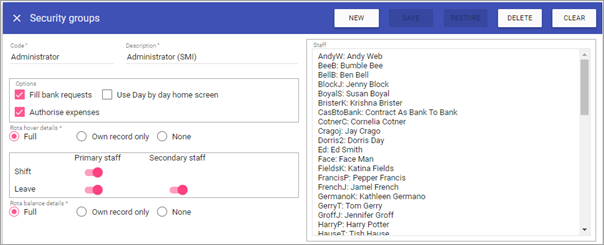
Code: Is the unique identifier for the Security Group set by the user.
Description: The name of the Security Group.
Parent Group: This is the group that is directly above the group that has just been created in the hierarchy from which the new created group inherits its properties from.
Staff: Lists all staff members that belong to the current selected Security Group.
Options
Fill bank requests: Allows anyone with this security group to assign staff to a bank request.
Use Day by day home screen: Specific control which at login sends the users in the selected security group straight to Day by Day > Shift Control.
Authorise Expenses: Gives security group access to authorise expenses for payment.
Rota hover details
Full: Allows the selected security group to mouse hover over all cells on the rota to see additional information.
Own record only: Allows the selected security group to mouse hover over cells on the rota to see additional information for only their personal details and transactions.
None: No mouse hover functionality is present on the rota for this selected security group.
When full access is selected you can choose:
Shift: This being on allows hover-over access to all shifts regardless of unit they are on.
Leave Primary Staff: This gives the security group access to all leave narratives for staff who are primary allocations to the rota they are viewing.
Leave Secondary Staff: This gives the security group access to all leave narratives for staff who are Secondary allocations to the rota they are viewing.
Rota balance details
Full: All rota balances will be displayed.
Own record only: You will only see your own rota balances.
None: You will see no rota balance details.
This allows you to setup managers of units that can just view shift hover-overs, or whom can only view staff's leave hover-over if they are primary to their unit.
4. Click on the SAVE button at the top of the screen.
Creating a New Security Group
1. Click on NEW at the top right of the screen.
2. Fill in the details for the Security Group.
3. Click SAVE.
NOTE: The Security Group should now appear in the list of Security Groups when accessing this screen.
Deleting a Security Group
1. Select the Security Group by double clicking on the required Security Group.2. The screen will change to show the details of the selected Security Group.
3. Click DELETE at the top of the page.
4. Click DELETE to the delete message.