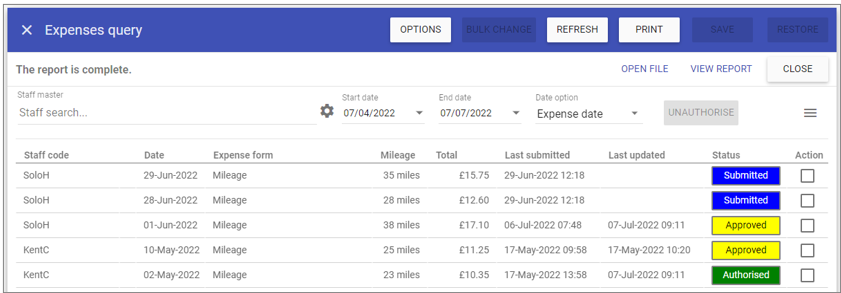
Expenses Query
Usage
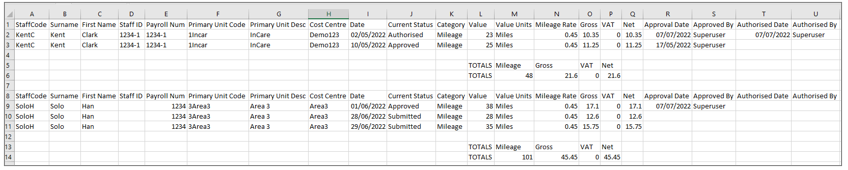
Expenses Query is for staff expenses and gives managers the facility to approve or refuse pending staff expenses that have been submitted.
Running the Report

Select report parameters and the information pertaining to those parameters will be displayed.
Staff master: To add a single staff member type the name of the staff member you wish to search in the search field and select the staff member by clicking on the auto complete drop down menu.
If staff member does not appear, click on
the cog to the right of Staff search and
select the relevant Staff status.
Start date: The start date of the reporting period.
End date: The end date of the reporting period.
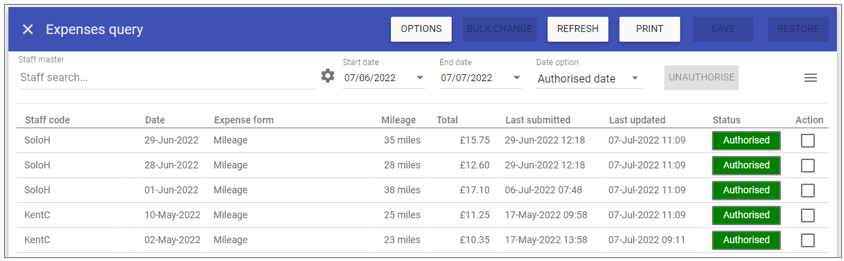
Expense date: Select date option by Expense/Approved/Authorised.
UNAUTHORISE: When available this will unauthorise an expense which was accidentally authorised and will return it to the previous approved status.
NOTE: If you accidentally select an expense which is not authorised in with the ones you wish to unauthorise, the UNAUTHORISE button will no longer be selectable .
Action: Ticking this check box enables the Bulk Change button so that the status can be changed on multiple items to either submitted, refused or approved.
Options
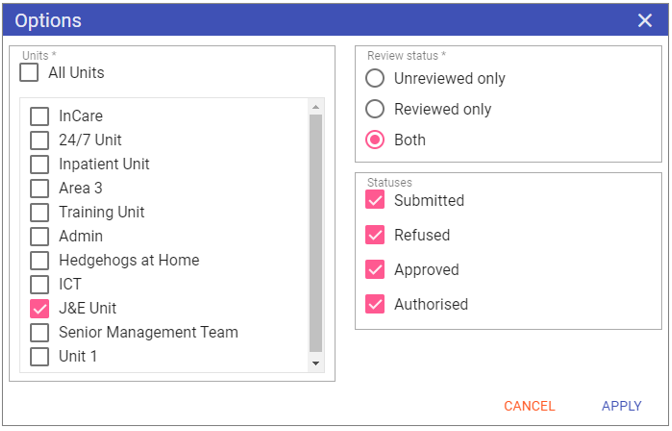
Units: Select the unit/s to be included in the report.
Review status
Unreviewed only: Displays unreviewed expenses only on the report.
Reviewed only: Displays reviewed expenses only on the report.
Both: Displays both reviewed and unreviewed expenses on the report.
Statuses
Submitted: Displays submitted expenses statuses on the report.
Refused: Displays refused expenses statuses on the report.
Approved: Displays approved expenses statuses on the report.
Authorised: Displays authorised expenses statuses on the report.
Expenses Review
Select the expense to be approved/refused, this will open the expense. Tick either Approved or Refused and add a Response if required and press SAVE: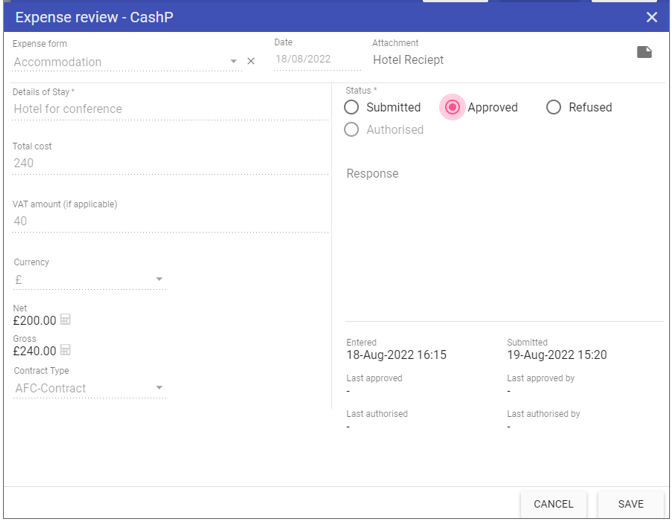
Expense form: Displays the expense form in review.
Date: Displays the date of the expense form in review.
Attachment: Displays the expense form attachment in review.
Status
Submitted: Selecting this sets the expenses item to the status of submitted.
Approved: Selecting this sets the expenses item to the status of approved.
Refused: Selecting this sets the expenses item to the status of refused.
Authorised: Only available once an expense has been approved.
Response: Allows a free form text response to provide additional information to the status.
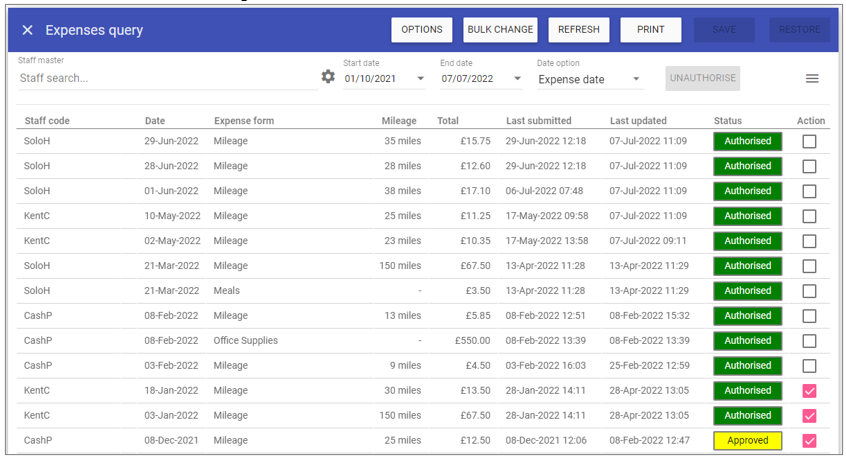
Bulk Change
Tick the Action box alongside each expenses to be approved,
this will allow the BULK CHANGE button to
become available. Tick Approved and
APPLY:
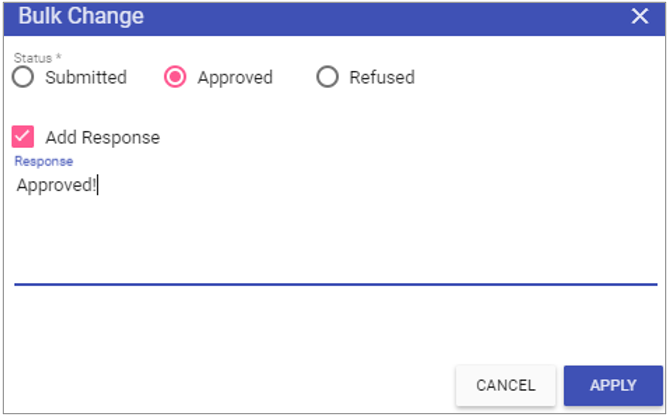 Statuses
Submitted: Sets the status on the expenses item to submitted.
Approved: Sets the status on the expenses item to approved.
Refused: Sets the status on the expenses item to refused.
Add response: Allows a free form text response to be added to the expenses status.
Response: The text of the response.
Authorising Expenses
Once expenses have been approved, the final step to payment is now authorising them. Select the expenses you wish to authorise for payment:
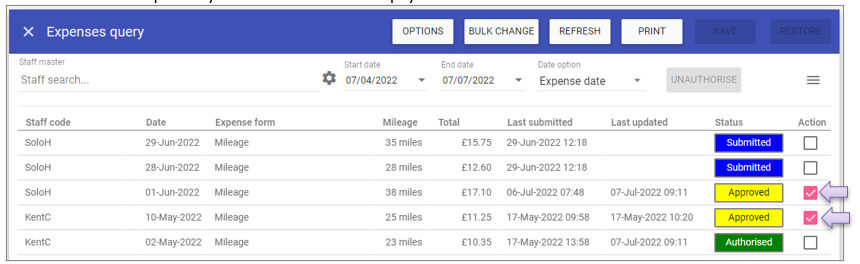 Click Bulk Change and select Authorised. You can add a response for these at this time to if you desire:
 NOTE: You can only authorise approved expenses, if you select any expenses which are not authorised and click Bulk Change you will not be able to select Authorised:
 Alternatively, you can also click on the status for authorised expenses and this will change the status to authorised, SAVING will complete the process:
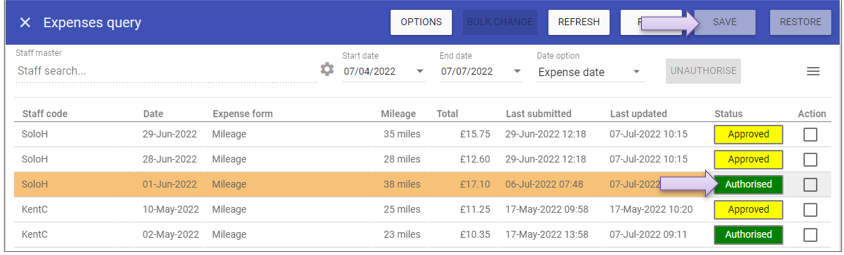 NOTE: Again, only an expense which is currently saved as approved will be able to change to Authorised.
Upon authorising all expenses for the next expense run, each staff member will receive an alert totaling the expenses authorised in a single SAVE/bulk change:
 REMEMBER: An alert is generated for each staff member giving them the total expenses authorised in one save (one bulk change).
SMI recommend having a set process and authorising all expenses at the same time for payment. This means each staff member will only get a single alert per expense run.
REMEMBER: An alert is generated for each staff member giving them the total expenses authorised in one save (one bulk change).
SMI recommend having a set process and authorising all expenses at the same time for payment. This means each staff member will only get a single alert per expense run.
Unauthorising Expenses
If you make a mistake and one of the expenses you authorised for payment should not have been authorised, you can select one or multiple and use the UNAUTHORISE button:
 NOTE: Unauthorising an expense returns it to the previous approved status.
If you accidentally select an expense which is not authorised in with the ones you wish to unauthorise, the UNAUTHORISE button will no longer be selectable:
Clicking into the expense
As well as outputting this information on the report/printout to file, the approver and authorised by can also be found if you click into an expense within the Expenses query screen. Click on the expense when highlighted as below: The Expense review now also shows the Approved by and Authorised by information:
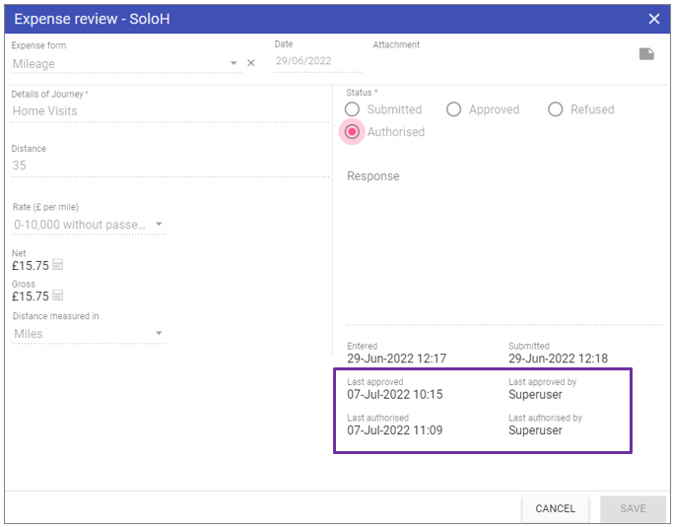
Printing
You can print directly from Expenses query, just outputting the expenses on screen.
This means the whole expenses process can be completed from a single location within Staff.Care.
You can output all expenses between a date range for approval, check them and approve them.
Later, you can then look on screen for those expenses approved within a date range, print and authorise accordingly without leaving Expenses query.
Clicking PRINT generates 2 outputs:
 VIEW: Outputs the PDF with signature spaces at the bottom:
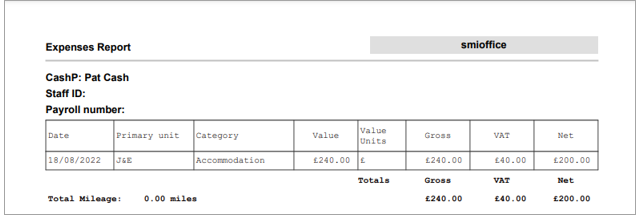 OPEN FILE: Outputs the CSV format: