Staff Maintenance
Usage
This screen is for staff member details including adding new users to the system and assigning their contracts, units, leaves, events, skills, training and expenses.

Staff Search Options
Click the cog icon to the right of the search field to display search options.
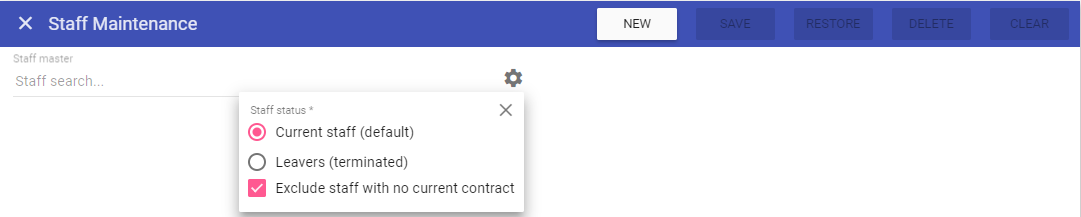 Current staff (default): Shows all staff who
aren't leavers.
Current staff (default): Shows all staff who
aren't leavers.
Leavers (terminated): Shows only leavers (indicated by putting a date in the termination field in
Staff maintenance).
Exclude staff with no current contract:
Do not show staff who do not have a current contract but who are not leavers.
Once options have been set,
simply type the name of the staff member you wish to search
for in the search field.
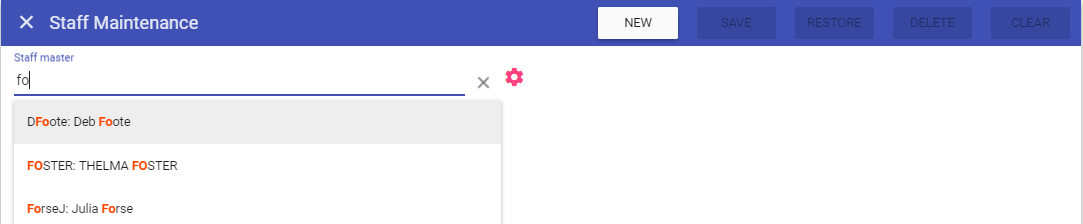
Staff.Care's syntax is Staff Code: First name Surname and Staff.Care auto complete function begins after 2 characters.
Creating new Staff Members (Workflows)
The new starter workflow is a 9 step process. During the workflow you can go back to previous steps by clicking BACK and move forward by clicking CONTINUE.
All data is temporarily held until the workflow is completed and any changes made will be reflected throughout the process.
To begin a New Starter Workflow > click
NEW.
The first page is demographics, fill in the fields as appropriate.
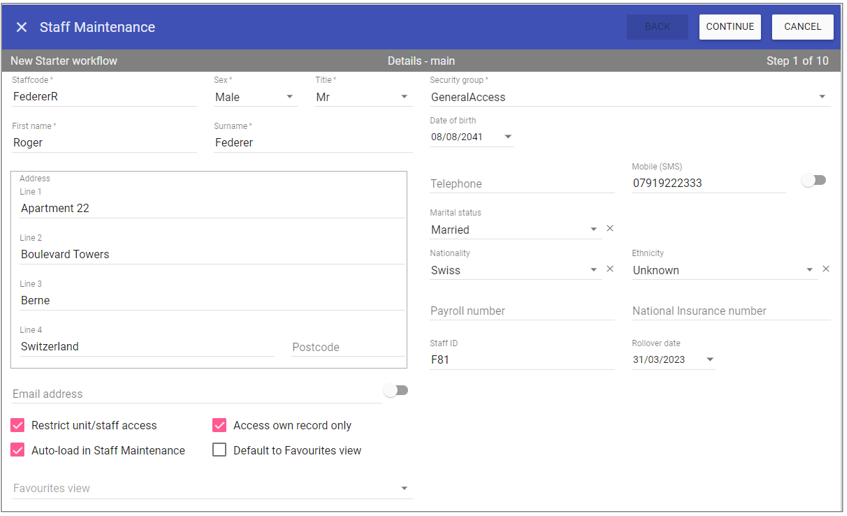 Staff Code: Is the unique identifier for the bank staff member set by the user.
Gender: The gender of that member of staff e.g. male.
Title: The title of that member of staff e.g. MR or MRS.
Security group: The security group of that member of staff set up in Admin > Security Groups.
First name: The first name of that member of staff.
Surname: The surname of that member of staff.
Date of birth: The date of birth of that member of staff.
Address line 1: The address line 1 of that member of staff.
Address line 2: The address line 2 of that member of staff.
Address line 3: The address line 3 of that member of staff.
Address line 4: The address line 4 of that member of staff.
Postcode: The postcode of that member of staff.
Telephone: The telephone number of that member of staff.
Mobile (SMS): The mobile number of that member of staff.
Marital status: The marital status of that member of staff.
Nationality: The nationality of that member of staff.
Ethnicity: The ethnicity of that member of staff.
Payroll number: The payroll number for that member of staff.
National insurance number: The national insurance number of that member of staff.
Staff ID: This is a unique employee code for use outside Staff.Care.
Rollover date: The default date for the rollover of staff leaves.
Email address: Email address of that staff member.
Restrict unit/staff access: The user can only view staff details and unit details that they are assigned to.
Access own record only:
The user can only view their staff details but can view all available units.
Auto-load in staff maintenance: Loads the specific staff member upon clicking this menu without having to search.
Default to Favourites view: Use the favourites menu set up in Admin > Favourites.
Favourites view: Which favourites menu to use.
Step 2 is the next of kin details.
 Next of kin
Name: The name of the next of kin.
Telephone: The telephone number of the next of kin.
Mobile: The mobile number of the next of kin.
Address: The address of the next of kin.
Email: The email address of the next of kin.
Notes: Additional information pertaining to the next of kin.
Emergency contact
Name: The name of the emergency contact.
Telephone: The telephone number of the emergency contact.
Mobile: The mobile number of the emergency contact.
Address: The address of the emergency contact.
Email: The email of the emergency contact.
Notes: Additional information pertaining to the emergency contact.
Step 3 is the payroll details.
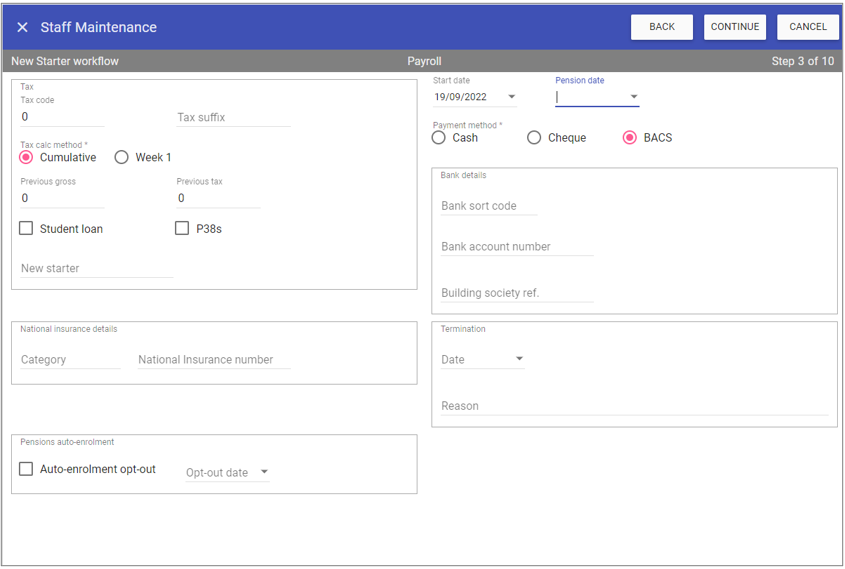 Tax code: Staff member tax code (numeric).
Tax suffix: Staff member tax code (alpha).
Cumulative: Annual tax allowance.
Week 1: i.e. emergency tax.
Previous gross: See P45.
Previous tax: See P45.
Student loan: Advised by inland revenue.
P38s: Advised by inland revenue.
New starter: Enter the new starter category (A, B or C) that applies to the new starter checklist.
Start date: When the staff member started working for the organisation.
Pension date: Date pension is due to start.
Cash: Paid in cash.
Cheque: Paid by cheque.
BACS: Paid by BACS.
Bank sort code: Bank sort code.
Bank account number: Bank account number.
Building society ref: Building Soc. Reference number.
Category: National insurance category.
National insurance number: National
insurance number.
Date: When the staff member does not work for the organisation anymore.
Reason: E.g. retired.
Auto-enrolment opt-out: Denotes if the staff member opted out of the
government auto-enrolment pension scheme.
Opt-out date: Date the staff member opted out of the
government auto-enrolment pension scheme.
Step 4 is the security details and is where you create the staff member logon to Staff.Care.
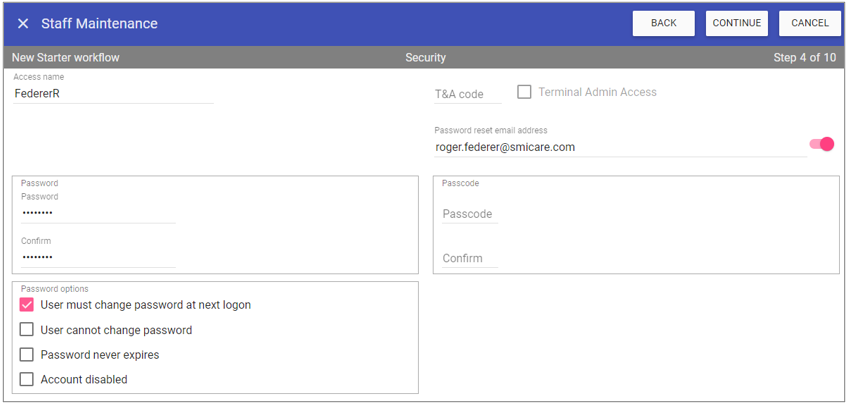 Access name: This is the user's login name.
T&A code: This is a unique identifier for the user clocking-in (if biometric terminals are used)
Terminal Admin Access: This is ticked if user requires admin rights to the biometric terminal.
Password
Password: The user's password to login with.
Confirm: Confirmation of the user's password.
Password reset by email
Password reset email address: Enter an email address by which a password reset link will be sent if user locks themselves out of the system.
Allow password reset email: Upon entering an email address this defaults to on, if turned off this disables the password reset via email for this user.
Password options
User must change at next logon: Upon logging in the first time, the staff member must change the default password to one of their own choosing.
User cannot change password: Prevents the staff member from changing their own password.
Password never expires: Password
doesn't expire after the default expiry period.
Account disabled: User name and password will no longer allow this staff member to login to Staff.Care.
Activating the Password reset email address: The toggle switch only becomes active once an email address is entered and both must be present for each staff member in order for them to be able to reset their own passwords.
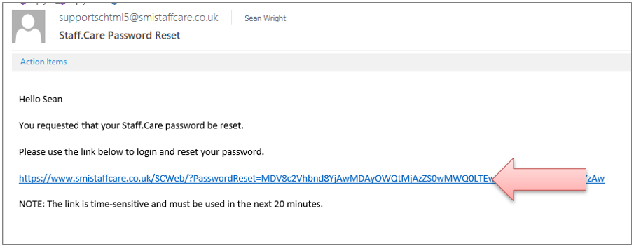
REMEMBER: The reset email will be sent to the email address provided and the link will be active for a default of 20 minutes (this can be set anywhere from 10 minutes up to 720 minutes), please let SMI know how long you wish this to be prior to installation.
The RESET PASSWORD button is displayed on the login screen so if you can't remember your password or lock yourself out of Staff.Care, you can reset your own password as follows:
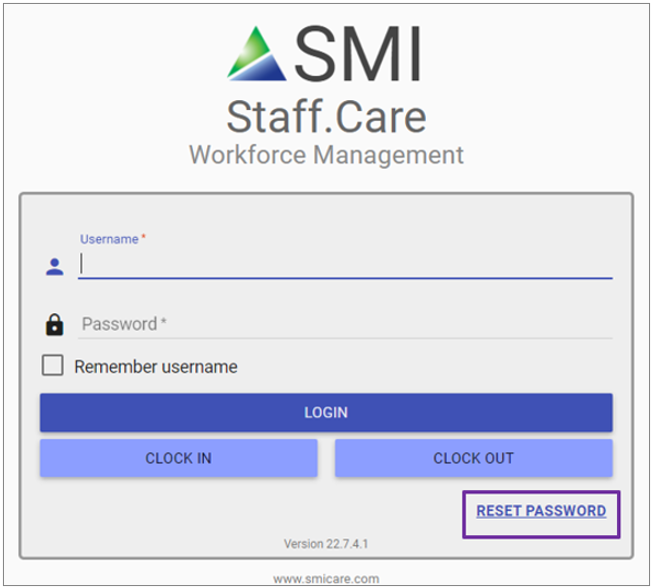
Upon clicking the RESET PASSWORD button you are prompted to enter your chosen reset email address and click on SEND EMAIL:

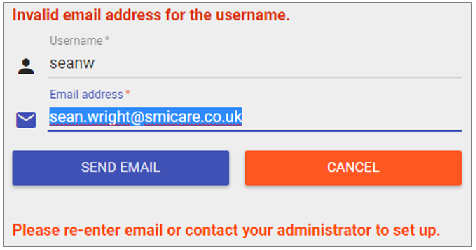
NOTE: If you enter the wrong email address the following will be displayed:
By entering your correct email address, you will receive an email with a link to reset your password:
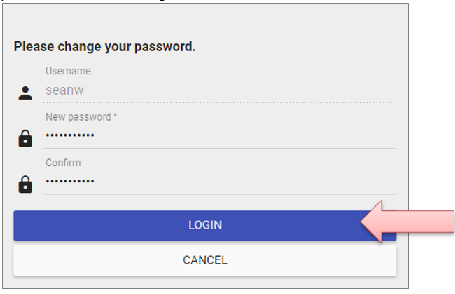
This will open a new window in your browser with your username already completed, simply enter a new password twice and click login:
Step 5 is the Alert & Messaging screen where you can make your selections, example below shows alert groups assigned to managers,
however these Alert groups are not available to all staff members.
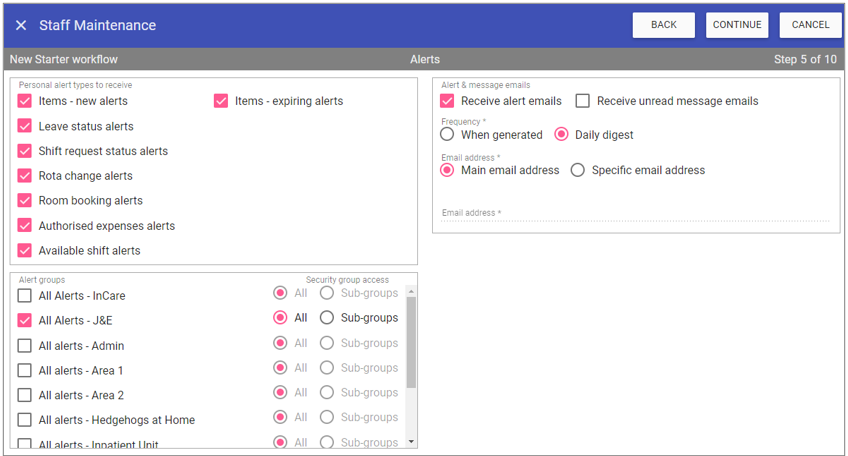 Personal Alerts: These should ALL be selected, denoting which personal alerts you receive.
Alert Groups: These show you which groups you have access to, those ticked are the ones you will receive alerts for.
Security group access:
ALL: All staff security groups for that alert group.
Sub-groups: All staff security groups lower than yours for that alert group (useful for units with more than 1 manager and no team segregation).
Alert & Message emails:
Receive alert emails: This will email you any alerts you receive within Staff.Care.
Receive unread message emails: If selected, you will receive an email containing any unread messages within Staff.Care.
Frequency: As a manager, you should have this set to Daily digest, meaning you will only receive 1 email per day for alerts and unread messages.
Main email address: If selected, your emails for alerts and messages will be sent to the email address on the Details main page of your staff record.
Specific email address: If selected, you can enter any email address you wish to receive your alerts and messages in the Email address field.
Email Address: If main email address is chosen this will display the email address from your Details>Main screen and cannot be edited. If Specific email address is
chosen then you must enter the email address you wish to receive alert/messages emails.
NOTE: Your access to this screen depends on your system's chosen security settings, speak to your System Administration Team if any changes are required.
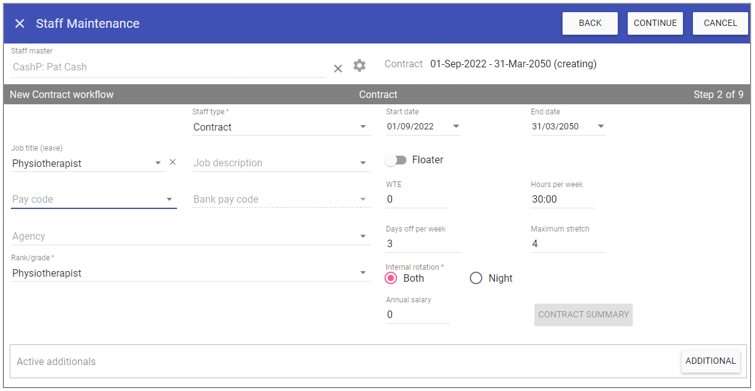
Step 6 is the start of the contract workflow.
NOTE: The following fields are all applied during leave accrual calculations setup in Admin >
Leave Accruals.
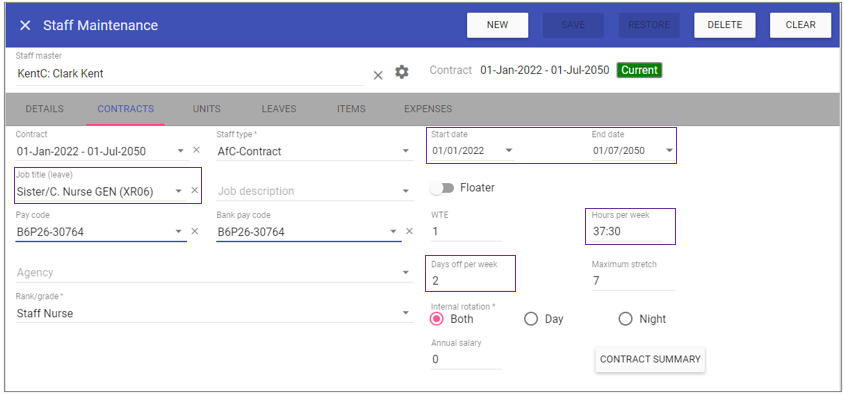
Job title, Start date, End date, Hours per week and Days off per week. (Job titles are used for WTE).
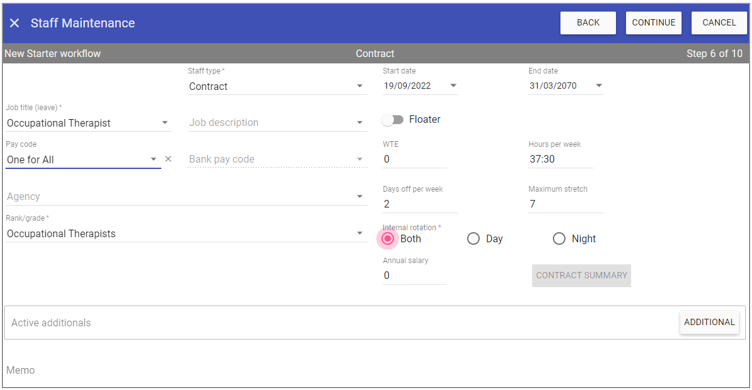 Contract The actual contract of the staff member.
Start date: Staff member organisational contract start date.
End date: Staff member organisational contract end date.
Job title (leave): The job title of the staff member. For example, set to Non-Clinical Non-Manager 0y which links directly to the leave accrual calculation for all none clinical staff who don’t manage
Staff description: For example, set to Admin Assistant as this is the exact role the staff member works.
Staff type: The staff type of the staff member.
Floater: Whether or not the staff member can work across different units.
NOTE: Make sure floater is ticked otherwise secondary unit staff won't show in View Requests.
Pay code: The pay code of the staff member.
Bank pay code: The pay code when working bank of the staff member.
WTE: Whole time equivalent hours, with up to 4 decimal places i.e., 0.8242.
Hours per week: The amount of hours per week the staff member works on this contract.
Agency: The agency that the staff member belongs to.
Days off per week: The amount of days the staff member
doesn't work on this contract.
Maximum stretch: The amount of consecutive days the staff member can work in a row.
Rank/grade: The rank and grade of the staff member.
Internal rotation
Both: Whether the staff member can work both day and night shifts.
Day: The staff member can work day shifts only.
Night: The staff member can work night shifts only.
Annual salary: The staff member's salary (yearly).
Contract summary: Used as a summary when contracts change.
Active additionals: Used to add additional grades and pay codes.
Memo: Any additional information about the staff member.
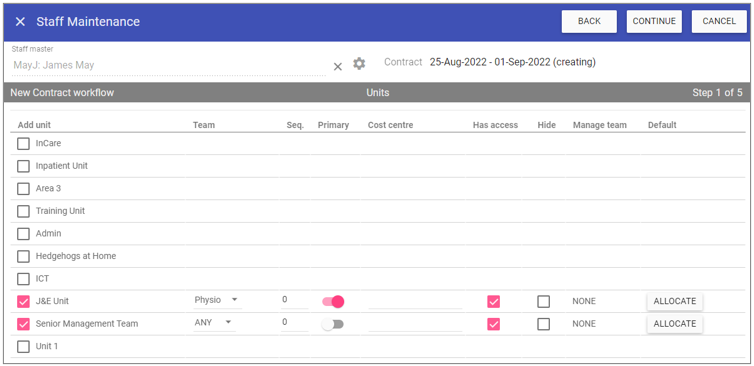
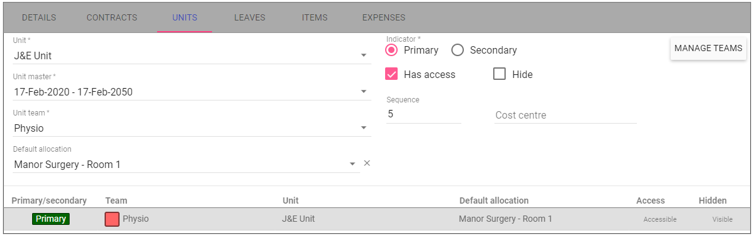
Step 7 is assigning the Staff member to Units, Work Patterns, Manage Teams and Default Rooms.
NOTE: If work patterns are selected whilst in this screen, the workflow changes from Step 7 of 10, to Step 7 to 11.
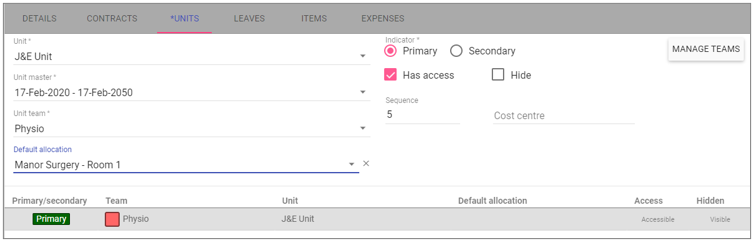
Simply click on the checkbox next to the units you wish to add, choose teams, pick which on you want to be primary and give access where required.
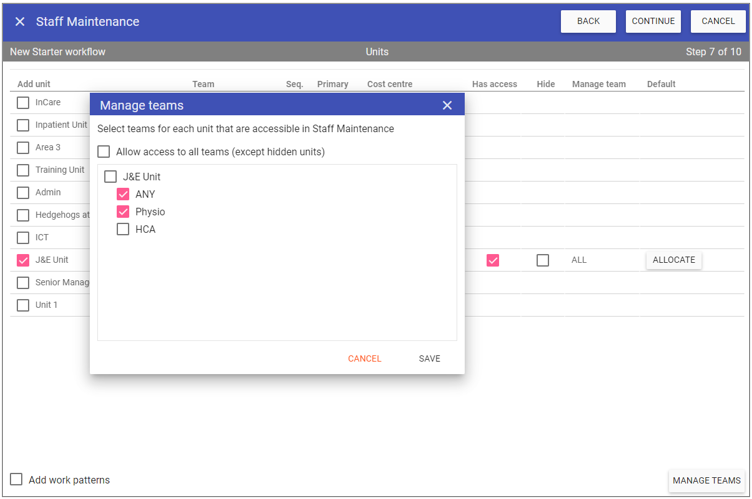
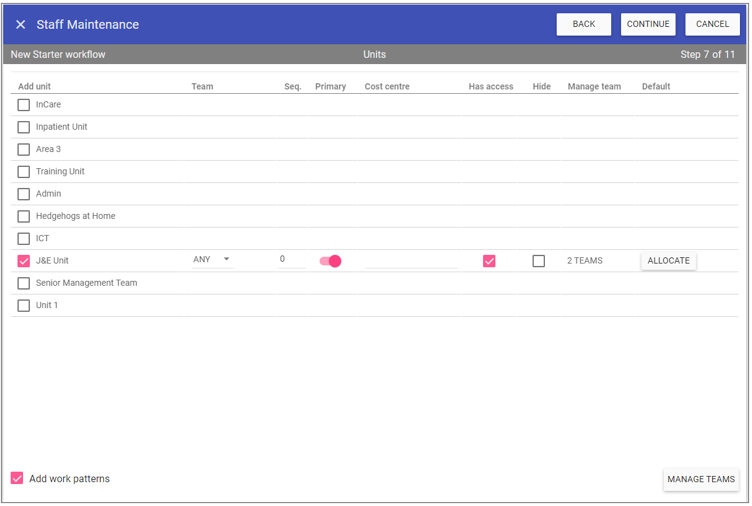 For higher grade staff that do not have access own record only checked there is the ability to restrict which staff they can access in Staff Maintenance through MANAGE TEAMS.
NOTE: ‘Manage teams’ limits access in Staff Maintenance only.
 You also have the ability to default a room to a staff member simply by clicking on the ALLOCATE button and selecting the room:
 And the room name will appear in the Default column, you can also edit the default allocation by selecting the pen icon alongside the room name:

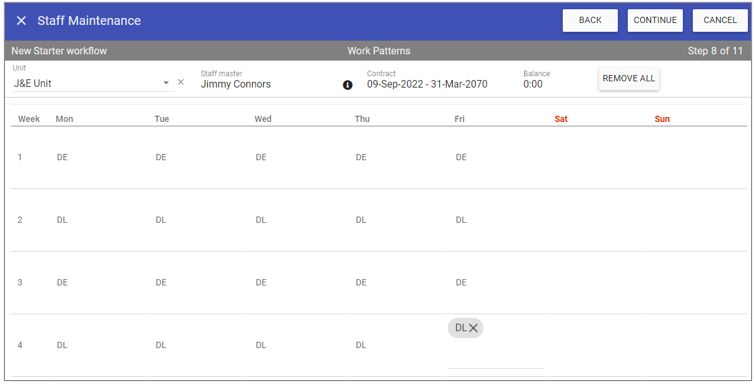
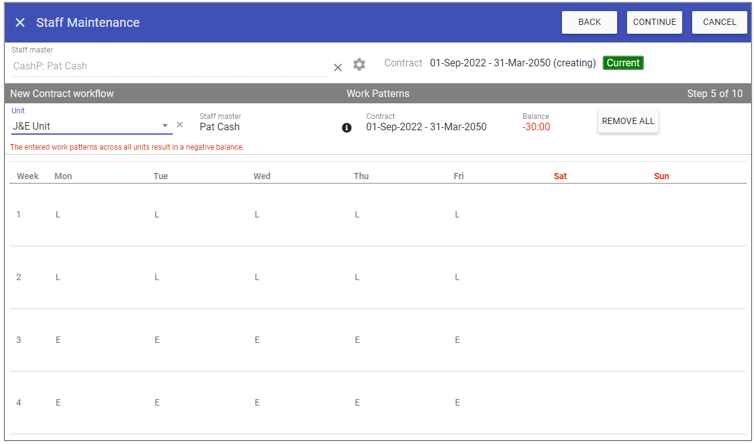
Step 8 is Work Patterns.
On this screen you can add a working pattern for the shifts the staff member will do:
 The information icon shows how to copy the shifts across.
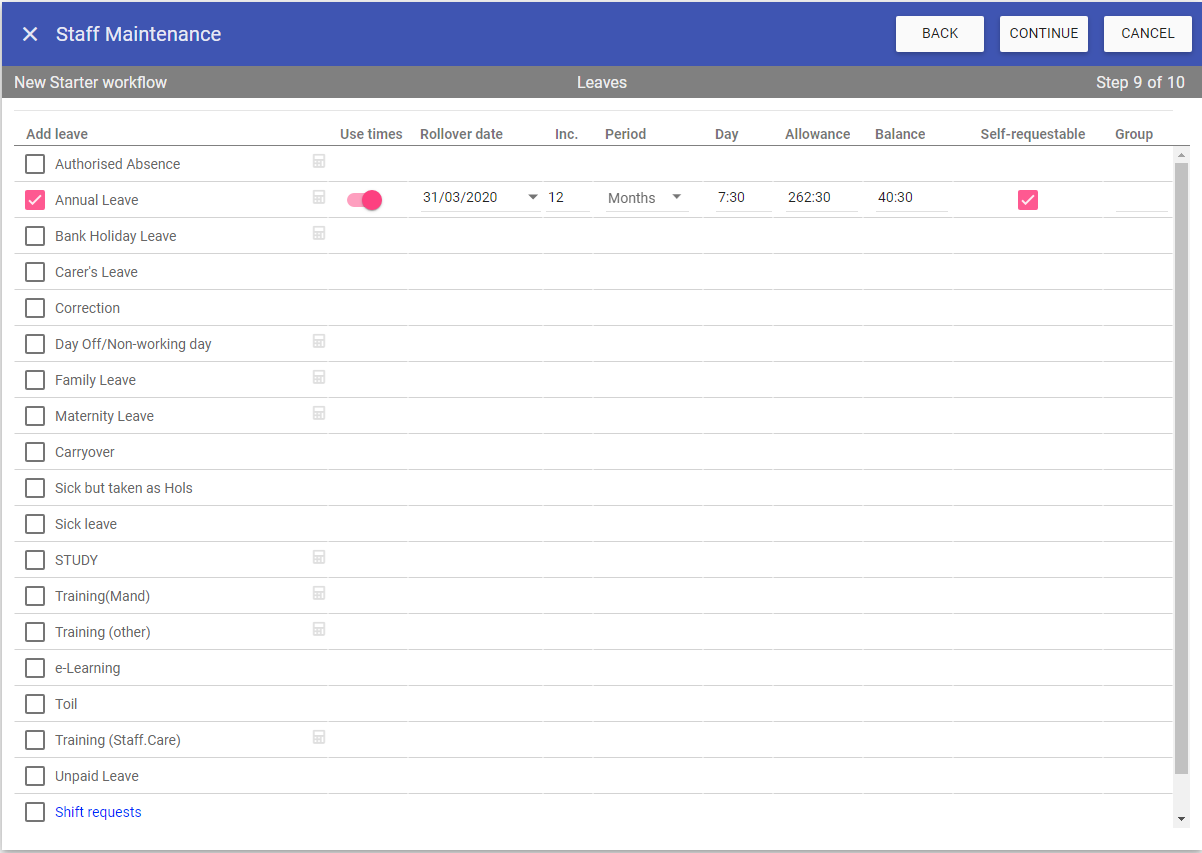
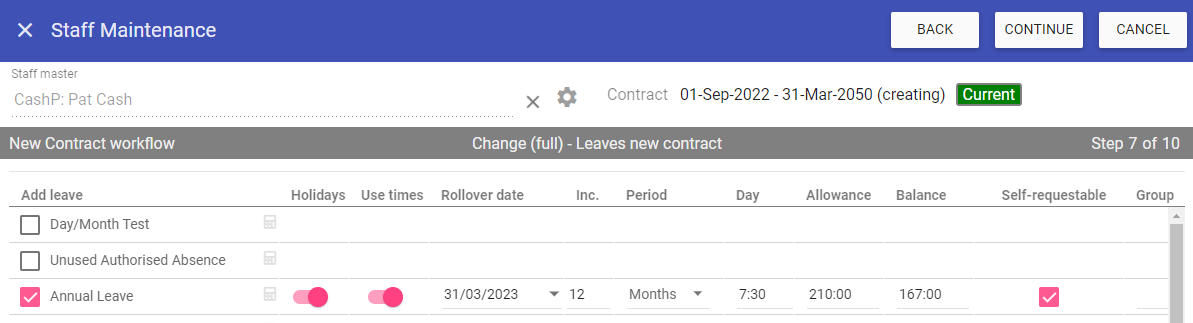
Step 9 is associating staff leaves, this screen is in the same format as the units. Simply ticking a leave will add it to the staff member’s record.
NOTE: Any leaves with any of the Leave accruals formulae set will display a calculator icon.
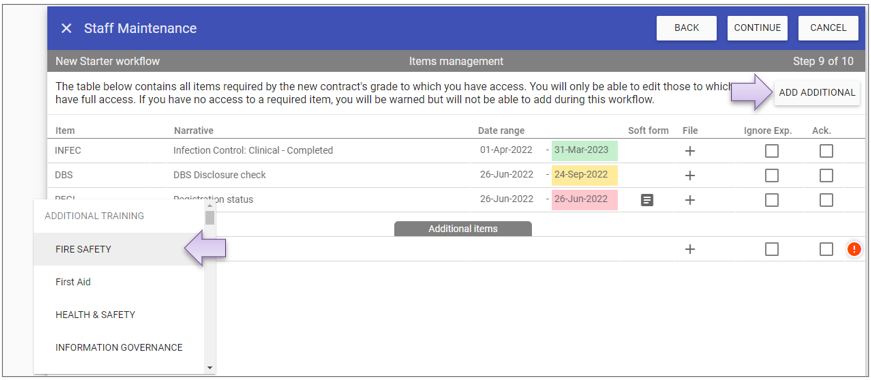
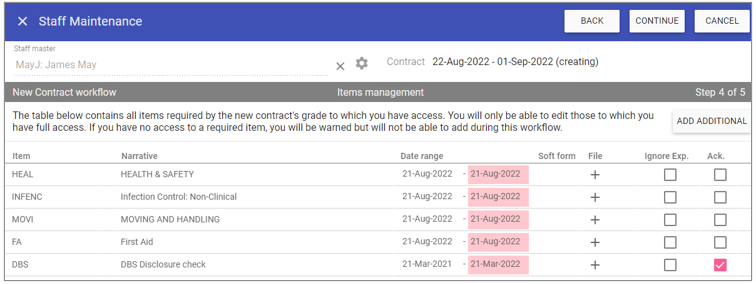
Step 10 is Items management screen which details all items required for the new contract:
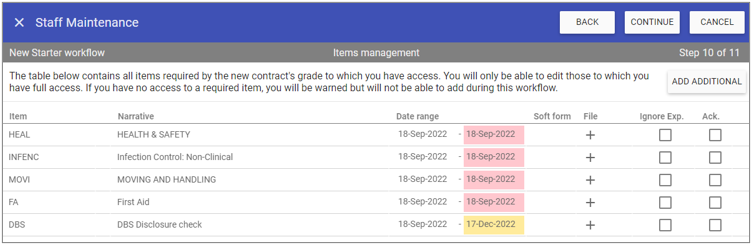 Depending on the grade selected, the items for that particular role will automatically be present. You can edit all the fields associated to each of the items
added during the workflow.
Depending on the grade selected, the items for that particular role will automatically be present. You can edit all the fields associated to each of the items
added during the workflow.
Narrative: Clicking on the Narrative allows you to update it:
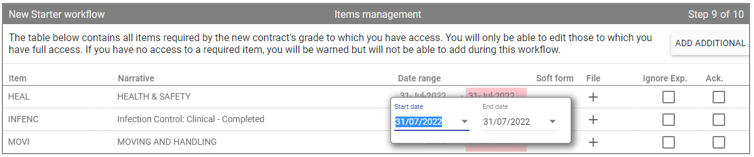
 Start/End Date: Click on the dates and manually edit the start and end dates, if these have been provided:
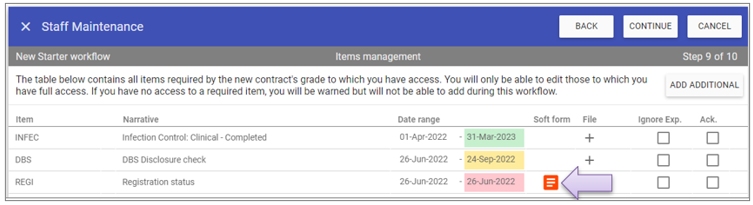
 Soft Form Icon: Any associated soft form can be opened and completed during the workflow:
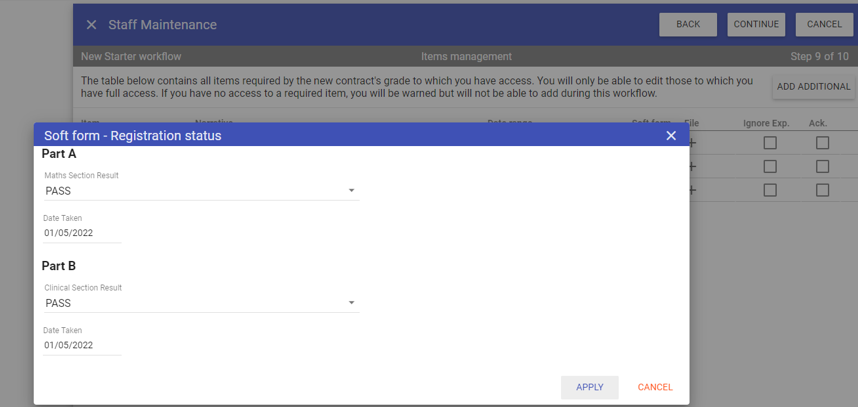
 Soft form opens for completion, clicking APPLY adds your changes:
 + Icon: Allows you to attach a file.
Ignore Expiry: Sets the item to not be included in expiring alerts or in the dashboards.
Ack: Allows you to set the item as Acknowledged.
ADD ADDITIONAL: Clicking this button allows you to add any other items during the workflow:
 NOTE: You can update any added items in the same way, dates, soft forms, upload an attachment etc.
Once you have added/updated all the items you can during the workflow, click CONTINUE and FINISH to complete the workflow. All items previously added will be
displayed:
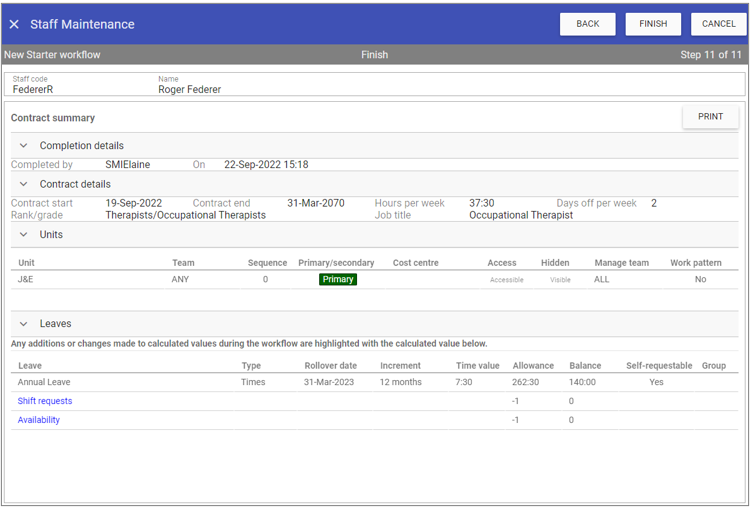
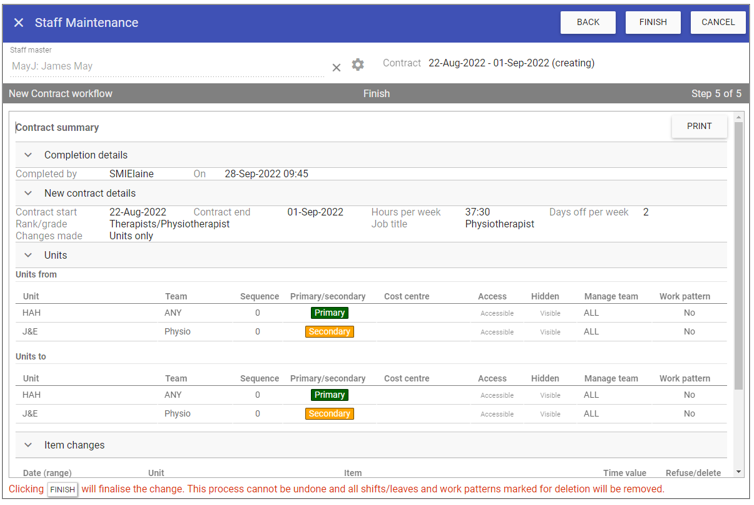
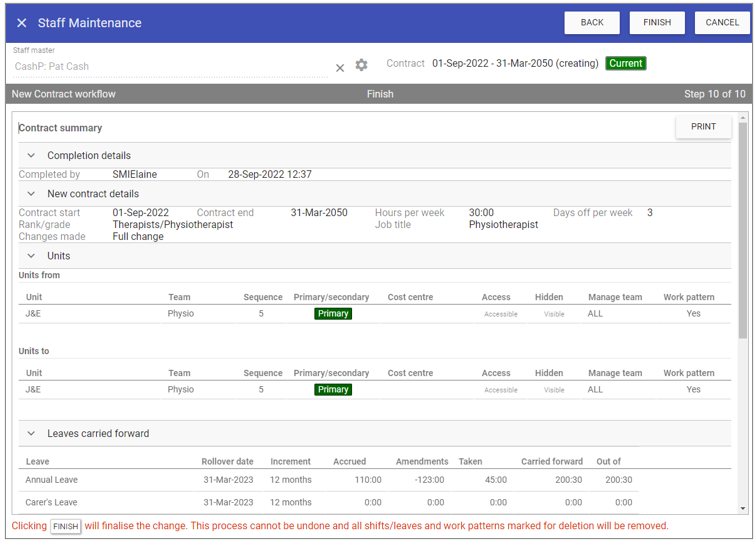
Step 11 is the contract summary which shows the important information from the contract setup including the staff member who completed the contract and when.
NOTE: The summary is always available to view and print in Staff Maintenance within the Contracts tab.
 Upon clicking FINISH the new starter is added to Staff.Care and you are taken to the main Staff Maintenance screen ready to add the next one.
Contract Workflows
In order to add a new contract to a staff member, simply open their
Staff Maintenance record, navigate to the Contracts tab and click NEW:
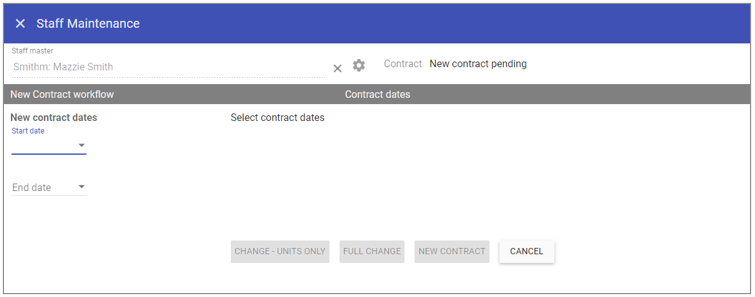 The new contracts workflow covers:
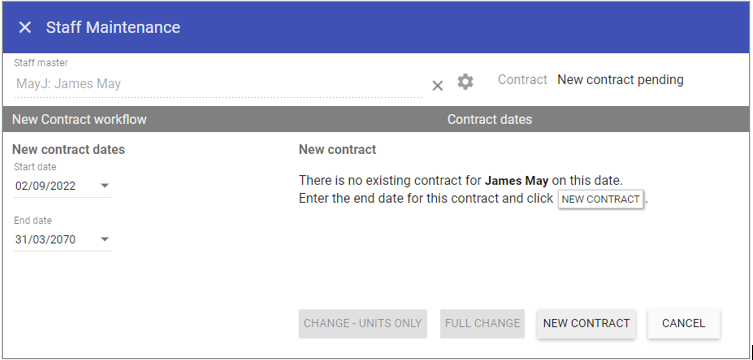
New Contract: Where no pre-existing contract is present (or after the existing contract finishes).
Change - Units Only: Where the new contract starts part way through an existing contract and you only want to change their units.
Full Change: Where the new contract starts part way through an existing contract and you want to change more than just their units.
New Contract Only
NOTE: IF A STAFF MEMBER IS MOVING FROM CONTRACT TO BANK OR BANK TO CONTRACT YOU MUST USE THE LEAVER WORKFLOW TO END THE FIRST CONTRACT, THEN ADD A NEW CONTRACT TO COMPLETE THIS TYPE OF CHANGE.The options presented depends on the start date of the new contract, if it doesn’t overlap a pre-existing contract then you can add a new contract
 In the next screen you can choose whether or not to copy details from an old contract by selecting the contract from the dropdown, and choosing which information to copy.
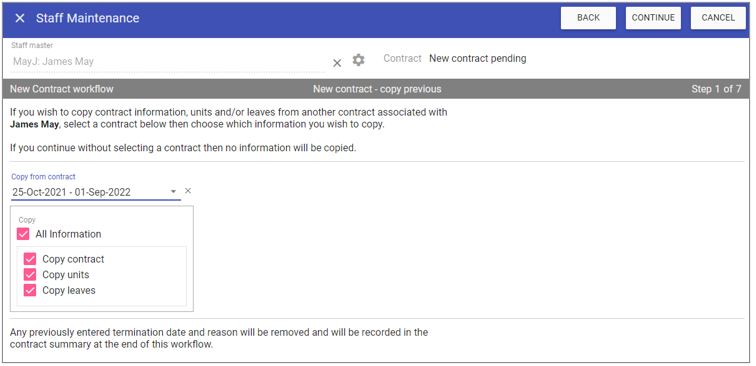 NOTE: If the staff member had previously left, the termination date and reason would be removed during this workflow.
Copying the information from all tabs means it is already there and you can make adjustments as appropriate to the contract, units and leaves without having to start from scratch.
The workflow will now take you through:
• Contracts tab.
• Units tab with team management where appropriate – if the units that the contract you chose are no longer used (hidden) these will not be selected during the copy.
• Work patterns (if required).
• Default room allocation (if required).
• Alerts.
• Leaves tab – all the rollover dates will be updated to those pertinent to the new contract.
• Items Management lists all the required items for the relevant grade.
These tabs are all detailed above in the New Starter Workflow. Again at the end, once completed, you will be able to view and print the contract summary from the new contract.
Units Only
Upon entering a start date in the new contract workflow which overlaps a pre-existing contract you are prompted with the contract change dialogue and only have the option to either complete a units only or a full change.
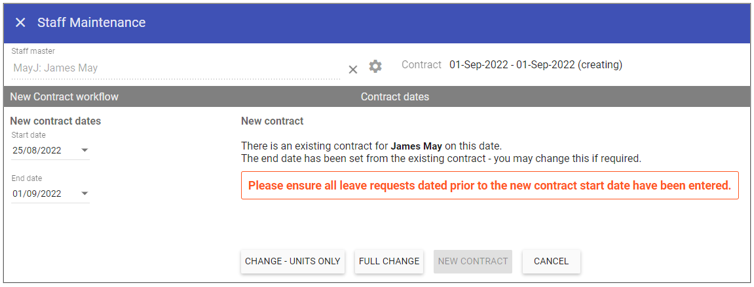 NOTE: Part of the change process moves all leave balance to the new contract, so if you do not enter all the leaves dated before the new contract starts, you will not be able to after finishing the contract change.
REMEMBER: You cannot complete a contract change retrospectively after you have completed the leave rollover.
Clicking CHANGE – UNITS ONLY – will start the simplified contract change workflow where only units can be changed. In the units grid the current units will be displayed.
You can make your changes and click CONTINUE.
 NOTE: You can also complete team management setup and assign working patterns during this workflow.
Upon clicking CONTINUE you are presented with the Alerts screen where changes can be made. By clicking CONTINUE again you can view the list of affected shifts/leaves.
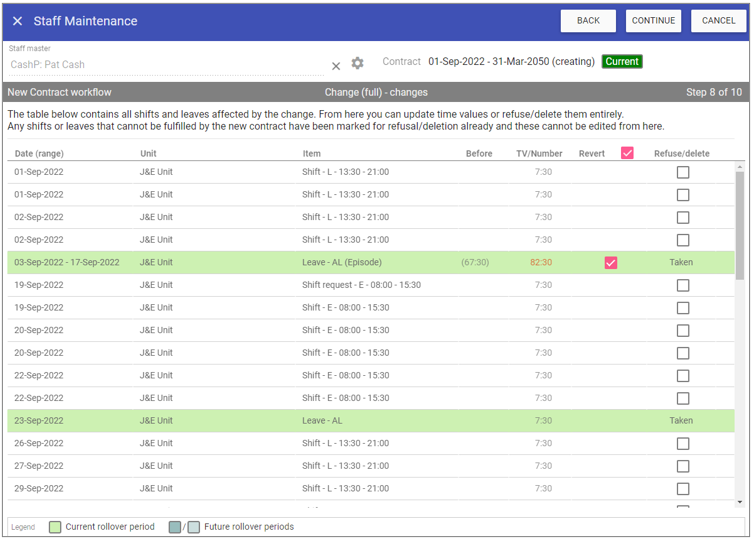
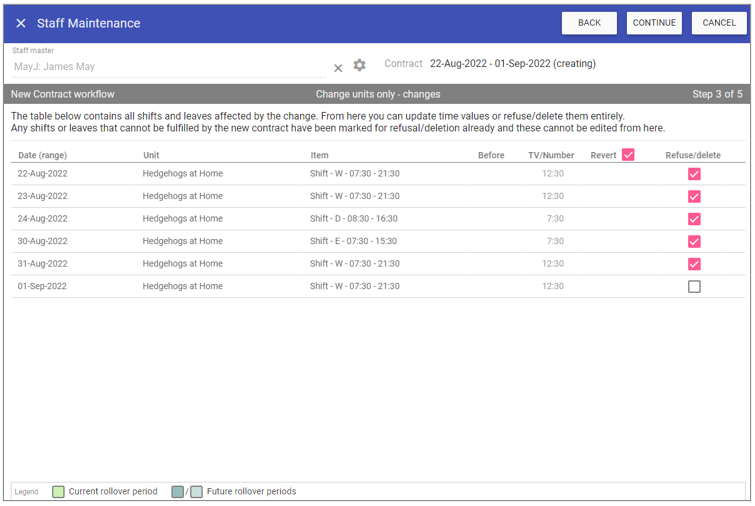 Any shifts that cannot be completed on the new contract will be deleted, you can also choose to refuse any leaves, change the leave time values or delete any other shifts as required.
The leaves are colour coded into rollover periods. Green is the current rollover period and grey is all future rollover periods.
NOTE: Leave is shown in episodes making time value changes easier to implement.
Revert Leave Time Values during contract changes: When changes in weekly hours or days off per week are made these affect the time value of a leave day/leave episode going from the start of the new contract.
With the revert leave time values functionality the system shows you both the newly calculated and what was originally booked and allows you to flick between the 2 for each individual leave episode.
You can choose whether or not to automatically update future leave time values during contract changes (before this was automatically done so new contract weekly hours
and time values of leave day were always respected). You will also have the option, per leave episode, to revert back to what was booked before or to the newly calculated leave time value.
Setup - SMI: Before we enable this functionality, SMI will need to know whether you want to default to keeping the previously booked time value for leaves during contract change or not.
NOTE: This is a systemwide default but there is the option to flick between these during the contract change too.
If you choose to default this on then leave time values will not be automatically updated during contract changes, if you choose to default it off then the time values will be automatically updated to match the future contract.
The chosen option will be applied to units only changes automatically.
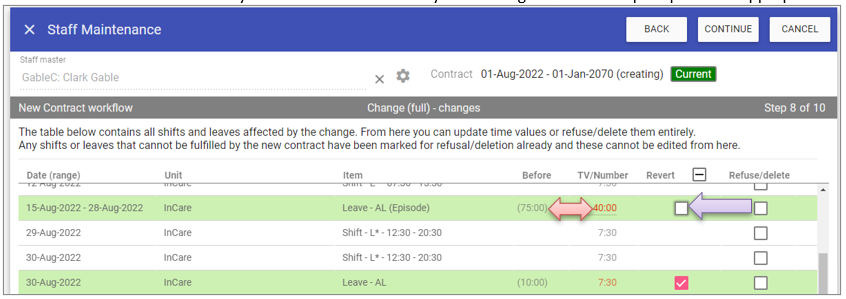
EXAMPLE OF REVERT LEAVE
I have changed Clark Gable’s contract hours from 37:30 down to 20:00 and his days off per week from 2 to 5. This means a single day of leave would now be 10 hours and a week of leave would be 20 hours under the new contract.
When we get to the changes step of the workflow, we can clearly see what was booked before the contract change and what has been newly calculated.
Revert OFF by deault - Below is how the changes step looks when leave is not set to revert to the time value booked prior to the change:
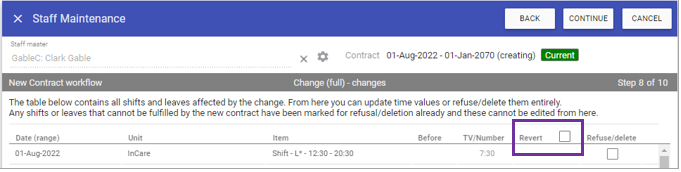 NOTE: Selecting the tick box next to Revert in the header will revert all to what was booked previously.
You can also select each episode of leave individually:
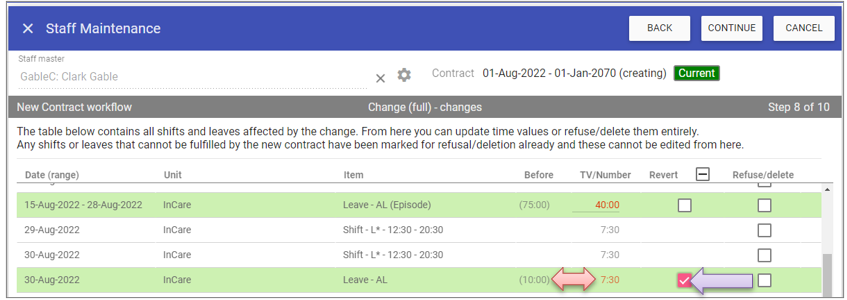 Upon clicking the Revert checkbox the previously booked leave time value moves to the TV/number field. This will be the time value for that leave now.
The newly calculated time value moves under the Revert header, just so you can still see what it would be.
Upon clicking the Revert checkbox the previously booked leave time value moves to the TV/number field. This will be the time value for that leave now.
The newly calculated time value moves under the Revert header, just so you can still see what it would be.
Revert ON by default - When revert is on by default, all leaves will be selected to use the time values booked under the old contract. The revert all checkbox will be selected automatically.
The originally booked time values will be under the TV/Number column whilst the newly calculated time values will be shown in brackets under the Revert column for reference:
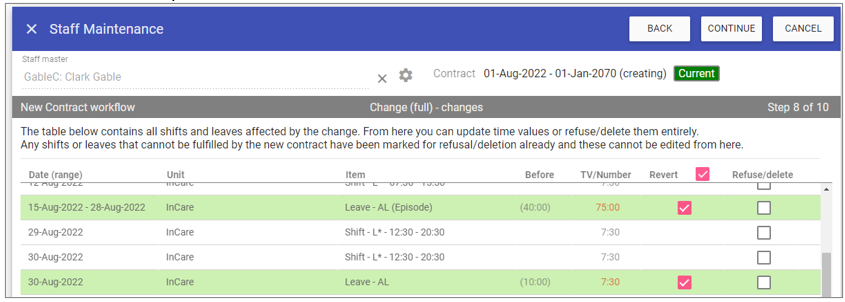 You can then choose which ones you do not wish to revert by unselecting the tick boxes per episode as appropriate:
 Upon clicking CONTINUE you are presented with the Items management screen where changes/additions can be made if required.
 Click CONTINUE again and the final step is the summary where the workflow can be completed.
 Clicking FINISH will complete the workflow and save the new contract into Staff.Care. Any refused/deleted shifts/leaves will be removed.
Full Contract Change
In order to start the full contract change workflow, upon entering the start date click FULL CHANGE.
In the copy contract screen the previous contract is chosen, as this is the contract from which data will be transferred.
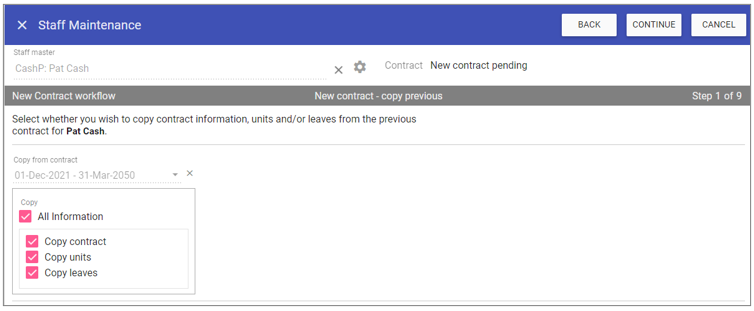 NOTE: You can choose not to copy certain information across, however, SMI recommend you copy everything forward unless the staff member is moving from contract to bank or bank to contract.
REMEMBER: You cannot copy leaves to a new contract with a start date prior to the last completed leave rollover.
Upon clicking CONTINUE you are presented with the contract screen, here you can make your amendments to the contract.
In this example the staff member is reducing their hours to 30:00 per week and increasing their days off per week to 3 to accommodate this change.
 The next step allows you to change units or add additional units if required.
NOTE: Work patterns are selected by default, as where these exist a change in contract will more than likely change the shifts they will be working.
The work patterns screen shows an excess of 30 hours as we have reduced contracted hours.
 You will not be able to continue where the work pattern exceeds contract hours.
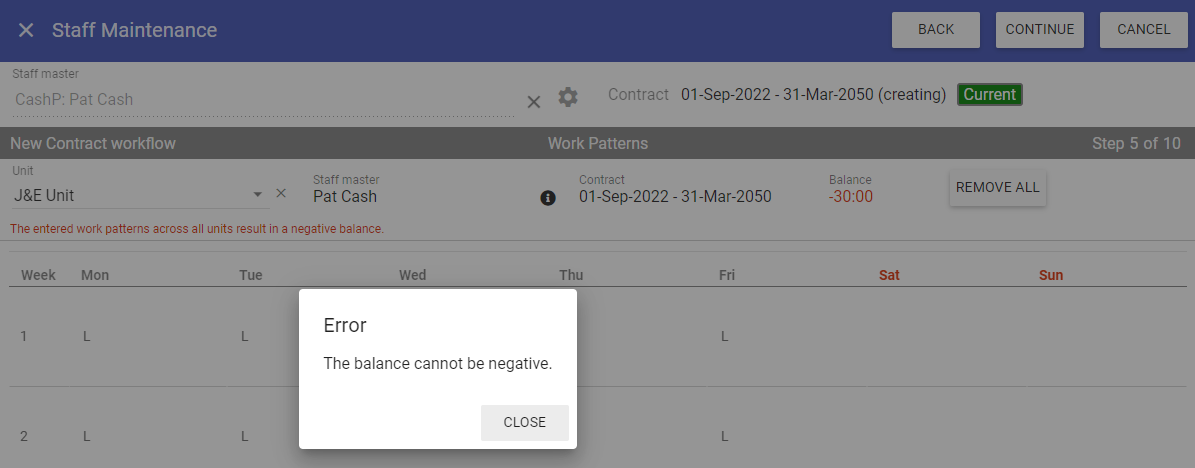 Once you have updated the working pattern so the balance is 0:00 or above, you can continue.
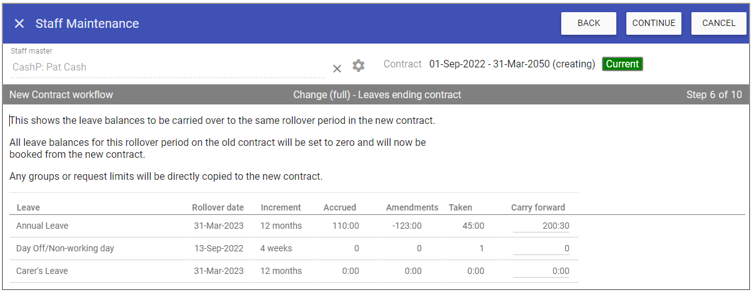 The Leave accrual calculations are applied here for the ending of a contract.
Rollover date: This applies the next rollover date after the new contract starts.
Increment: Shows the increment set to each leave type.
Accrued: This is the calculated leave accrual for the ending contract in this rollover period.
Amendments: This is the total additions or reductions to balance in the shown rollover period.
Taken: This shows the total leave of each type taken during the rollover period.
Carried forward: Allows you to edit amounts carried forward from previous year if required (this can be positive or negative).
Clicking CONTINUE takes us to the new contract leaves screen.
 The leave accrual calculations are completed here and include the leave carried forward plus any leave booked in the remainder of the displayed rollover period.
NOTE: If your change occurs in the next rollover period then no leave is carried forward.
Upon clicking CONTINUE you will be taken to the change screen – this includes any leaves or shifts which are dated after the change.
 Where leave is over booked in a rollover period the exclamation icon will be displayed and on hover-over this will tell you how much over they are.
You can refuse these here or leave them to carry the negative balance forward meaning that the organisation will never be out of pocket.
NOTE: As we know you cannot always refuse booked leaves, this process will allow leave balances to be negative.
REMEMBER: Negative balances will ALWAYS be carried forward to the next rollover period.
You can also adjust time value leave balances manually if you wish by clicking on the balance and entering a time value.
NOTE: Any changes to leave balances or refusing leave will be taken into consideration in the final balance.
As this staff member is reducing hours you can also delete shifts from rotas to bring their working hours in-line with their new contract.
Revert Leave Time Values during contract changes: When changes in weekly hours or days off per week are made these affect the time value of a leave day/leave episode going from the start of the new contract.
With the revert leave time values functionality the system shows you both the newly calculated and what was originally booked and allows you to flick between the 2 for each individual leave episode.
You can choose whether or not to automatically update future leave time values during contract changes (before this was automatically done so new contract weekly hours
and time values of leave day were always respected). You will also have the option, per leave episode, to revert back to what was booked before or to the newly calculated leave time value.
Setup - SMI: Before we enable this functionality, SMI will need to know whether you want to default to keeping the previously booked time value for leaves during contract change or not.
NOTE: This is a systemwide default but there is the option to flick between these during the contract change too.
If you choose to default this on then leave time values will not be automatically updated during contract changes, if you choose to default it off then the time values will be automatically updated to match the future contract.
The chosen option will be applied to units only changes automatically.
EXAMPLE OF REVERT LEAVE
I have changed Clark Gable’s contract hours from 37:30 down to 20:00 and his days off per week from 2 to 5. This means a single day of leave would now be 10 hours and a week of leave would be 20 hours under the new contract.
When we get to the changes step of the workflow, we can clearly see what was booked before the contract change and what has been newly calculated.
Revert OFF by deault - Below is how the changes step looks when leave is not set to revert to the time value booked prior to the change:
NOTE: Selecting the tick box next to Revert in the header will revert all to what was booked previously.
You can also select each episode of leave individually:
Upon clicking the Revert checkbox the previously booked leave time value moves to the TV/number field. This will be the time value for that leave now.
The newly calculated time value moves under the Revert header, just so you can still see what it would be.
Revert ON by default - When revert is on by default, all leaves will be selected to use the time values booked under the old contract. The revert all checkbox will be selected automatically.
The originally booked time values will be under the TV/Number column whilst the newly calculated time values will be shown in brackets under the Revert column for reference:
You can then choose which ones you do not wish to revert by unselecting the tick boxes per episode as appropriate:
Clicking CONTINUE again takes you to the Items management screen where you can add any new items or amend existing ones as necessary.
 Upon completing your changes and clicking CONTINUE you are presented with the contract summary which saves against the new contract.
 Click FINISH to complete all changes.
If you don't add a default room to a staff member during any of the contract workflows, you can do this retrospectively by clicking on the Units tab and select the unit,
then open up the drop-down box alongside Default allocation and select the room:
 Once the room is selected it will appear under the Default allocation column:
Leaves - Recalculate
The RECALCULATE button allows you to correct any mistakes/make any changes which affect leave allowances/balances/time value of leave day on a contract. You can then update the contract, click on the leaves one by one and click RECALCULATE which will update the leave to match your updated contract. This is to be used when:• You have a new starter whose start date changes.
• You accidentally add the wrong contract weekly hours, job title or days off per week.
NOTE: The RECALCULATE button does not update pre-booked leave time values nor does it update the Contract Summary.
REMEMBER: This is intended to fix recently added contracts only, please do not use on older contracts especially those which start prior to the last rollover.
USAGE
The fields within the contract which affect leave accrual calculations are as below:
 Any changes to these fields after the new contract/new starter workflow will affect the leave accrued. This is what the
RECALCULATE button is for.
Any changes to these fields after the new contract/new starter workflow will affect the leave accrued. This is what the
RECALCULATE button is for.EXAMPLE
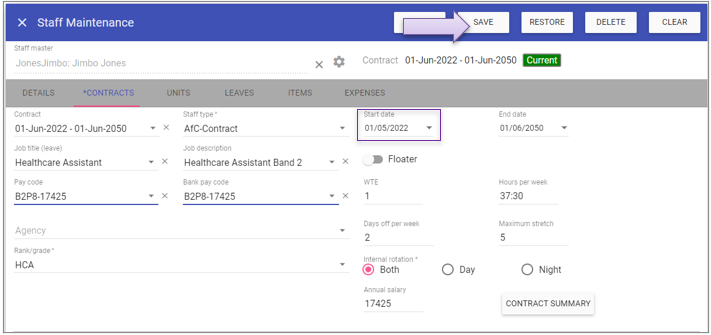
You have a new starter Jimbo Jones, who was due to start on the 1st June 2022, however his start date has now changed to the 1st May 2022. The system calculated how much leave he would have from the 1st June when he was added as a new starter.
Go to his record and update his contract start date to 01/05/2022 then SAVE:
 Now go to the Leaves tab and pick Annual Leave, we can see the balance calculated from 01/06/2022:
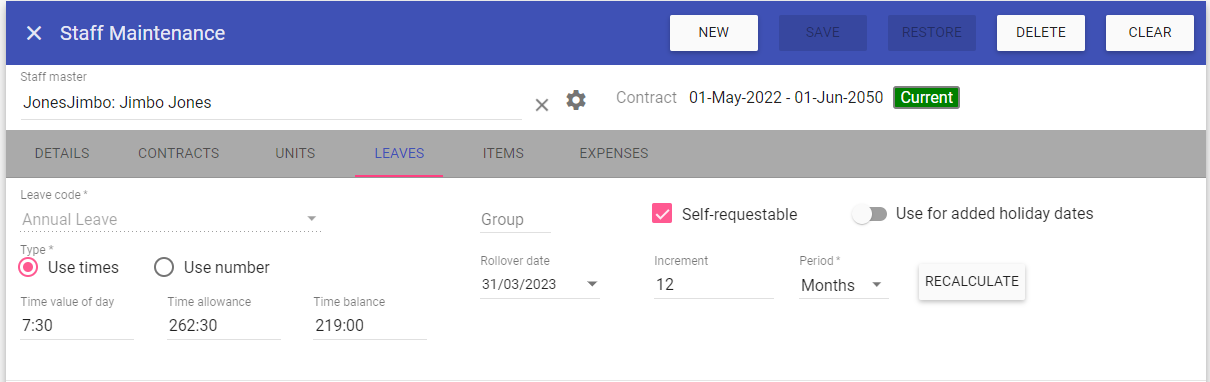 Press the RECALCULATE button and the balance is re-adjusted for the new start date:
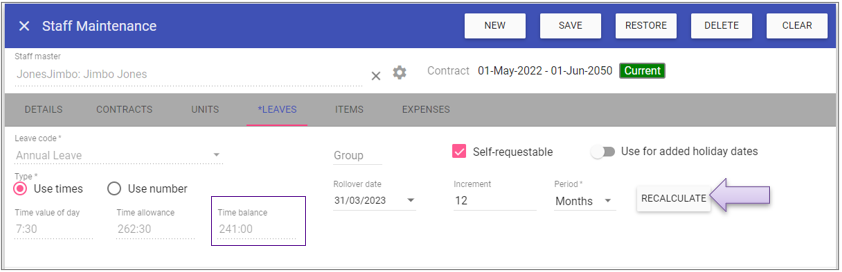 NOTE: The time value of leave day and allowance do not change as nothing affecting these has been altered.
Click SAVE to complete the update.
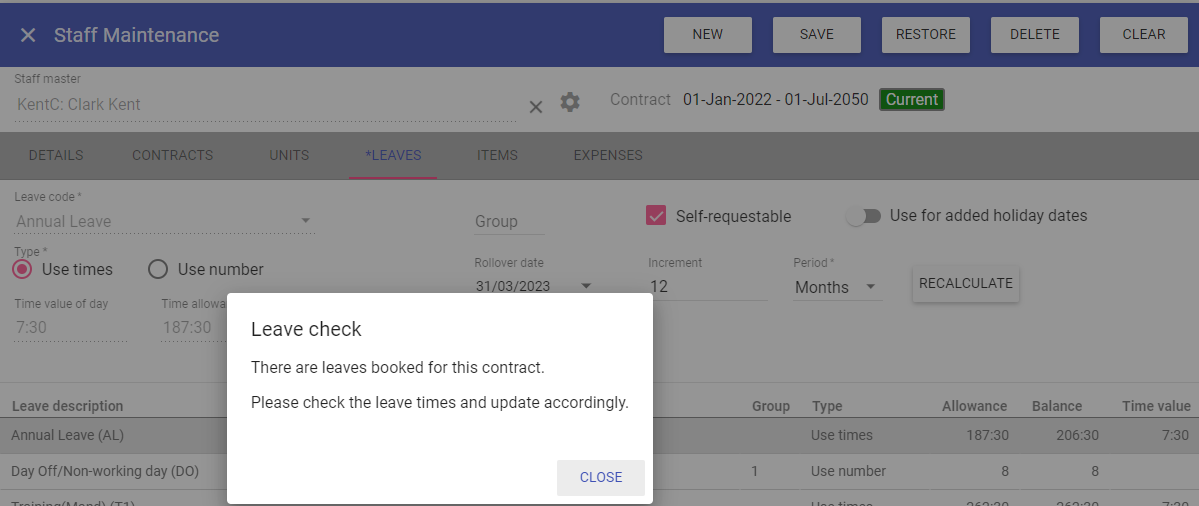
If the contract has any leave booked under it, you will be reminded to check these leaves on clicking the RECALCULATE button, as below:
Leaves - Holiday dates
For the Bank/Public holidays to automatically display on a rota, the toggle button to turn on the holiday dates must be selected in the Staff Maintenance record: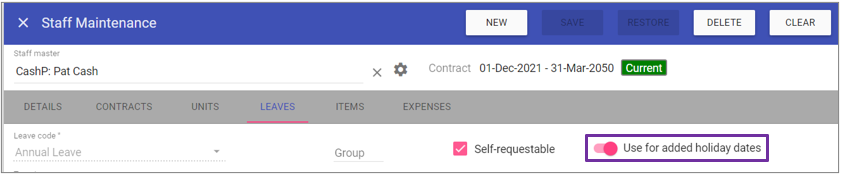 Make sure Use for added holiday dates toggle is turned on.
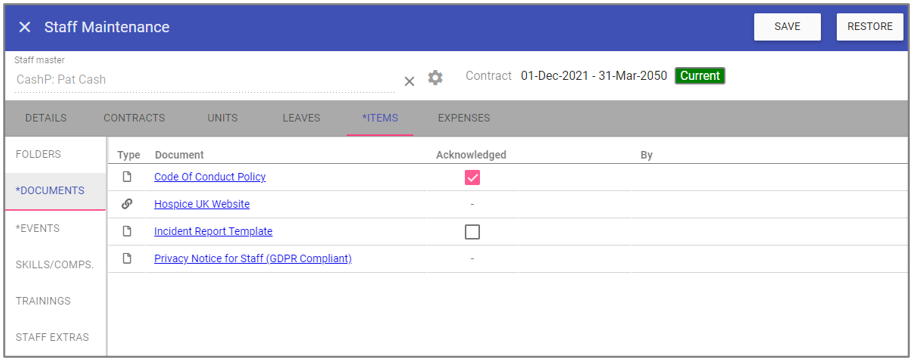
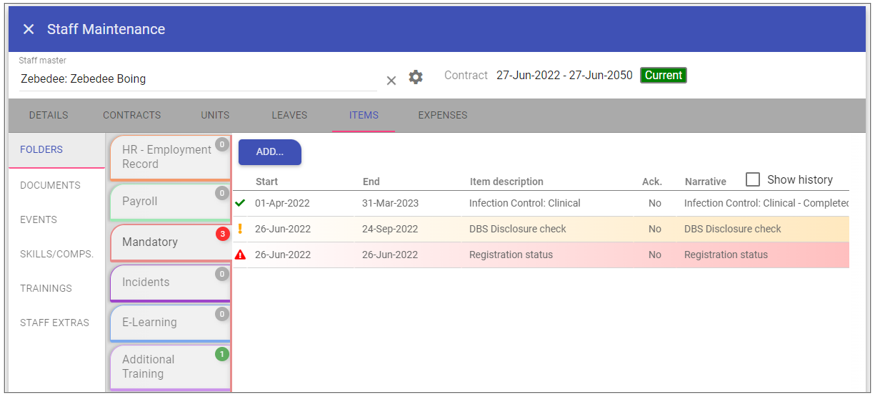
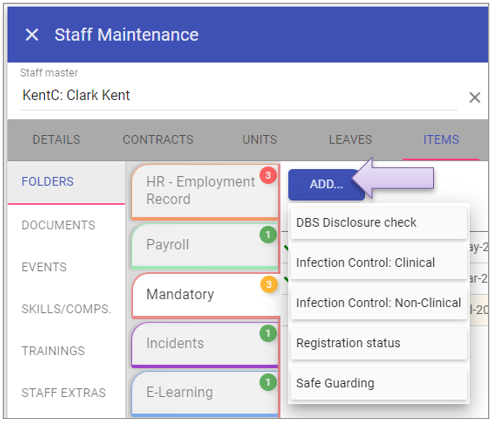
Items - Documents/Events/Skills/Training/Staff Extras
Items are saved within folders (listed on left hand side) in accordance with the appropriate folder name: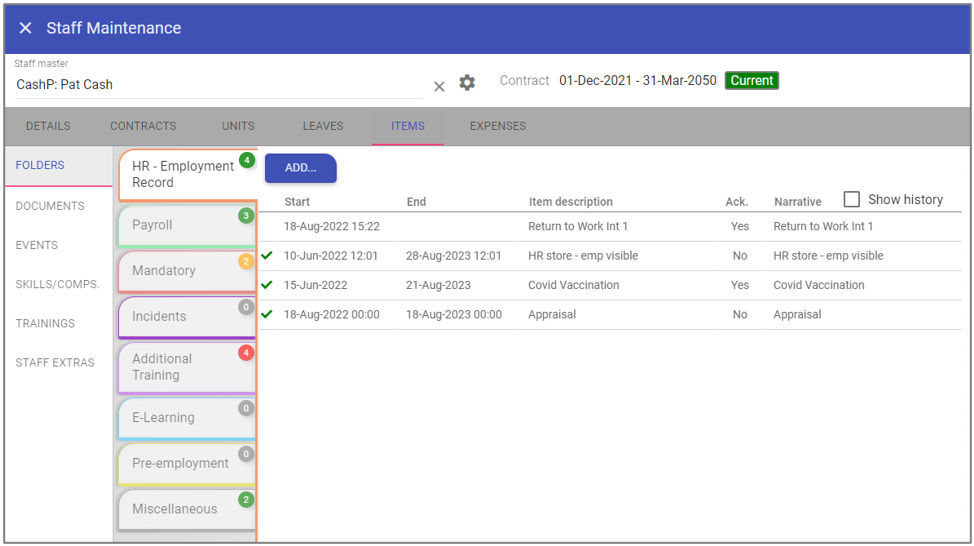 NOTE: There are individual screens for each item menu down the left and clicking on these will take you to the corresponding screen.
FOLDERS - Under this menu you can see each individual folder in sequence order.
Count icon - In the top right of each folder is a round icon with a number, the number corresponds to the number of unique item types under each folder the staff member has attached:
Red icon – Means one or more of the items under this folder has expired.
Amber icon – None of the items have expired but one or more items under this folder are expiring.
Green icon – None of the items under this folder are expired or expiring, all are well in date.
Grey 0 icon – Means no items are under this folder.
ADD - The Add button allows you to pick from any items to which you have full access and are associated to the current folder.
Clicking Add under the Mandatory folder only gives 5 options as there are only 5 items associated to this folder:
 Selecting one of these will take you to the correct item screen to input the data:
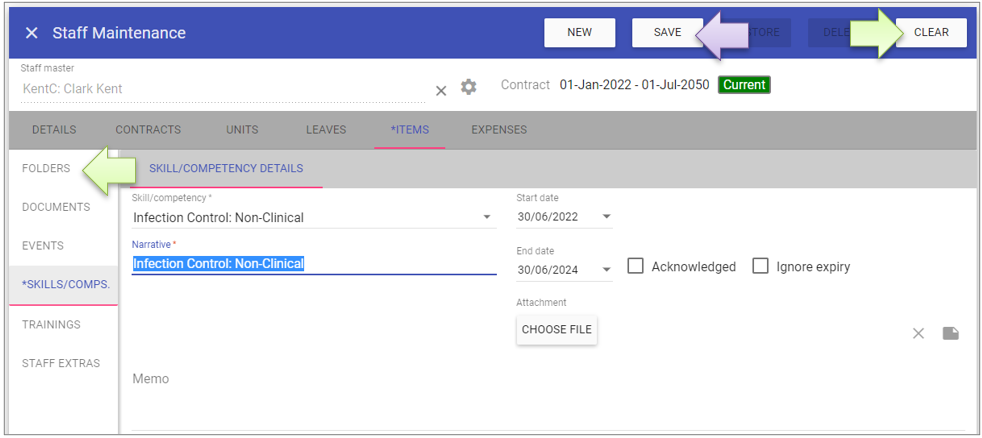 Once completed, click SAVE, then click either CLEAR or Folders to return to the folders view.
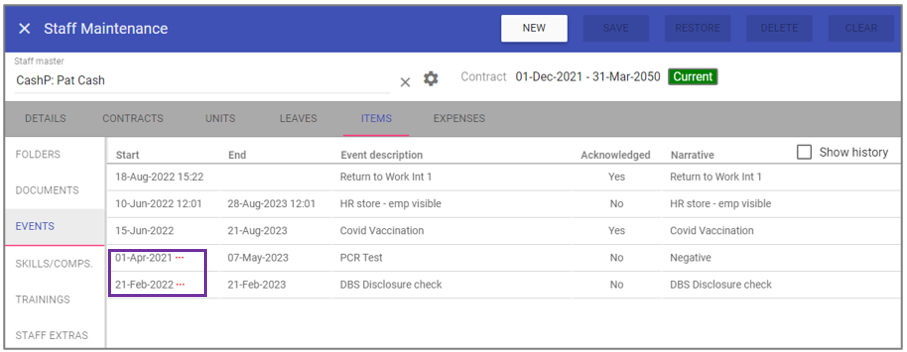
All items of the same type have a single row view, showing the first start date and the latest end date of consecutive/overlapping entries (these are denoted by 3 red dots after the start date):
 Clicking on the entry here will bring up the latest of each item:
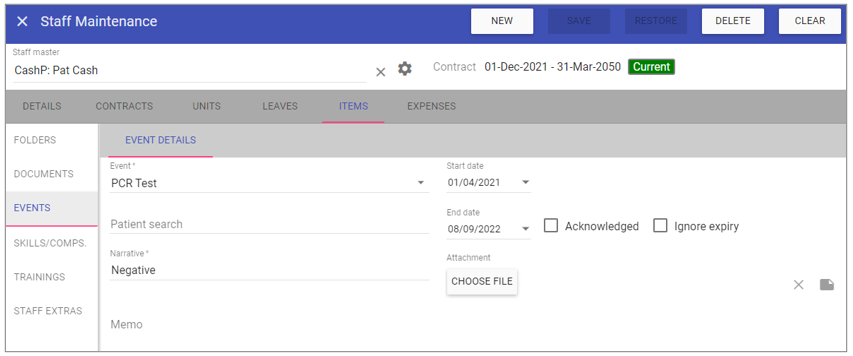 Selecting Show history within the list will show all entries individually, with the latest end date at the top:
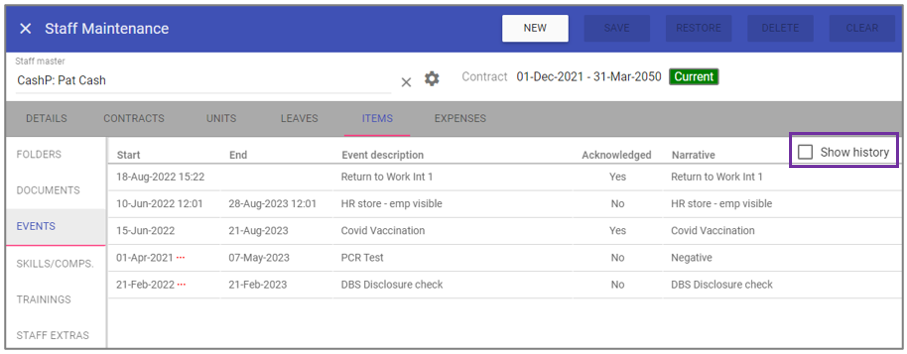 The Ignore expiry control, which is present within each item, stops the selected event from outputting to the Items Management dashboard when it is
expiring/expired (there is also a filter to remove these from all 4 of the items reports). Perfect for when staff change roles and no longer require certain items to be updated:
The Ignore expiry control, which is present within each item, stops the selected event from outputting to the Items Management dashboard when it is
expiring/expired (there is also a filter to remove these from all 4 of the items reports). Perfect for when staff change roles and no longer require certain items to be updated: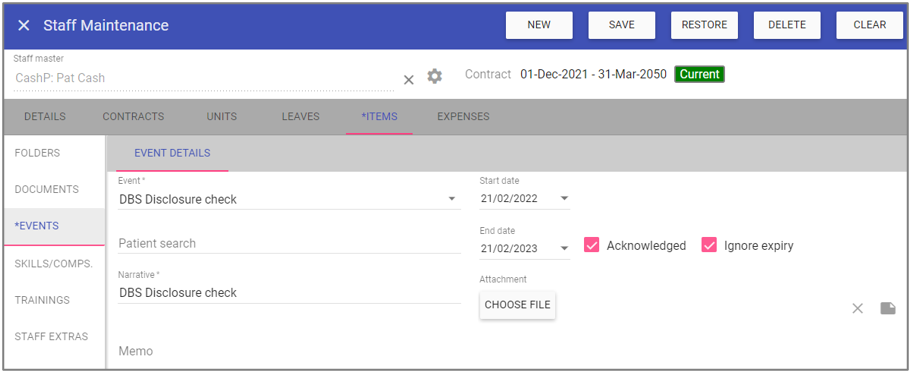 If you have a soft form attached to your Item, you can print directly from Staff Maintenance:
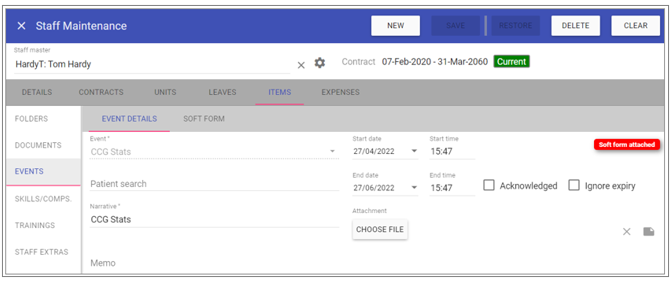 Open the soft form and complete as required:
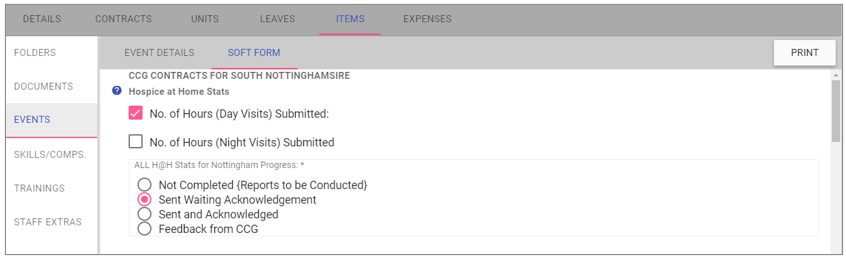 Now press the Print button and this will output the soft form to PDF format:
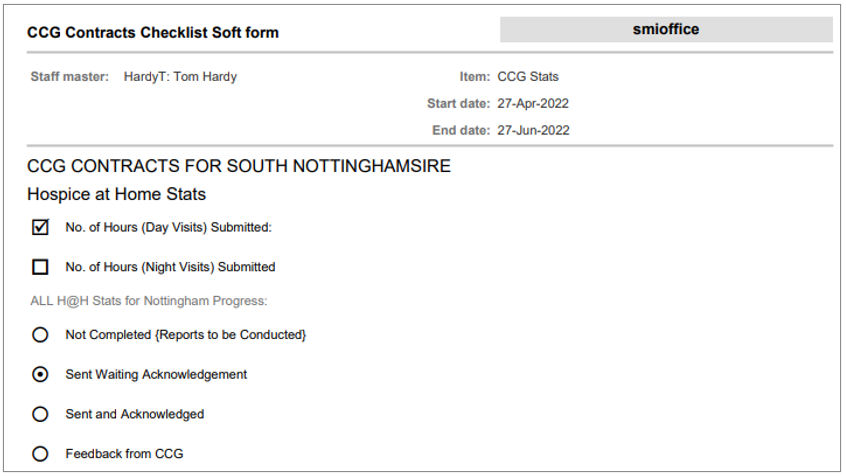 All documents, including their acknowledgement status are also displayed in Staff Maintenance: