Unit Schedules
Usage
This is the area of Staff.Care that allows for the creation of a schedule plan. All available staff members, that have been allocated to the selected unit, will be displayed along side the current hours balance.
Shifts and Leaves can then be assigned against the selected staff member. Time balances will then be automatically adjusted.
Staff.Care allows you to record both Planned (prescribed) and Actual rota information.
A Planned Rota should be used to record all planned shifts. The Actuals, refer Day by Day > Shift Control and should be used to record Actual events, usually once the rota date has passed.
Assigning a shift to a staff member is a simple process of CLICK & SELECT. Staff.Care will display the available working hours for each staff member and recalculate the balance based on the shifts and leaves added. At the start of each new rota period,
Staff.Care will calculate the available hours for the period and add/remove any balance from the previous period.
 Unit: Lists all defined units. Select the required Unit from the drop down.
Unit Master: Lists all unit masters for the selected unit. Select the required Unit Master.
Rota Dates: Lists all of the
previously created rota date periods. Select the required
rota and rota dates to display the full page schedule.
Triangle Icon button: Loads the rota based on the above selection.
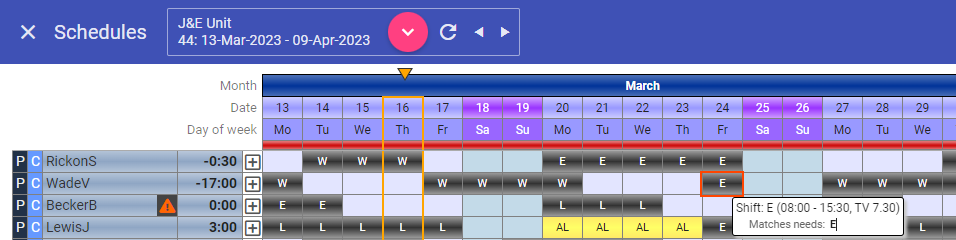
Schedule/Rota
 If Holiday dates have been added in Admin > Holiday dates, they will be displayed on the rota containing those dates:
 Staff list
Staff Assignment: (P or S)
Indicates Primary or Secondary staff member to the unit.
Contract Type: Indicates if the staff member is Contract, Bank or Agency.
Name: The staff member name.
Name colour - Yellow:
Indicates that the staff member can work days only.
Name colour - Light blue:
Indicates that the staff member can work both days and nights.
Name colour - Dark blue:
Indicates that the staff member can work nights only.
Contract time balance: Comprises weekly contract hours multiplied by the number of weeks in a rota. This value is then REDUCED as Shifts and/or Leaves are added to a rota. The balance is INCREASED by any un-allocated hours from the previous rota.
Bulk add/delete (+): Allows multiple shifts to be entered against a single staff member in one entry. Putting in a - sign in the bulk function row will allow the deletion of multiple existing shifts.
Rota header row
Month: Calendar month.
Date: Calendar date. When clicked will display the Rota Needs.
Day: Short code for the day of the week. When clicked will view Daily Budget page.
Dependency Value: Displays the current dependency for the rota day. When clicked will display the Set Day Dependency automatic fill page.
![]() - Indicates critical item expiring on or before this rota (appears next to staff name).
- Indicates critical item expiring on or before this rota (appears next to staff name).
![]() - Indicates there is a pending request overlapping a shift.
- Indicates there is a pending request overlapping a shift.
Adding Shifts
The Shifts/Leaves page is where shifts are selected and added to a schedule against a Date and Staff member.
This page is opened by selecting the cell adjacent to the staff code and for the required DATE and DAY. Click once in the cell.
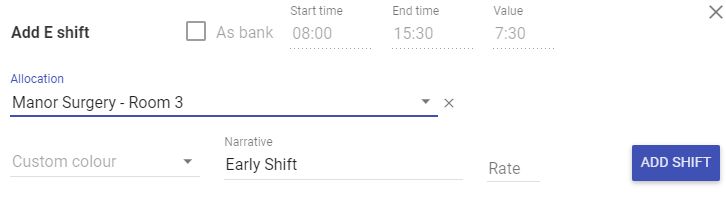
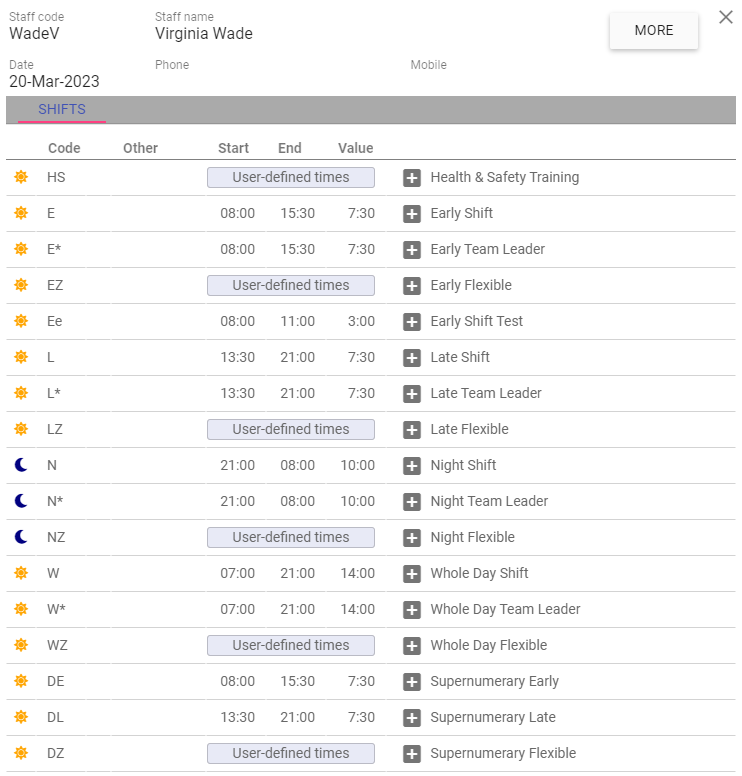 Code: The 2 letter shift code.
Other: Highlights other transactions present by unit code, or leave type.
Start: The start time of the shift.
End: The end time of the shift.
Value: The amount of hours the shift lasts.
Plus sign: Adds the shift to the rota.
Clicking on the shift (not the plus sign) reveals an additional details box that you can add to at the time of adding a shift to the rota:
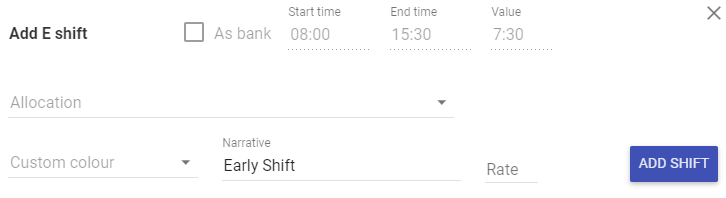 As bank: Adds the selected shift as a bank shift.
Custom colour: Allows the shift to be displayed on the rota in a different colour to distinguish an additional meaning (Key holder for example).
Narrative: Change the shift text.
Rate: A numeric value for the rate paid of the shift.
Clicking the MORE button opens the following control:
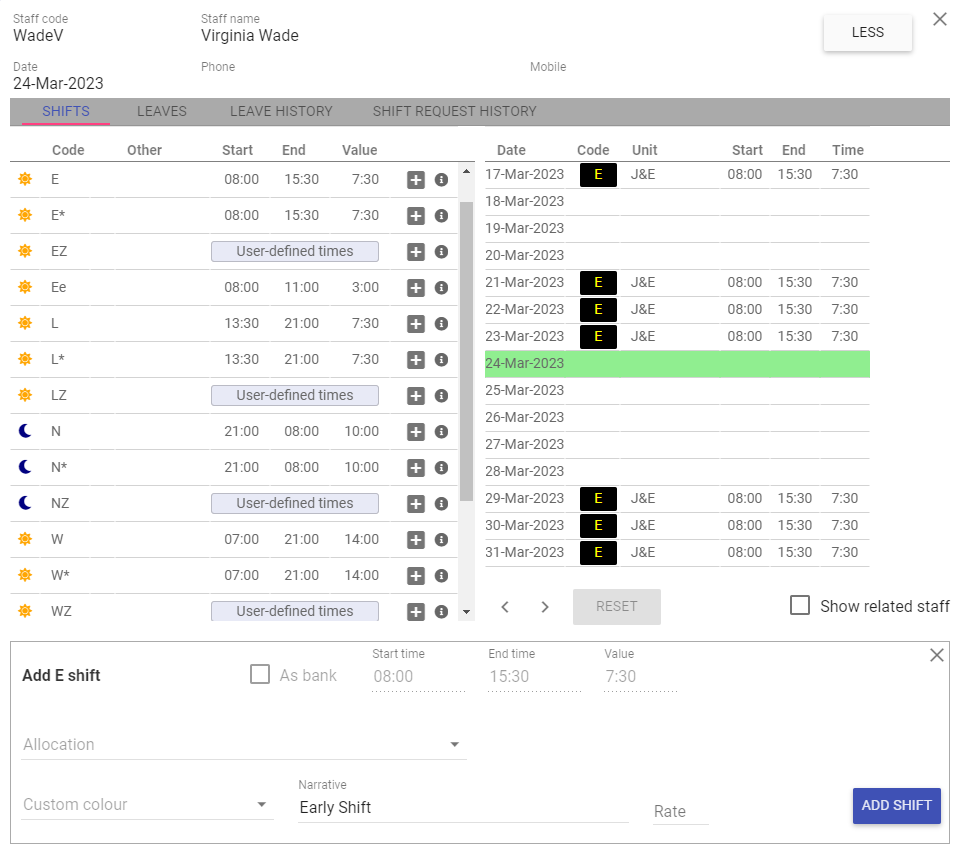 On the right hand side of the screen you can see the previous/next 7 days of roster for the selected staff member, you can use the arrows to view future or previous working transactions.
On the left hand side of the screen clicking on the required Shift Code will return you to the rota view. The Shift Code will now appear in the selected cell.
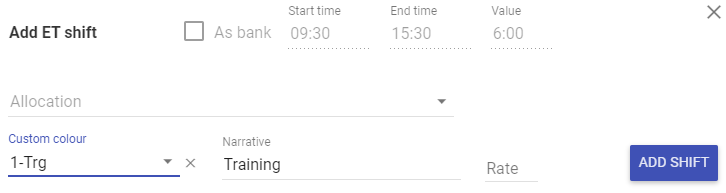
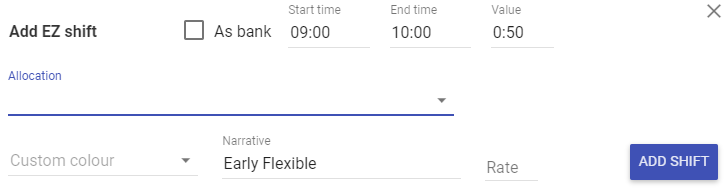
For shifts that have been set up with a zero time value, enter the start time (hh:mm), end time (hh:mm) and the time value for the shift. Then click the Add button.
When a shift which has a unique colour applied to it (in Unit > Unit Maintenance), this will automatically be applied when the shift is selected:
 It will then be displayed on the rota:
 When work patterns contain a shift that has a colour created for it:
 The colour will only change once the rota is saved:
To add shifts As bank tick the As bank box before clicking Add shift. When used, the Time Value for the selected shift WILL NOT be deducted from the contract time balance.
If the unit requires all bank shifts to have a shift colour, when you add a shift As bank the shift colour field will become mandatory:
 You will not be able to add any shifts As bank without choosing a colour before clicking to Add shift.
Symbols:
 - Indicates that it is a day shift.
 - Indicates that it is a night shift.
 - Indicates that the staff member cannot work this shift.
This could be due to Internal Rotation (Staff Maintenance) set to either Day only or Night only, Unavailability set or Rules are set to restrict the shift.
You can also add or change room assignment on adding or editing shifts on the rota:
Adding Long shifts
If a combo has been set up in Units > Units Maintenance > Shifts > Combos to make a long shift (W) which meets both an early (E) and a late (L) shift, the long shifts will always count as the multiple shifts regardless of whether
there is a need left for them or not. There is also the option to show the needs totals under each main shift count. The over/under/correct colour is separated from the count itself so you always have a total number of staff on shift
and the colour represents whether these meet your exact requirements or not.
In the example below, the rota is under in both the E and L shift on the 13th January:
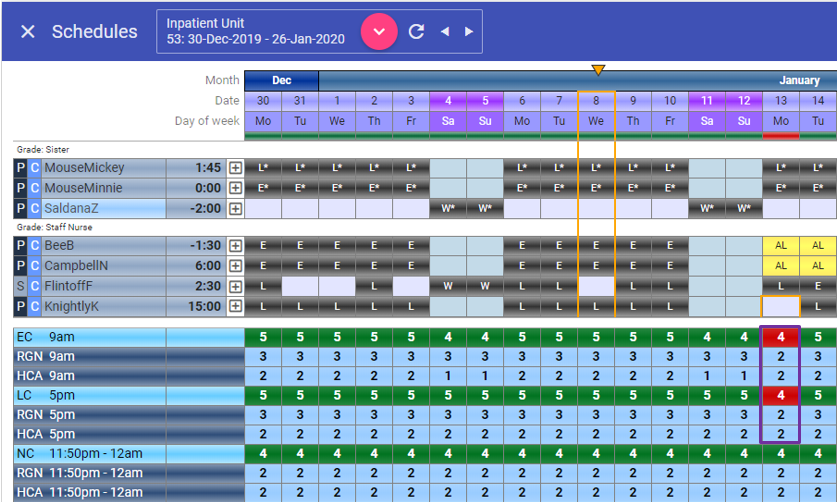 If you add a W shift to KnightlyK on the 13th January the count for both E
and L has increased by 1:
If you add a W shift to KnightlyK on the 13th January the count for both E
and L has increased by 1:
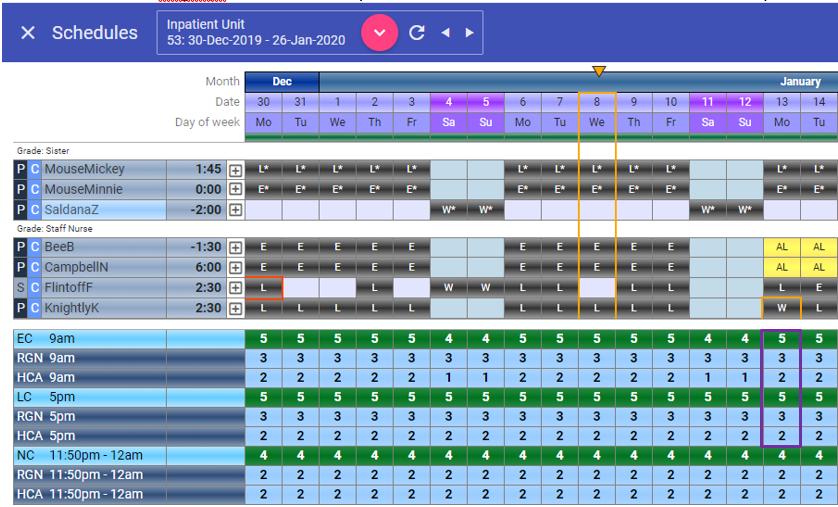 All needs have been met as the count colour is now green.
If another W shift is added to SaldanaZ on the 13th January you can see that even though there is no set need for the combo the shift still counts as an E and an L:
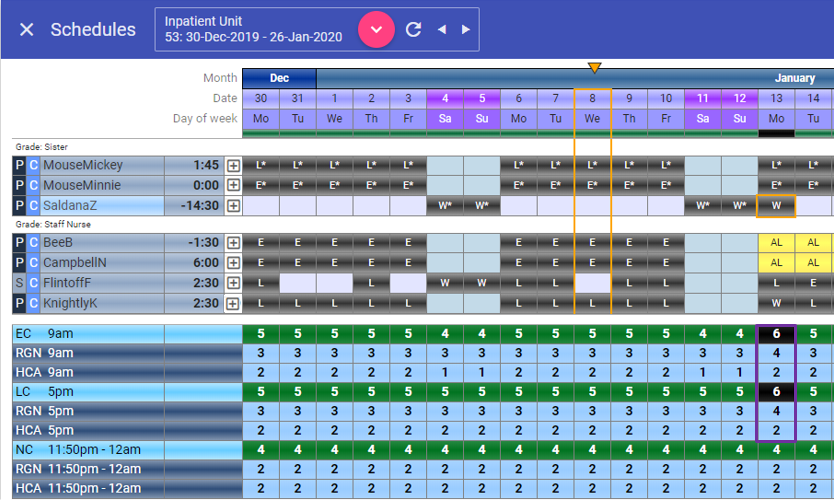 No matter how many W shifts are added they will always be counted as the E and L we set them up to count as (they will always count as 2 shifts in the rota).
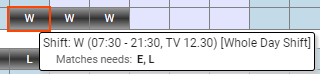
If you hover over the W shift the narrative displays the E and L shifts matches the needs:
There is a small bar at the top of the rota indicating needs too. If you are over or under you can hover-over and get more information:
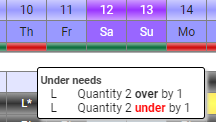
NOTE: As with all needs colours, understaffing takes precedence.
Bulk Add Shifts
You can add multiple shifts for the same staff member using the bulk add/delete functionality - this is the
[+] icon along the name.
You will then see the following:

NOTE: The shift colour becomes mandatory when Add shifts as bank is selected.
The following popup will simultaneously appear to show all the shifts assigned to this unit:

You can now simply bulk add by entering the shift code under the correct date then pressing the tab key to move to the next day:
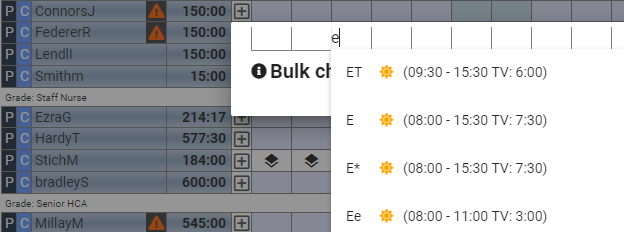
Hovering over the (i) symbol will give you additional information about the bulk change functionality:

NOTE: Using shift plus the left or right arrow keys will copy the currently selected day’s bulk change shift(s) to the cell immediately left or right of the currently selected cell.
Likewise, you can also Bulk Delete any shifts and leaves by using this facility.
You open the bulk add field as above but you need to add a – (minus) within each box to remove the relevant transactions:

Click CONFIRM to apply the changes to the rota and do not forget to Save the rota.
Adding User-defined shifts
When entering a user-defined shift on the rota, if you enter a time value which is longer than the difference between start time and end time you get the following error:
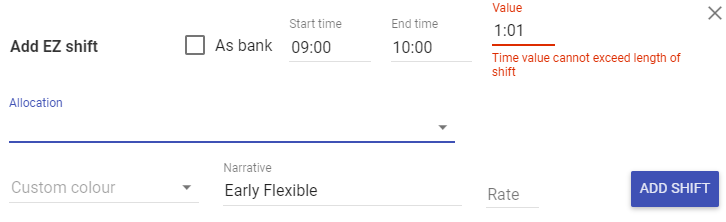
If the time value entered is less than or equal to the difference between the start time and end time then the shift can be added:
Adding Leaves - Planned and Unplanned
Select the Leave tab on the Shift/Leaves window - all planned and unplanned leave (has no time allowance) displays on the same screen.
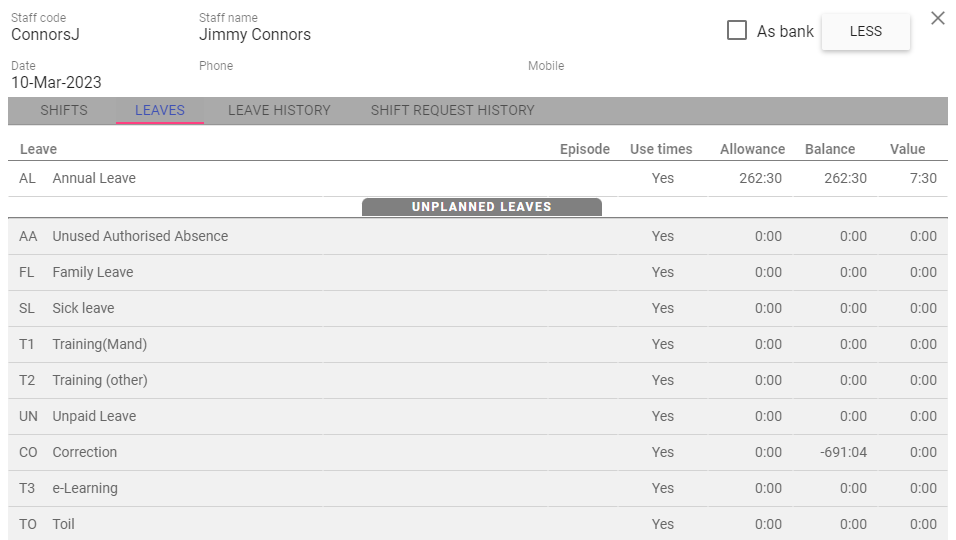 All leaves available for the selected staff member will be listed along with Allowances, Balances and a default time value for the Leave type.
Click the required Leave Code.
 If the Leave is set to “Use Times”, enter From and To times.
The time value will default to the value defined in Leave Codes.
Once complete, click the ADD button to add the leave to the rota.
Sub-code: Select a sub leave if required.
As bank: Tick to add the leave as bank.
Status pending: The leave has not been reviewed by management yet.
Start date: The start date of the leave.
End date: The end date of the leave.
Start time: The start time of the leave.
End time: The end time of the leave.
Time value: The time in hours and minutes of the leave.
Reason: Reason for leave.
Affects pay: Specifies if the Leave code is designated as affecting a staff member's pay.
Work related: Specific to ESR interface.
3rd party: Specific to ESR interface.
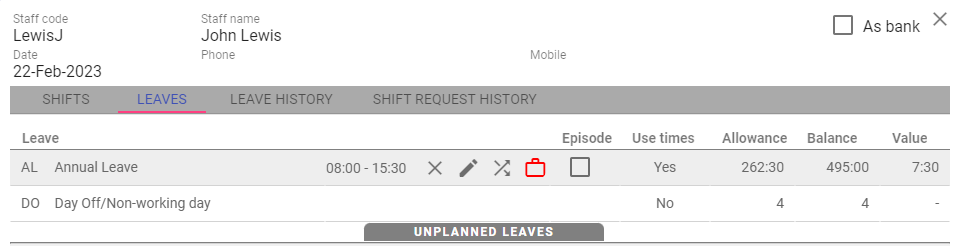
Click back onto the leave just added, and the following icons are available:
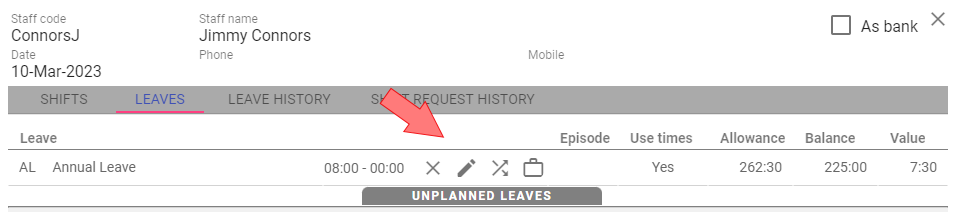
![]() Delete the leave
Delete the leave
![]() Edit the leave
Edit the leave
![]() Swap the leave to another leave
Swap the leave to another leave
![]() Swap leave for a shift
Swap leave for a shift
NOTE: You can only swap a single day of leave to a shift, if you select a whole episode
the briefcase icon is not available:
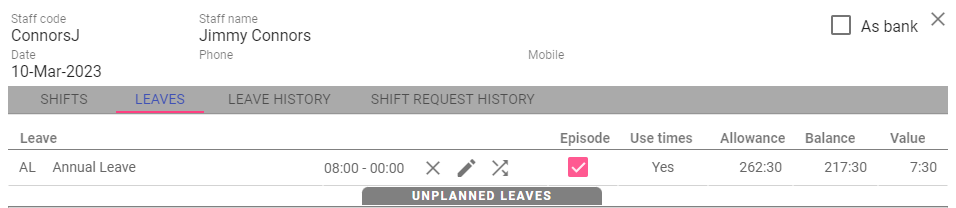
Deleting Leaves
Deleting a leave also deletes the associated staff request. Select the date you want to remove the leave and click on the delete icon. Also tick the Episode
box if there is more than one day in the episode:
 Save the rota and navigate to Staff > Staff Requests, the request has been removed.
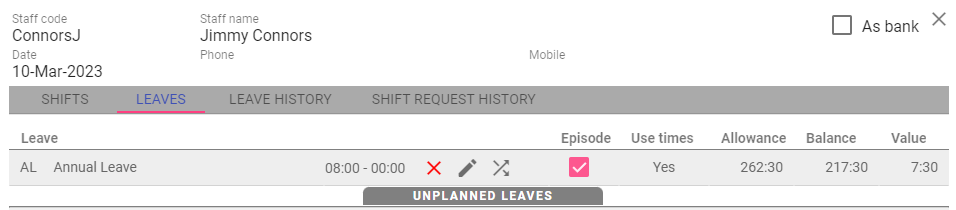
Updating Leaves
Click the Pencil icon with the episode box selected to edit the whole
episode of leave:
 You can change the times including the time value for the whole episode, once you have finished just click update to complete the change.
Swapping to a different leave
If someone is ill when they are due to be on holiday, you can change a whole episode (or individual days) of leave to a different leave type,
this will keep all the same times the
same as they were before. Click on the leave in the rota and select the crossed arrows icon:
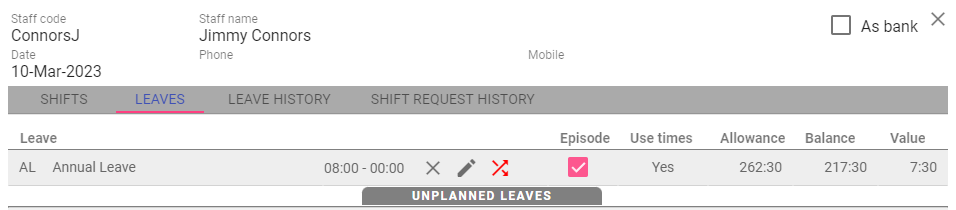 NOTE: Unticking the Episode box will allow you to just select a single day of leave from the episode to change.
Upon clicking the swap to leave icon you then select the leave code you wish to change it to:
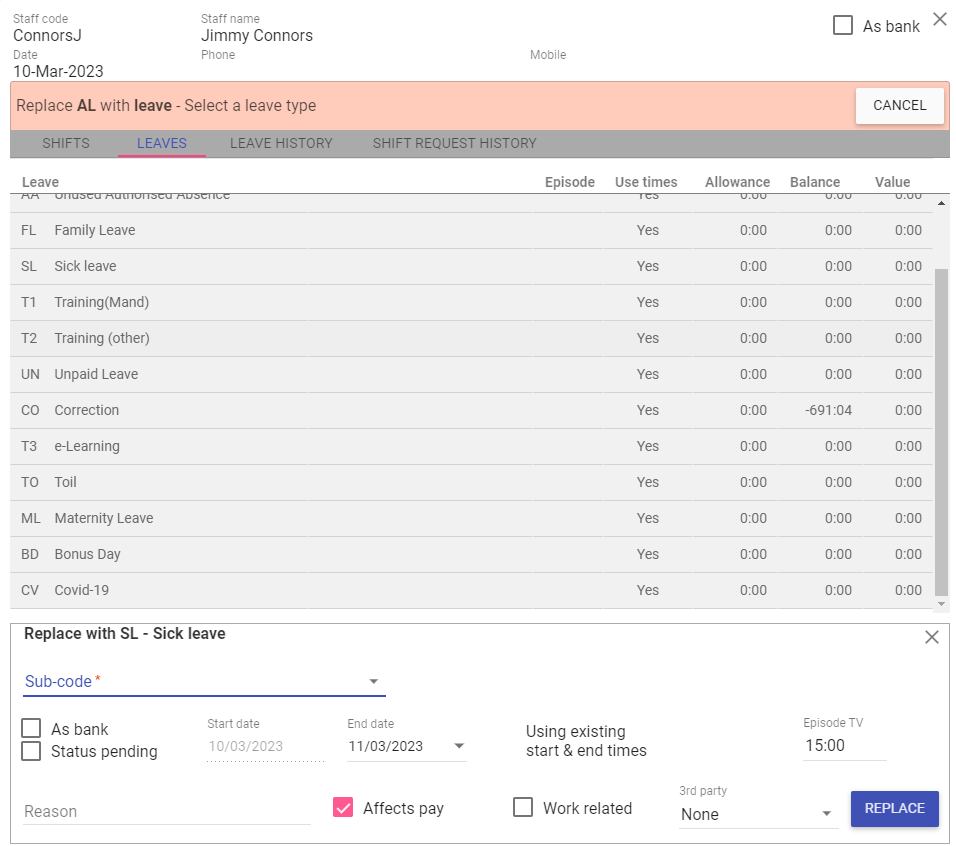 Select the Sickness Leave code and choose a sub-code but everything else remains the same, now press the Replace button.
Upon completing your changes make sure you SAVE the rota (this means you can still restore back to the last leave if you have made a mistake).
Swapping a single day of leave to a shift
In order to swap a day of leave to a shift, select the day you wish to change and untick the Episode box so that the Briefcase icon appears:
 On clicking the Briefcase icon you are presented with the shifts screen:
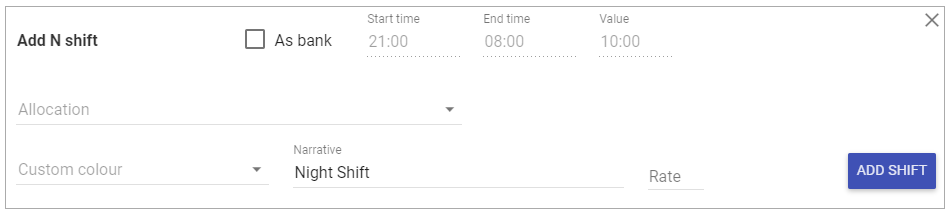
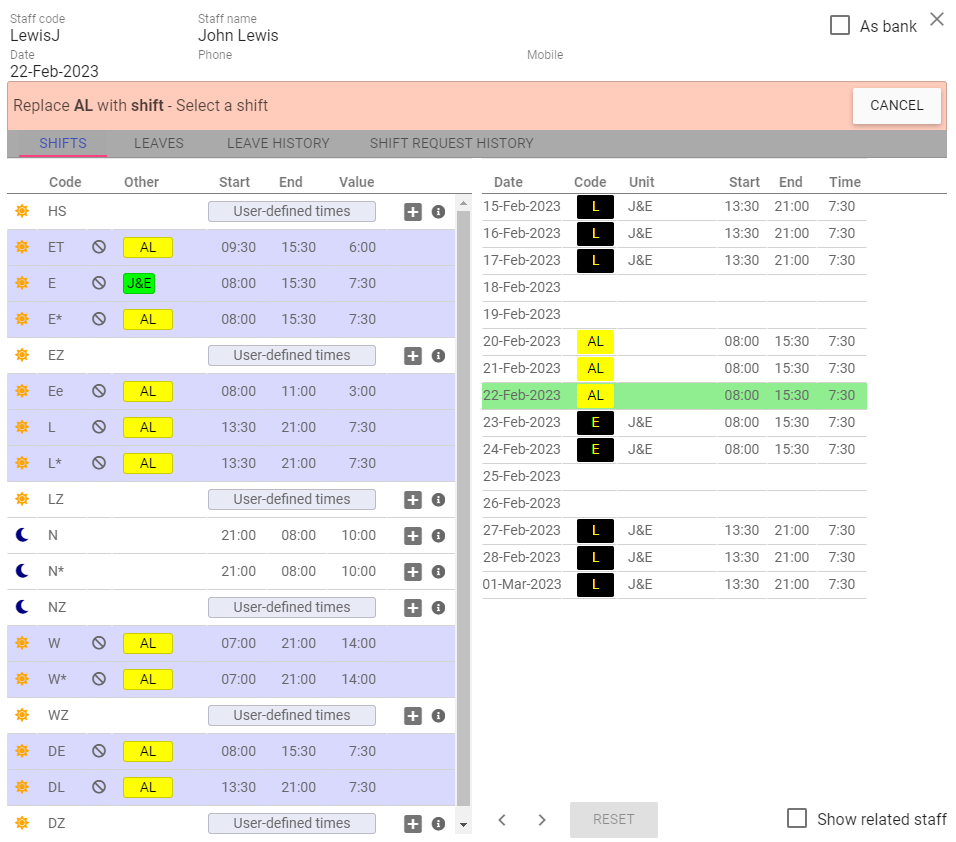 Click the Swap to Leave icon (Briefcase), then select the leave code you wish to replace the leave with.
In this example it is the Night shift and then press the Add Shift button:
Click the Swap to Leave icon (Briefcase), then select the leave code you wish to replace the leave with.
In this example it is the Night shift and then press the Add Shift button:
Rota View – Request which can be actioned
On your rota, any unactioned requests over shifts will be displayed with the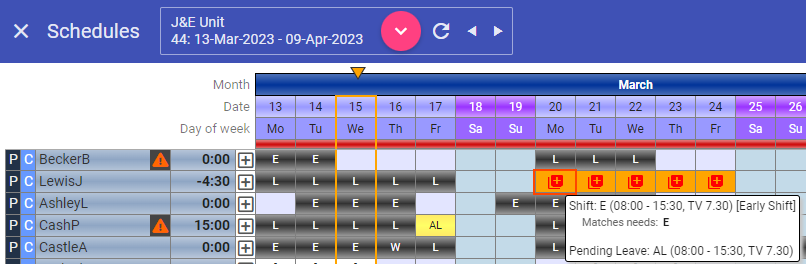 NOTE: The narrative will show the existing shift AND the pending request(s) but the staff member’s rota balance WILL NOT be updated until requests have been approved/refused.
There is an option in the rotas which, when turned on, will prompt you to action all requests which overlap a shift on save:
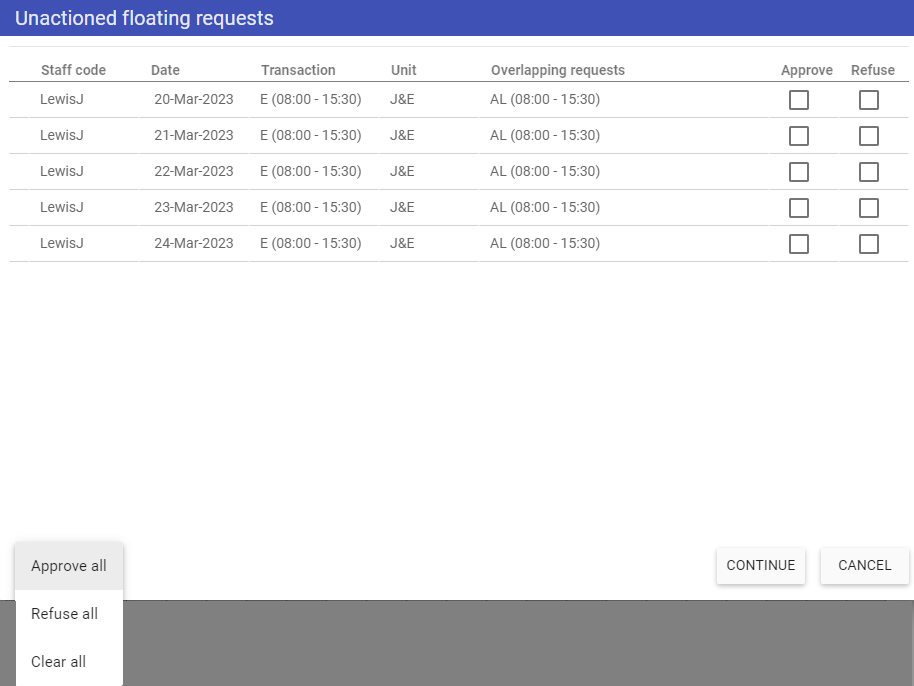
 Upon saving the rota, you will be prompted as below:
 CONTINUE: As all these requests have not yet hit the “grace period” you can just continue which will save your rota changes and leave the requests as pending and still overlapping the transactions.
Approve/Refuse checkboxes: You can approve or refuse one or more of these requests by ticking the appropriate box one by one.
CANCEL: Will return you to the rota without saving.
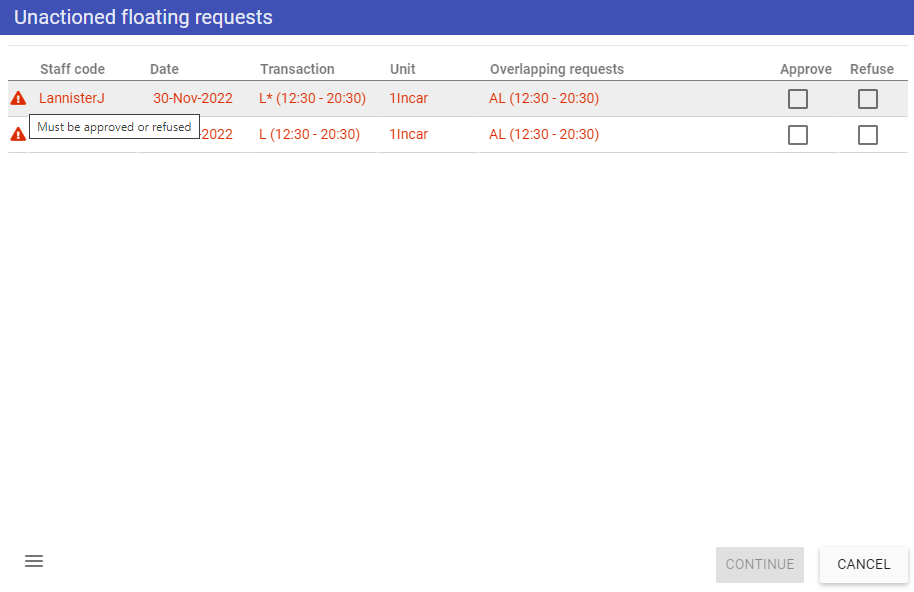
Clicking on the menu icon in the bottom left corner of the screen will allow you to bulk approve/refuse all the floating requests in one go (or clear all your current selections):
 If we approve Monday to Thursday but refuse the Friday and click CONTINUE:
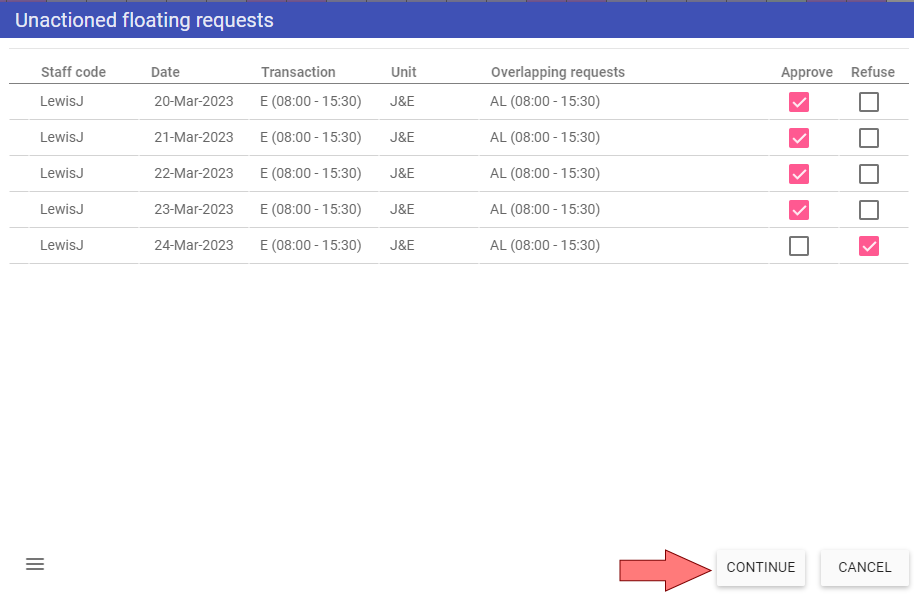 The rota will save those changes, LewisJ will have Annual Leave from Monday to Thursday and his original
E shift on Friday:
The rota will save those changes, LewisJ will have Annual Leave from Monday to Thursday and his original
E shift on Friday: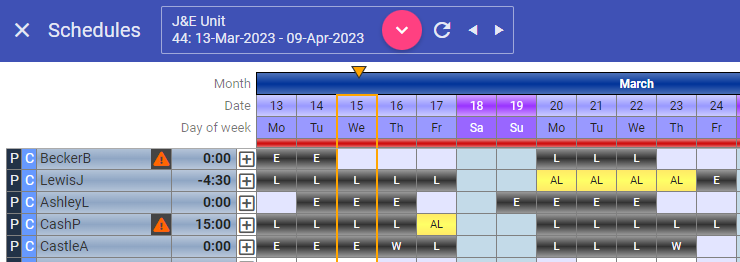 NOTE: As the leaves
were the same time value as the shifts they
replaced, the rota balance is still -4:30 minutes. Also, if you Approve/Refuse ALL the requests here,
the alert can then be actioned (keeping all managers in the loop).
NOTE: As the leaves
were the same time value as the shifts they
replaced, the rota balance is still -4:30 minutes. Also, if you Approve/Refuse ALL the requests here,
the alert can then be actioned (keeping all managers in the loop).Rota View – Accessing Future Rotas if Previous Rotas have Unactioned Requests
If there are any requests on previous rotas, you will not be able to access future rotas on the same unit, nor save the rota until the request(s) have been actioned.If we try to navigate to a future rota when there is an unactioned floating request on a previous rota, you will see the following message:
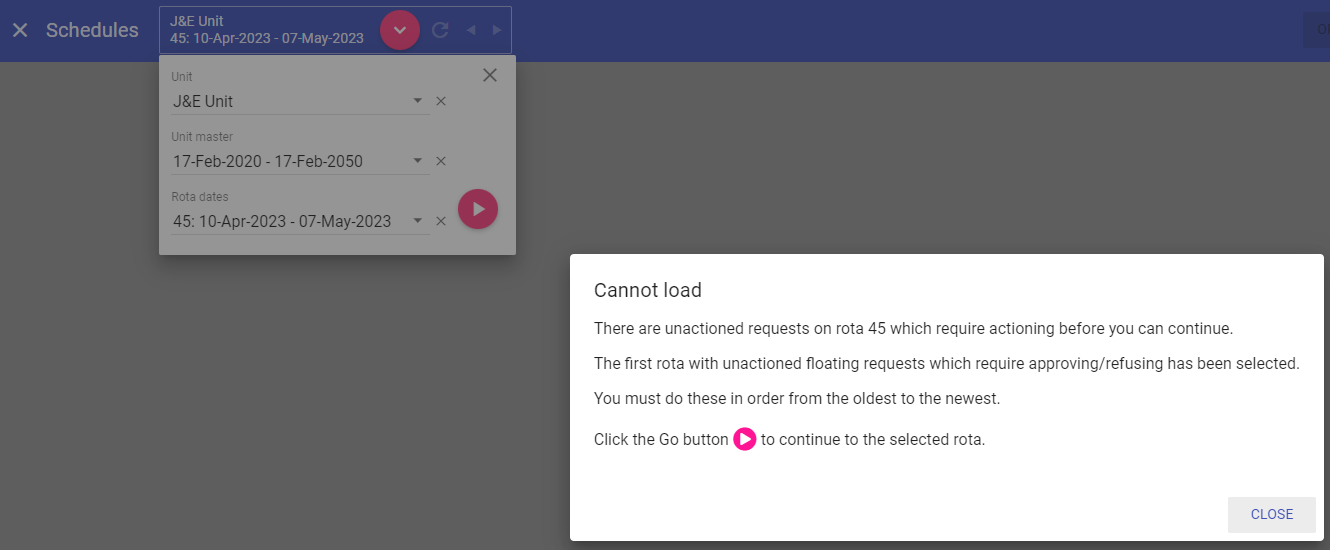 NOTE: This uses your floating requests grace period and will stop you editing future rotas which are more than the grace period after any unactioned requests.
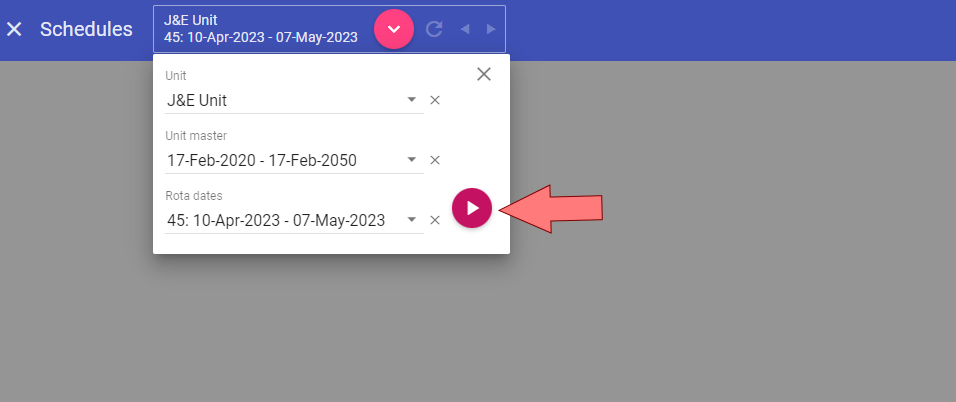
Click CLOSE on the popup message then the play button and this will load the required rota:
Rota View – Requests which must be Actioned
Once a request is on or passed the date it must be actioned the rota save popup forces you to action the request before saving.If we click SAVE on the rota, we will get the unactioned popup as before, except this time there is a warning icon
 If we select and action, in my example approve, the CONTINUE button will become active and we can now save the rota:
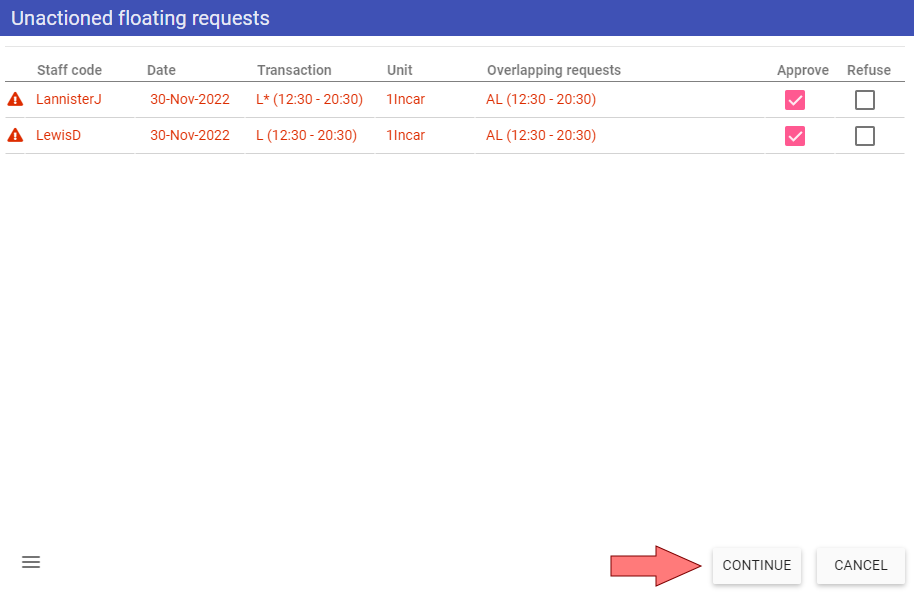
User-Defined Shifts inserted via Secondary Unit
This functionality, which is part of the floating requests, allows managers from different units to insert user-defined shifts in to existing shifts on the same or other rotas (great for training rotas and cross unit working).To receive notifications for inserted shifts from a different unit, you need to add the alert type “Rota changes (Cross unit) to your manager alert groups via (Admin > Alert Groups).
You will also need to make sure that your rotas are saved to a level which generates alerts in advance, so any changes to your staffing is picked up. Make sure all the levels you wish to generate alerts have the Generate Alerts option selected in (Admin > Save Levels). If we look at a secondary unit rota for HammondR, we can see he is working on the HAH unit on the 20th March:
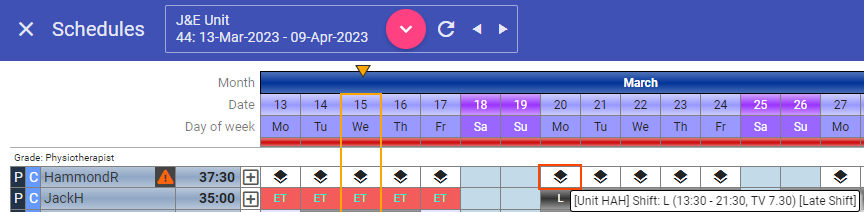 If we click on the 20th March for HammondR and select the LZ shift, we can now effectively move part of HammondR's shift to the J&E Unit. Enter the times we require HammondR for and click ADD SHIFT:
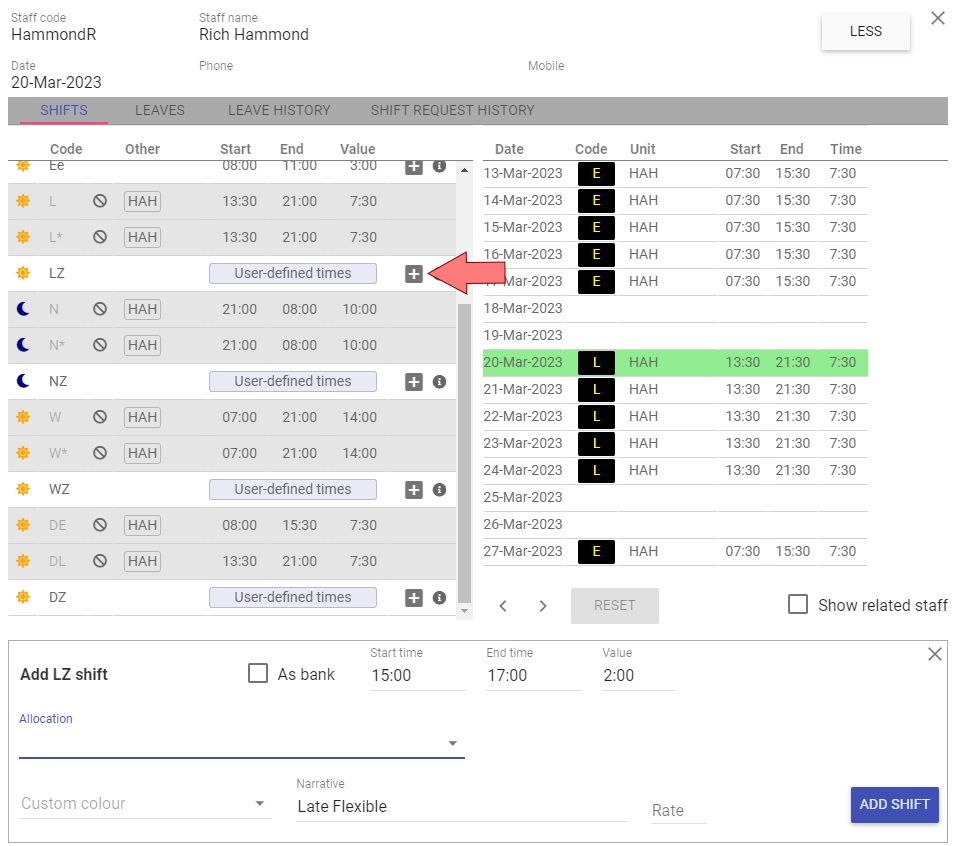 We will then get the following prompt which shows the remaining portions of his original shift will still be worked on HAH:
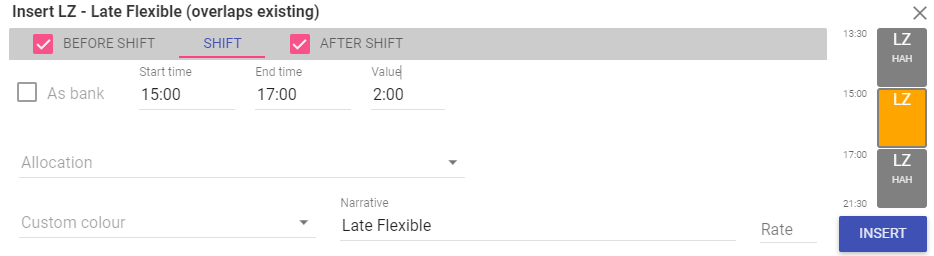 NOTE: Just like wrap around shifts for a leave request. Upon clicking INSERT there will be the new shift added to J&E plus 2 ‘wrap around’ shifts added to the HAH unit:
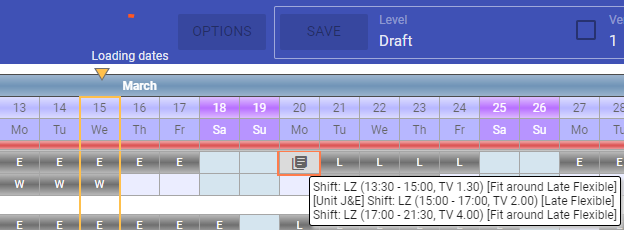 Clicking in to the shift will display the 3 shifts on the right side of the popup:
Critical Items
Where one or more critical items have expired on the rota you are viewing or before, you will see a flag next to the staff member’s name, as below:
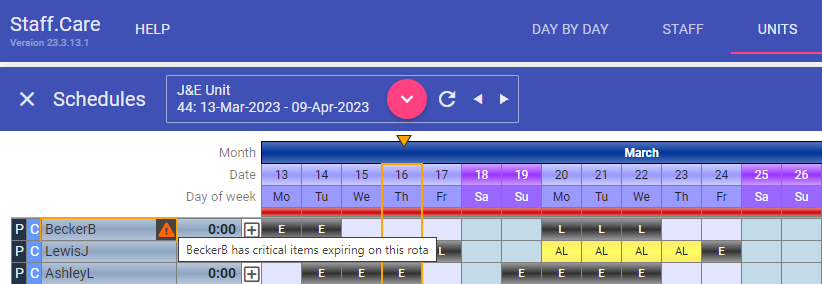 The manager can now check what is expiring and when from Staff Maintenance and take appropriate action.
REMEMBER: Critical items should only be used for an item whereby if they expire the staff member CANNOT be rostered!
Leave History
Select the Leave History tab. All recorded leave requests for that particular staff member on the specific unit are displayed.
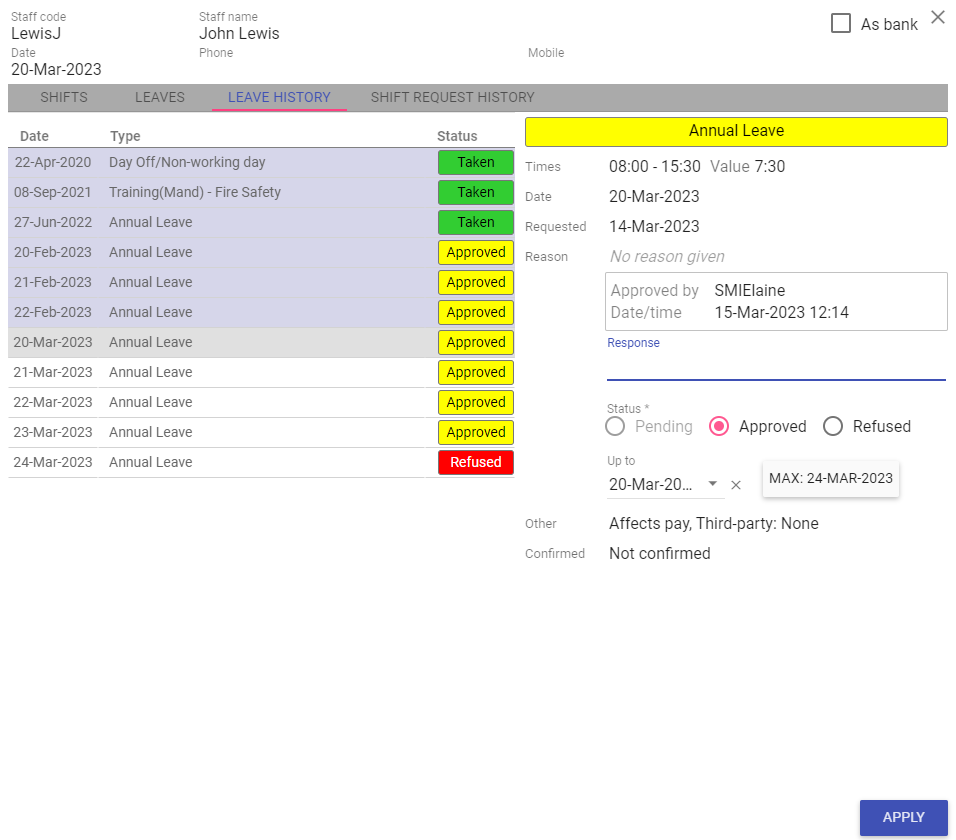 When the leave has been requested by a staff member, managers have the option of approving or refusing leave directly from this screen by editing the status of the leave and can also give a response if
necessary.
When the leave has been requested by a staff member, managers have the option of approving or refusing leave directly from this screen by editing the status of the leave and can also give a response if
necessary.
Approved by: Name of approver.
Date/time: Date and time approval was completed.
Pending: The leave request is pending a review from management.
Approved: The leave request has been granted by management.
Refused: The leave request has been denied by management.
Response: Additional text for a manager to give additional detail
on why they chose the selected leave status.
Shift Request History
Select the Shift Request History tab. This is the same as leave history except that it is for shifts only. All recorded shift requests for that particular staff member on the specific unit are displayed.
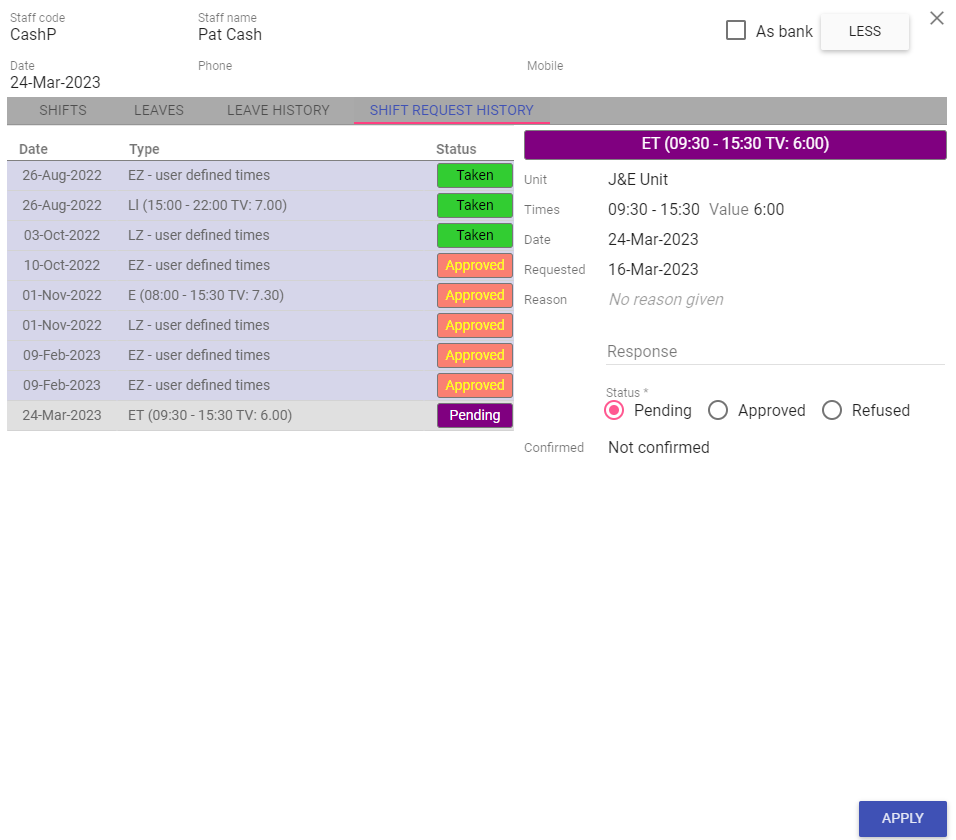 When the shift has been requested by a staff member, managers have the option of approving or refusing shifts directly from this screen by editing the status of the shift and can also give a response if necessary.
Pending: The shift request is pending a review from management.
Approved: The shift request has been granted by management.
Refused: The shift request has been denied by management.
Response: Additional text for a manager to give additional detail on why they chose the selected leave status.
Rota Needs
Rota Needs displays the needs created in Unit>Unit Maintenance. All needs are listed with any filled needs displaying the staff member name. This screen is used to assign staff members to the rota based on the specified needs.
To open Rota Needs click once on the date:
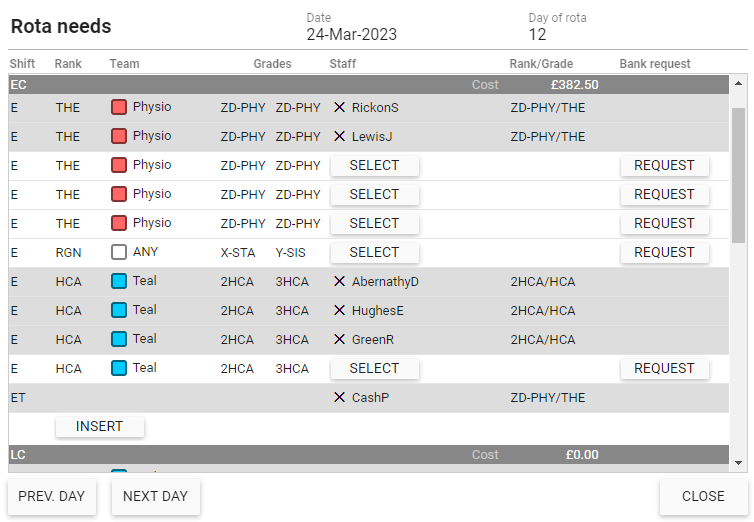 Date: Display the date for the selected rota day.
Day of rota: Displays the day of the rota.
Shift: Displays the shift code.
Rank: Displays the rank for the specified need.
Team: Displays the team for the specified need.
Grades: Displays the grades for the specified need.
Staff: Displays the staff member name that fulfills the need OR if the SELECT button is visible, click to display the available staff member selection list to select them, to fulfill the need.
Insert: Click to view the insert needs screen.
Bank request: Click to insert a bank request.
Cost: If costs have been setup against staff members, the cost associated with the needs will be totalled in the adjacent column.
Previous Day: Click once to view the needs for the previous sequential day.
Next Day: Click once to view the needs for the next sequential day.
Close: Closes the needs box and returns to the rota.
Filling Bank Requests - You can fill bank requests either via the rota or via Bank Requests/Bank Maintenance.
NOTE: You will need to select secondary and bank staff prior to filling any bank requests as they must be on the rota to show.
In the rota, click on the date at the top of the rota and click SELECT next to the bank request:
 This will open the screen showing all staff who can work the shift, you can then select requested only, choose the staff member and click Apply:
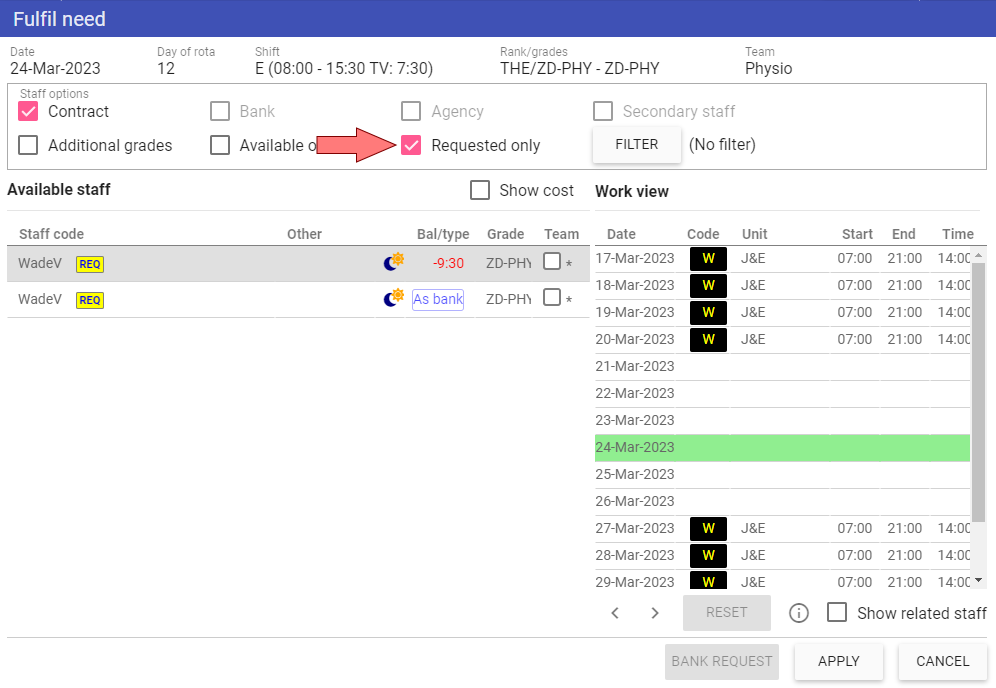 NOTE: Anyone who has requested the shift will show “REQ” next to their staff code. If someone has another transaction on the same date they will not show in this list.
This will add the shift to the staff member, click SAVE to complete the filling of the request:
View Daily Budget
When a Unit Budget has been set within Unit Maintenance, and when Pay Codes have been created and applied to staff members, the View Daily Budget page will display approximate costs by shift and a balance against budget. Click on the required day at the top of the Unit Schedule to view the daily budget screen.
Note: These values are only approximate as they do not account for shift enhancements, double-time etc.
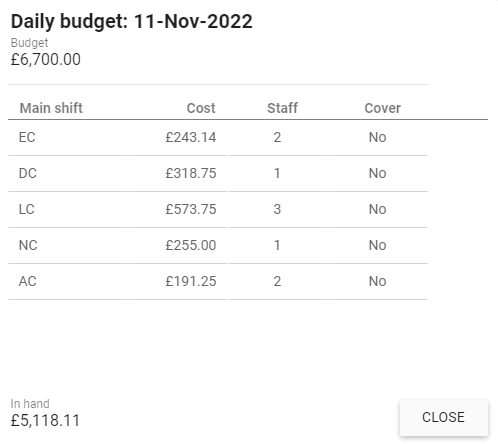
Budget: Display the daily budget.
Main Shift: Displays the shift code.
Cost: Displays the approximate cost per shift.
Staff: Displays the number of staff assigned to the shift.
In hand: Budget minus cost.
Set Day Dependency
When multiple Needs Dependencies have been set, an alternative to the default dependency can be selected. Click on the required dependency on the Unit Schedule. An AutoFill for the current day can be made based on the selected Day Dependency.
To access Set Day Dependency, click on the dependency at the top of the rota against appropriate day.
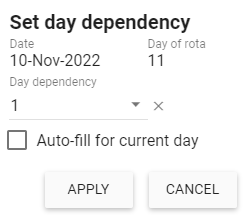
Date: Displays the date for the selected rota day.
Day of rota: Displays the day number for the selected date within the selected rota. For example when a rota begins on a Monday, Day of rota 3 would refer to the Wednesday.
Day dependency: Lists all available Needs Dependencies and highlights the default dependency.
Auto-fill for current day: If you want to AutoFill the current day, based on the selected dependency, check (tick) the selection box followed by the Apply button.
View Staff Member
When the staff member name, listed to the left of the schedule, is clicked, the View Staff Member page is displayed.
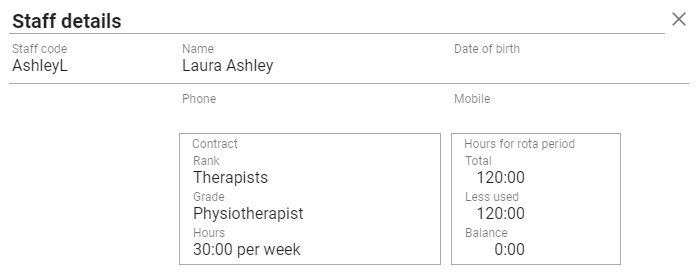
Staff code: Displays the staff code for the selected staff member.
Name: Displays the first
and last name of the selected staff member.
Phone: Displays the telephone number of the selected staff member.
Mobile: Displays the mobile telephone number of the selected staff member.
Date of Birth: Displays the date of birth for the selected staff member.
Rank: Displays the rank of the selected staff member.
Grade: Displays the grade of the selected
staff member.
Hours: Displays the weekly contracted hours for the selected staff member.
Hours for rota period - Total: Displays the opening balance of contract hours, including any unused hours from the previous rota and minus any over worked hours from the previous rota, for the current rota period for the selected staff member.
Hours for rota period - Less used: Displays the time value for hours entered against the staff member, both shifts and leaves, within the current rota.
Hours for rota period - Balance: Displays the difference between the hours for rota period – total and hours for rota period – less used.
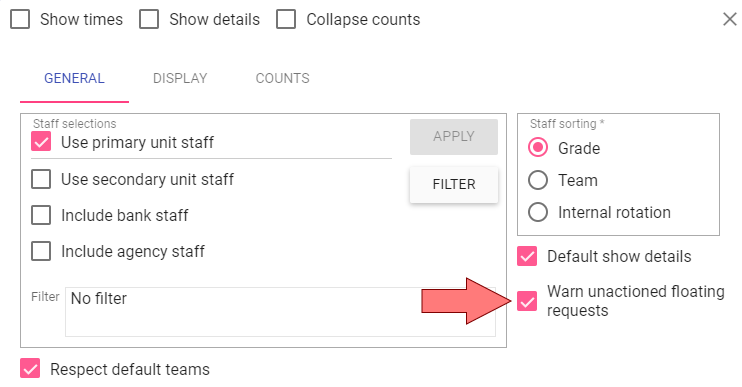
Options General
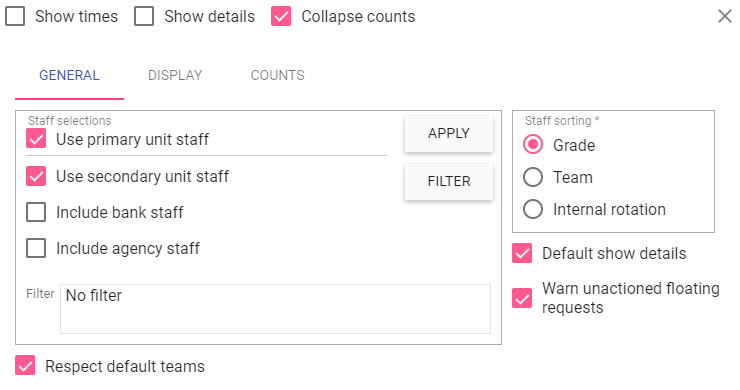 Show times: Displays the rota in times view.
Show details: Displays the rota in details view.
Collapse counts: Hides the counts at the bottom from view.
Staff selections
Use primary unit staff: Displays all staff members assigned to this unit as their Primary Unit in Staff Master.
Use secondary unit staff: Displays all staff members assigned to this unit as their Secondary Unit in Staff Master.
Include bank staff: Displays all staff members with a Staff Type set as Bank only.
Include agency staff: Displays all staff members with a Staff Type set as Agency (neither Contract nor Bank).
Filter: Allows the filtering of secondary, bank and agency staff for when they last worked on the unit.
E.g. only show bank staff who worked on this unit in the last month.
Staff sorting
Grade: Orders the staff list by grade.
Team: Orders the staff list by team.
Internal rotation: Displays the staff members in order by Internal Rotation – Day, Night, Both.
Default show details: Displays the rota in details view by default.
Warn unactioned floating requests: Shows the floating requests popup on save if any are present.
NOTE: If turned off, the floating requests popup will only show when they must be dealt with.
Respect default teams: When automatic rota fill is used, this allows for staff members’ allocated teams to be ignored, if unchecked, thus adding staff members without the team constraint.
Options Display
 Display dependency: This is a legacy, non-functional item, and no longer used.
Display patient hours: Number of hours allocated to each
patient displayed to the user.
Display months: Shows the month as a header at the top of the rota.
Show extra contract info: When checked, the rota will display extra codes to the left of the staff code.
Show full counts on load: If checked full counts will be displayed upon opening the rota.
Show header labels: Allow the Date, Day and Dependency to be visible on Rota screen when checked.
Show bulk change shifts list: Displays a list of available shift codes in a list when using the bulk add functionality.
Patient hours
Patient numbers: Allows the user to see the Number of patients allocated to each Unit.
Number of hours over/under: Allows the user to see how many shift hours are required for the unit and how many shift hours have been over or under assigned.
Percent hours over/under: Allows the user to see how many shift hours have been over or under assigned as a percentage.
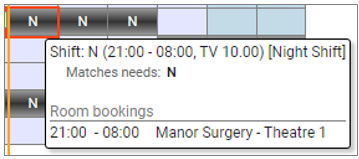
Hover over
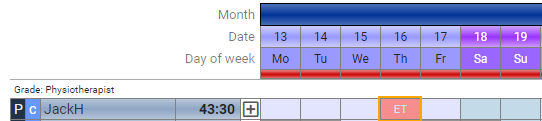
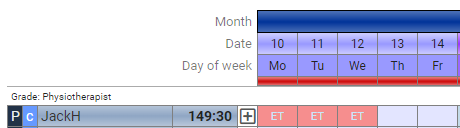
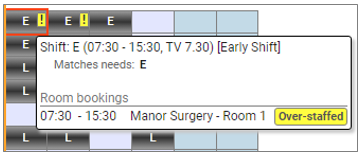
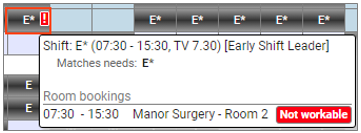
Show bookings: Displays the name of the room the staff member is working in.
When Show bookings is on, it displays a narrative showing the room name for that shift when you hover over the shift:
Where a room is over-staffed you will see a yellow exclamation mark:
And if there is a room/shift mismatch it will show a red exclamation mark:
Options Counts
Count Options are used to control the count view displayed at the bottom schedule page.
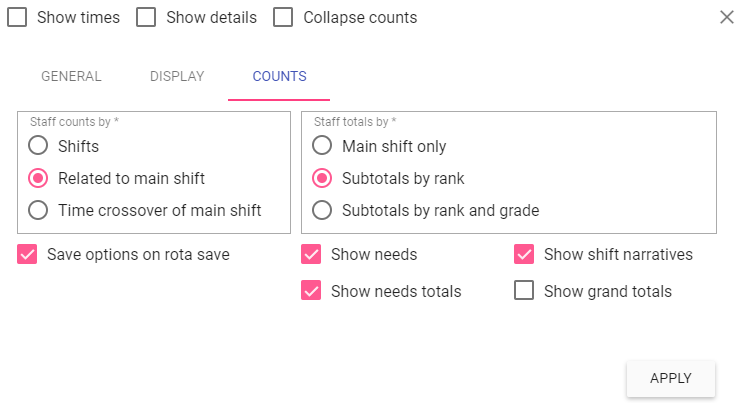 Staff counts by
Shifts: Counts by individual shift codes.
Related to main shift: Groups the counts by all the main shift codes.
Time crossover of main shift: Counts the staff for any shift that crossover the main shifts. This is independent of the related to main shift option and can offer a flexible count for staff members working, for example, two back to back split shifts.
Staff totals by
Main shift only: Displays only the totals for the main shift codes.
Subtotals by rank: Groups the counts by the staff member rank.
Subtotals by rank and grade: Groups by rank and grade.
Save options on rota save: Save the count selections made when the rota is saved. When re-opened the settings are retained.
Show needs: Colour codes the count values based on the needs set (see below).
Show needs totals: Turns the addition of a 'needs out of' in the counts on/off (see below).
Show shift narratives: Turns the default shift narrative on/off in the count headings.
Show grand totals: Only displays the grand total count.
When the Show needs box is on, the counts are displayed as follows:
 But when the Show needs totals box is on, the counts are divided so that the shift total displays at the top and the needs total is underneath:
 When the Time crossover of main shift has been selected, this allows you to count the number of staff that should be and are on shift at each point throughout the day. Every need and
every shift that crosses each main code time is counted. The shifts are at the top and the needs totals are underneath:
When the Time crossover of main shift has been selected, this allows you to count the number of staff that should be and are on shift at each point throughout the day. Every need and
every shift that crosses each main code time is counted. The shifts are at the top and the needs totals are underneath:

Settings
To access further rota functionality, click the settings button at the top right of the rota.

The following headings detail the following settings: Rules, Fill, Print, Analyse, Save Levels and History.
Rules
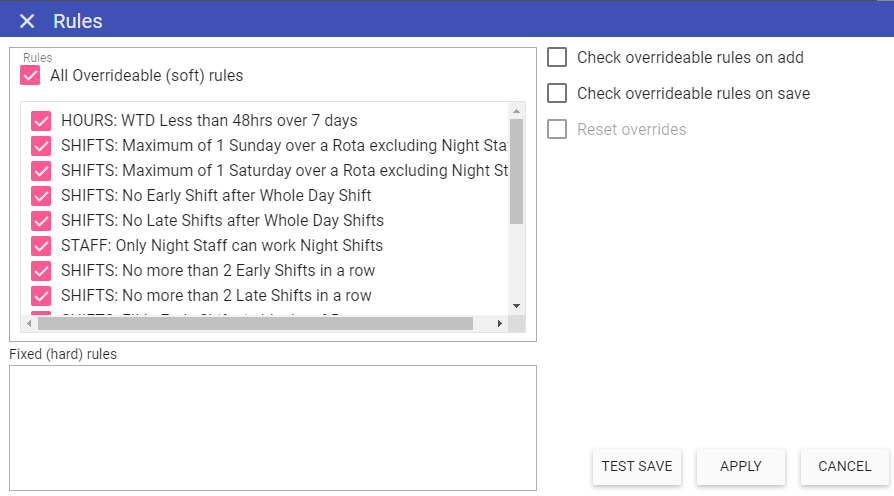 All Override able (soft) rules: A list containing all the soft rules available for the unit. Soft rules can be breached.
Fixed (hard) rules: A list containing all the hard rules available for the unit. Hard rules cannot be breached.
Check override able rules on add: As shifts are added to the schedule, either manually or via AutoFill, the rules are checked and breaches reported.
Check override able rules on save: As a completed schedule is saved, the rules are checked and breaches reported.
Reset overrides: When soft rule breaches have been overridden, checking this box will return them to a non-overridden status.
Test Save: If a schedule has been created with “Check Rules on Save” checked, this will check entries against the rules prior to saving and allowing for edits to be made prior to a final save.
Apply: Applies the rule to the rota.
Cancel: Closes the options without saving any changes.
Rota fill Options
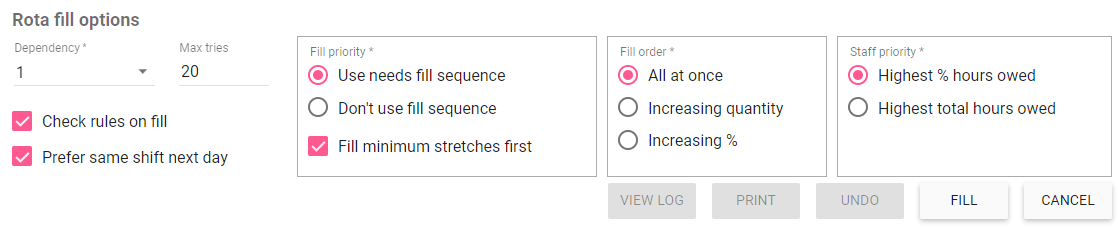 Dependency: Choose which dependency the automatic fill should use.
Max tries: The amount of times Staff.Care will try to fill the rota.
Check rules on fill: If rules should be adhered to during the automatic fill or not.
Prefer same shift next day: Prefer multiples of the same shift to be automatically added consecutively.
Fill priority
Use needs fill sequence: Will fill needs based on the fill sequence set in Unit maintenance > Needs, lowest to highest.
Don't use fill sequence: Will ignore the needs fill sequence during autofill.
Fill minimum stretches first: Will attempt to fill all staff with minimum stretch rules set first, allows for blocks of shifts to be filled.
Fill order
All at once: Fills all needs across the entire rota at once.
Increasing quantity: Fills needs starting with those that have the lowest quantity already filled across the entire rota.
Increasing %: Fills needs starting with those that have the lowest percentage filled across the entire rota.
Staff priority
Highest % hours owed: Allocate shifts firstly to staff members with the highest percentage hours owed.
Highest total hours owed: Allocate shifts firstly to staff members with the highest total hours owed.
View log: Views the log of the fill method. Shows details of which shifts and staff
members it tried to allocate first.
Print: Prints the rota.
Undo: Rescinds the last user action.
Fill: Begin the rota fill with the specific options selected.
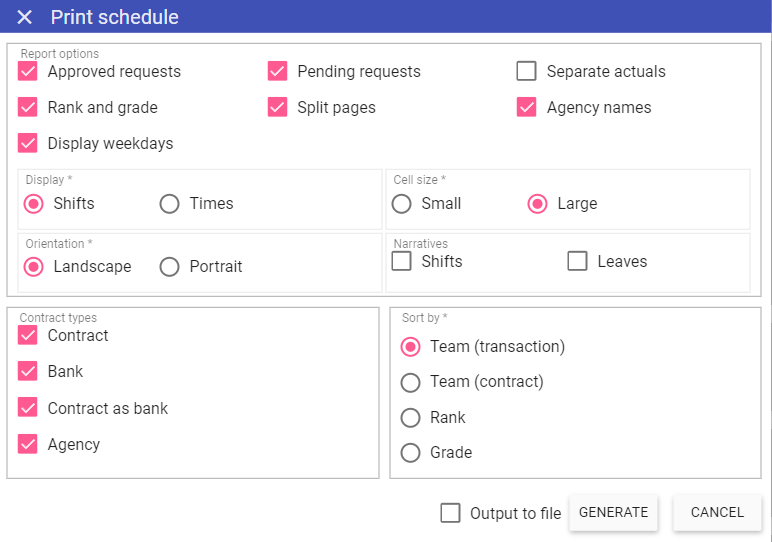 Report options
Approved requests: Captures leave/shift requests which have a status of Approved.
Pending requests:
Captures leave/shift requests which have a status of Pending.
Separate actuals: Displays actual transactions
separate to the transactions shifts.
Rank and grade: Lists all the staff members ranks and grades on the output.
Split pages: Gap in-between different staff types.
Agency names: Staff members name entered against shifts will appear in the ‘Staff’ list instead of staff code.
Display weekdays: Displays the days of the week.
Display
Shifts: Displays the shift code of the transaction.
Times: Displays the start time and end time of the transaction as well as shift code.
Cell Size
Small: All cells are smaller.
Large: All cells are larger and clearer.
Orientation
Landscape: Prints rota horizontally, letters and cells are wider than taller.
Portrait: Prints rota vertically, letters and cells are taller than it is wide.
Narratives
Shifts: Display shift narratives on the report.
Leaves: Display leave narratives on the report.
Contract Types
Contract: Captures staff member who have a staff type of ‘Contract’.
Bank: Captures staff members who have a staff type of ‘Bank’.
Contract as Bank: Captures staff members who have a staff type of ‘Contract as bank’.
Agency: Captures staff members who have a staff type of ‘Agency’.
Sort by
Team Transaction: Sorts staff members by team the transaction they are working is set (in needs).
Team Contract: Sorts staff members based on the
team assigned to them for the particular unit.
Rank: Sort staff members by the rank their grade is attached to.
Grade: Sorts staff members by the order of Grades in Admin > Grades.
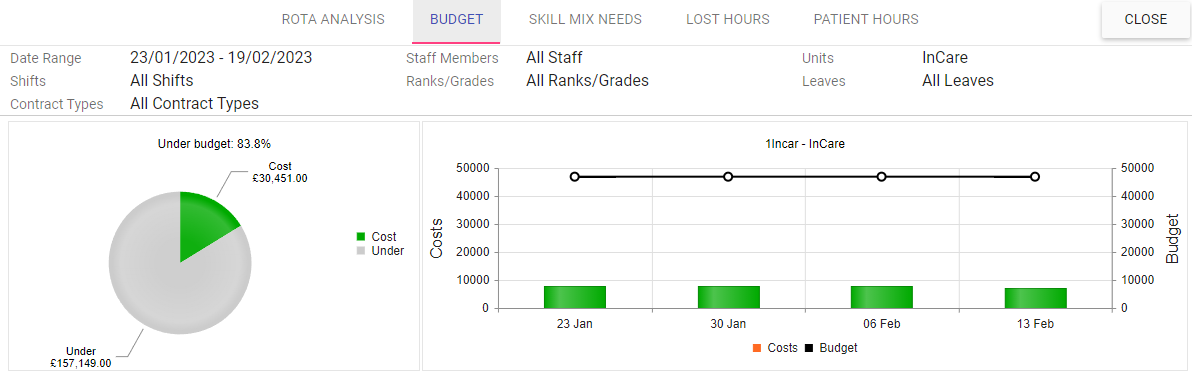
Analyse
The analyse button contains a shortcut to dashboard reports found in
day by day, please refer to the day by day help pages for further details.
Rota Analysis
Budget
Skill Mix Needs
Lost Hours
Patient Hours
Save levels
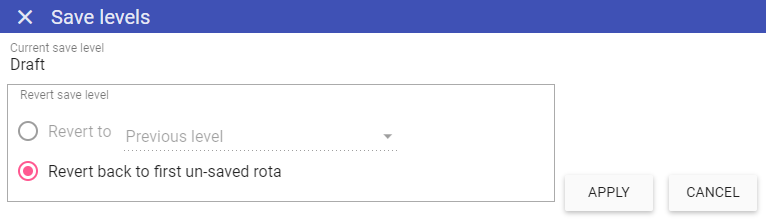
Current save level: Displays the save level that the rota is currently saved at.
Revert to: Allows you to go back to a previous save level.
Revert back to first unsaved rota: Allows you to go back to the very first unsaved rota.
E.g. will display unsaved work patterns if applicable.
Saving the rota to the next save level is done
at the top of the rota.
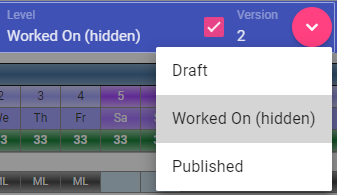
Level: Displays the current rota save level.
Tick box: Tick this to mark that the save level is complete. When ticked, saving the rota then allows the rota to move on to the next save level.
Version: Displays the version number of the rota save level. Each time the rota is saved this goes up by increments of 1.
Drop down menu: Displays all the save levels that you have access to.
History
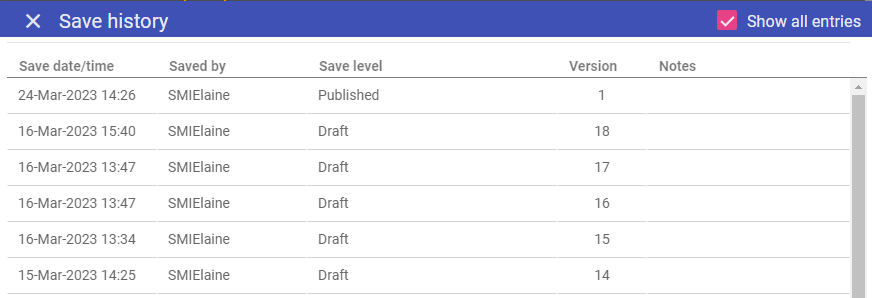 Save date/time: The date and time the rota was saved.
Saved by: The user who saved the rota.
Save level: The save level that the rota was saved on.
Version: The rota version that the rota was saved on.
Notes: Additional information.