Menu Dashboards
Usage
The dashboards are a real time portal, giving you the information you require, all in a single screen.
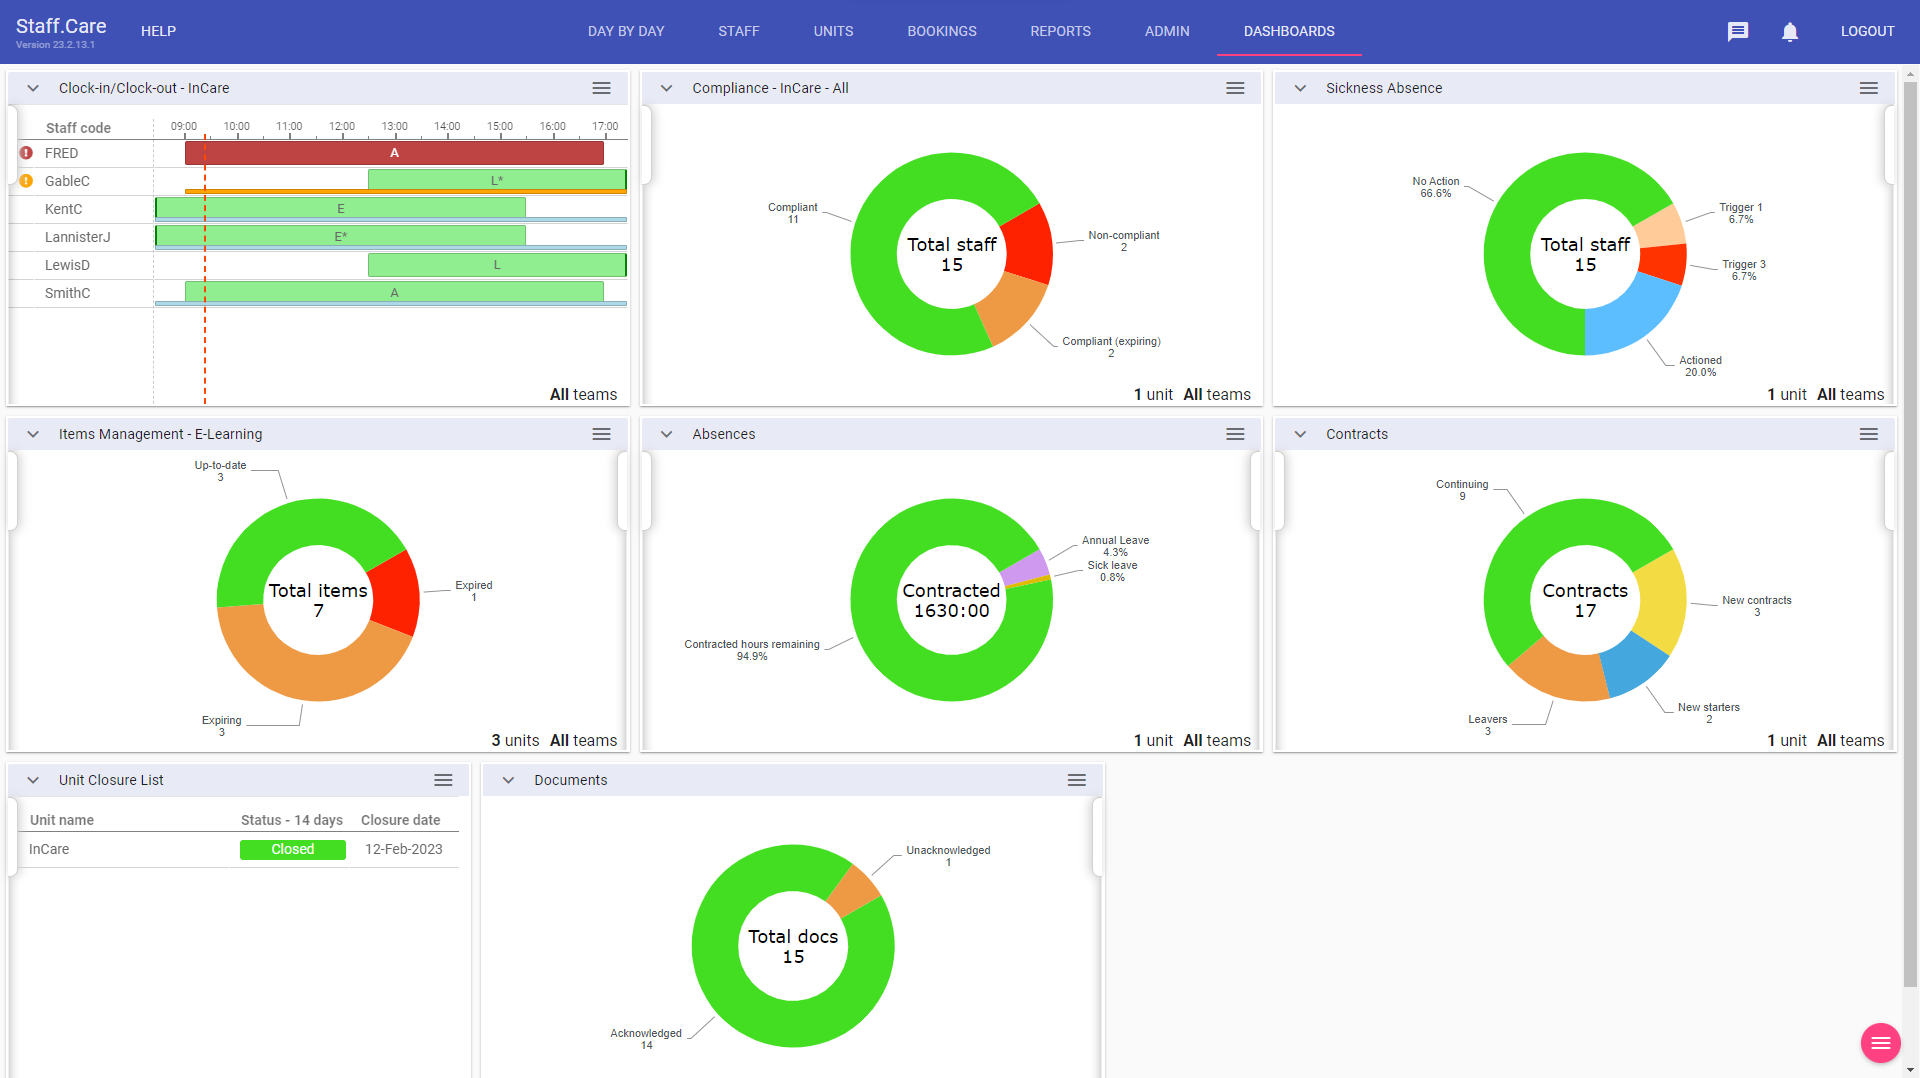
Dashboards Setup
There are 8 dashboard types in total (as in image above):
1. Leave Limits (for setup go to Admin > Leave Limits.): Designed to monitor sickness absence and set 'trigger points' for actioning. Uses the same logic as the Leave Limits report.
2. Absences: Designed to monitor staff contracted hours versus staff on leave whereby you select the leave codes you wish to be displayed.
3. Clock-in/Clock out: Displays a dashboard per unit and shows in real time staff whom are on shift and whether or not they have clocked-in, highlighting those who have not.
This dashboard can be duplicated to view data from more than one unit.
4. Contracts: Monitors new starters, new contracts (contract changes) and leavers over units to which you have access (or organisation wide for HR).
5. Documents (for setup go to Admin > Documents.): Monitors policies and guidance assigned to your staff and whether or not they have been confirmed as read (acknowledged).
6. Items Management (for setup go to Admin > Events, Skills/Competencies, Staff Extras,
Trainings): Monitors all expiring/expired Events, Skills, Trainings and Staff Extras so renewals can be booked, and then the newly completed
items added directly to the staff record via the dashboard. This dashboard can be duplicated to view data from more than one unit.
7. Unit Closure List: A simple list showing units to which you have access, and their closure status as of X days/weeks/months prior to the current date.
8. Compliance (for setup go to Staff >Items Matrix): Only items setup within the Items Matrix are selectable within this dashboard. This dashboard can be duplicated to allow you to
look at compliance for different units you manage or different items or a combination thereof.
Click on the magenta button in the bottom right-hand corner of the dashboards screen:

to open up the following options:
 Padlock icon: Opens up the security group config for your systems dashboards.
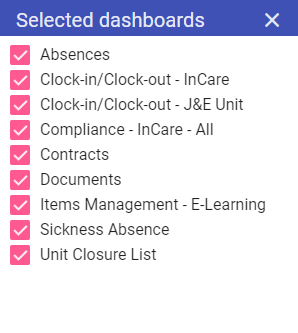
 Add/Remove icon: Allows you to add/remove dashboards you have access to.
 Refresh
icon: Allows you to refresh your dashboards screen.
Refresh
icon: Allows you to refresh your dashboards screen.
By clicking on the padlock icon, this opens the security group config where you can assign access options.

Security Group: Select the security group you wish to edit the default dashboards for.
Restrict dashboard access: If ticked, removes any dashboards not set as default to this
security group from the dashboard picklist.
Allow add/remove dashboards: If ticked, allows this security group to add or remove dashboards using the select dashboards option.
All move dashboards: Allows this security group to move the dashboards around on their screen.
Using the dashboards - Managers/HR
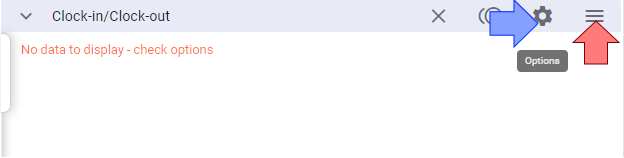
When you first login some of your dashboards may state there is "No data to display - check options".
Click on the menu button ![]() and then click on the cog icon
and then click on the cog icon ![]() to bring up the selected dashboard's options menu.
to bring up the selected dashboard's options menu.
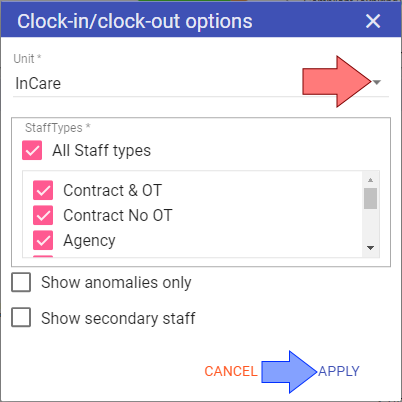
In the Clock-in/Clock-out dashboard the unit is not selected for you, make your selection and click APPLY:
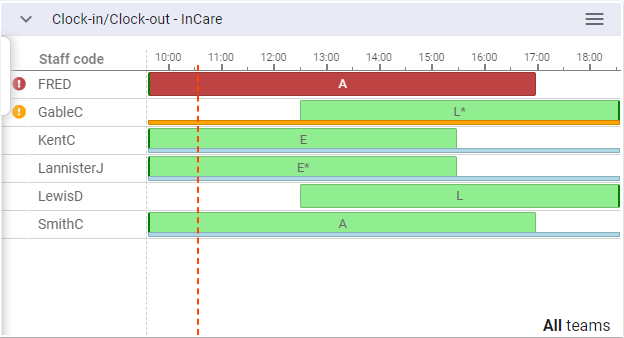
Your dashboard now has data to display:
Repeat this process for all your dashboards and these will become your default settings.
NOTE: All dashboards with a time period will default to today's date upon login.
1. Leave Limits
The Leave Limits dashboard is displayed with the description given (setup in Admin>Leave Limits), ie Sickness Absence:
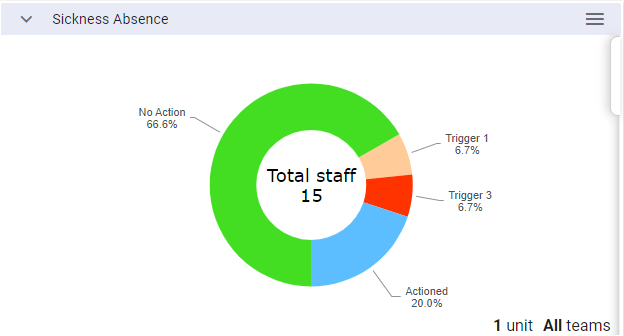
This dashboard monitors your staffs' sickness records based on the organisational limits setup.
Not only can you see which staff have reached the internal "trigger points", but you can also make notes and mark them for action. Only when the next sickness leave is
added to a staff member will the defined limits be checked and marked appropriately.
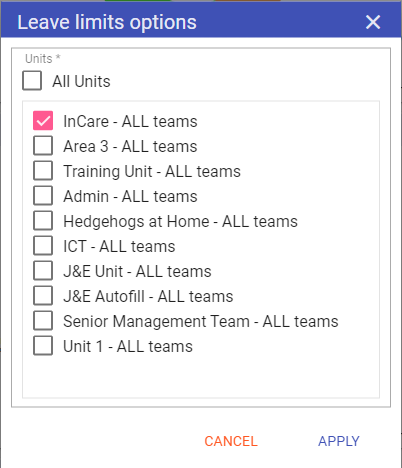
Options - Select the units you wish to manage sickness absence for and click APPLY:
NOTE: These will become your default settings.
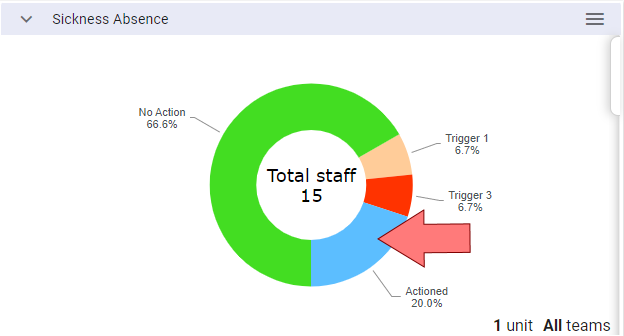
Click on the graph to see which staff have reached one of the trigger points.
NOTE: The limits are applied at the time the leave is entered/removed, if a limit is changed this will have no effect on those currently flagged in the Dashboard.
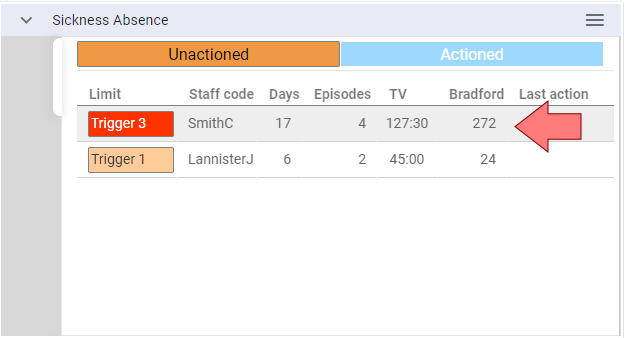
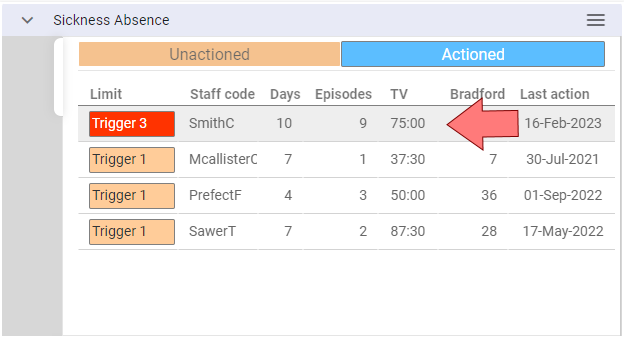
The list is displayed and you can click on whichever staff member you wish to mark for action first:
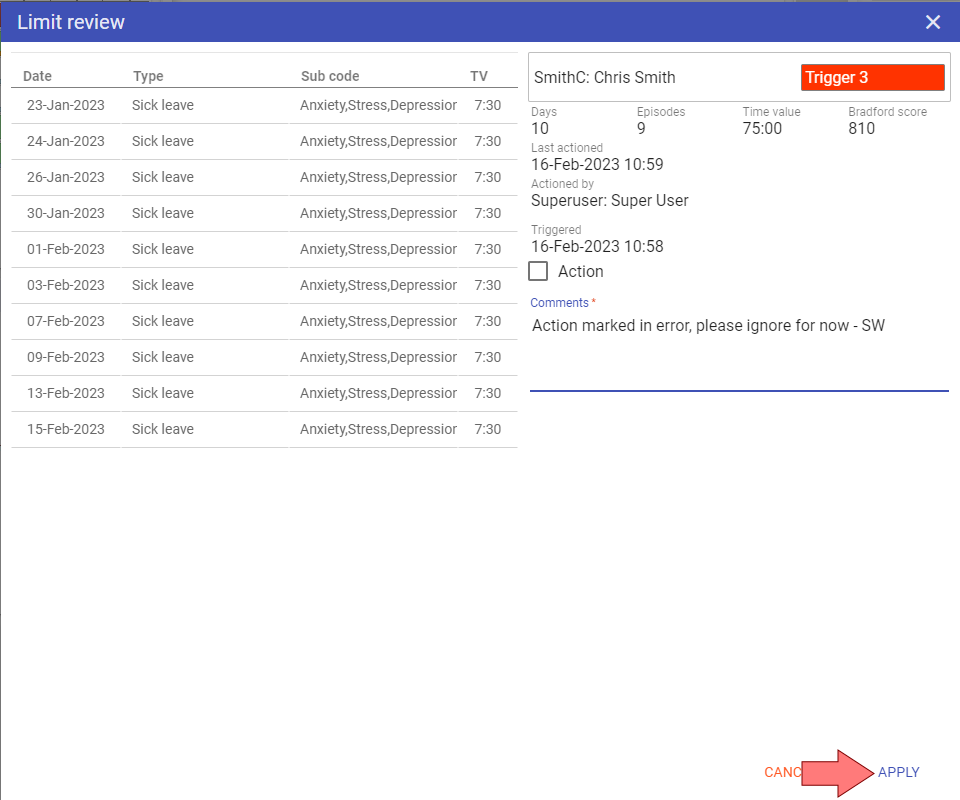
Upon clicking on the staff member, you are given the option to enter comments and mark for action:
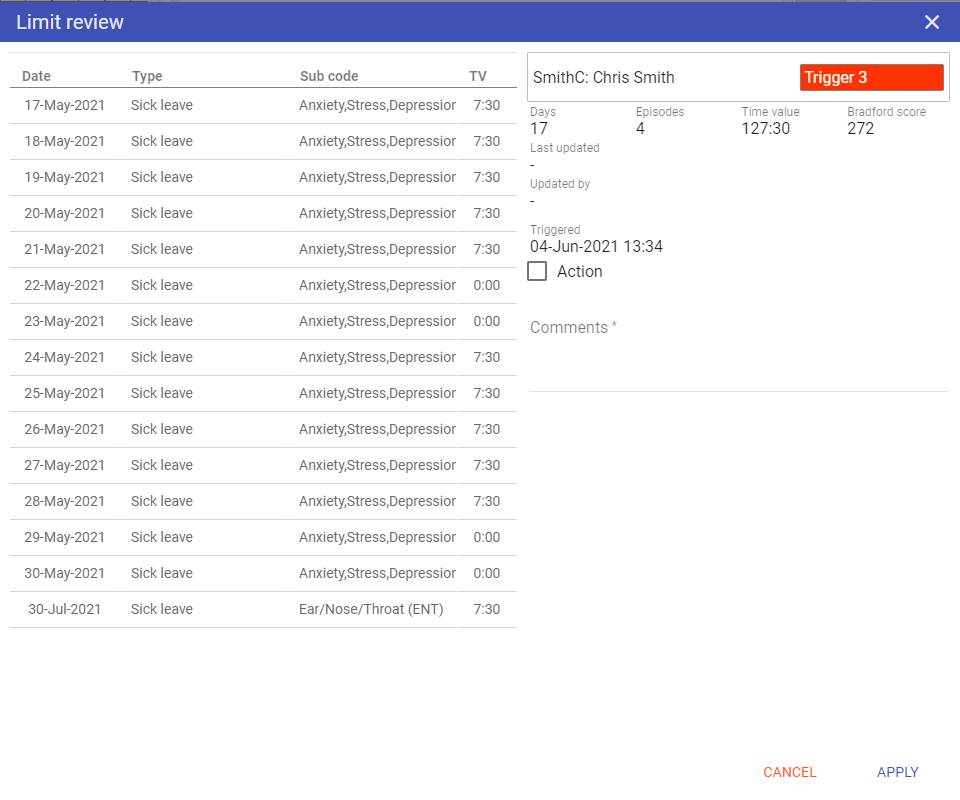
NOTE: The comments made the previous time this staff member triggered a limit will be displayed here too. Once you have made your comments and marked for action, click APPLY:
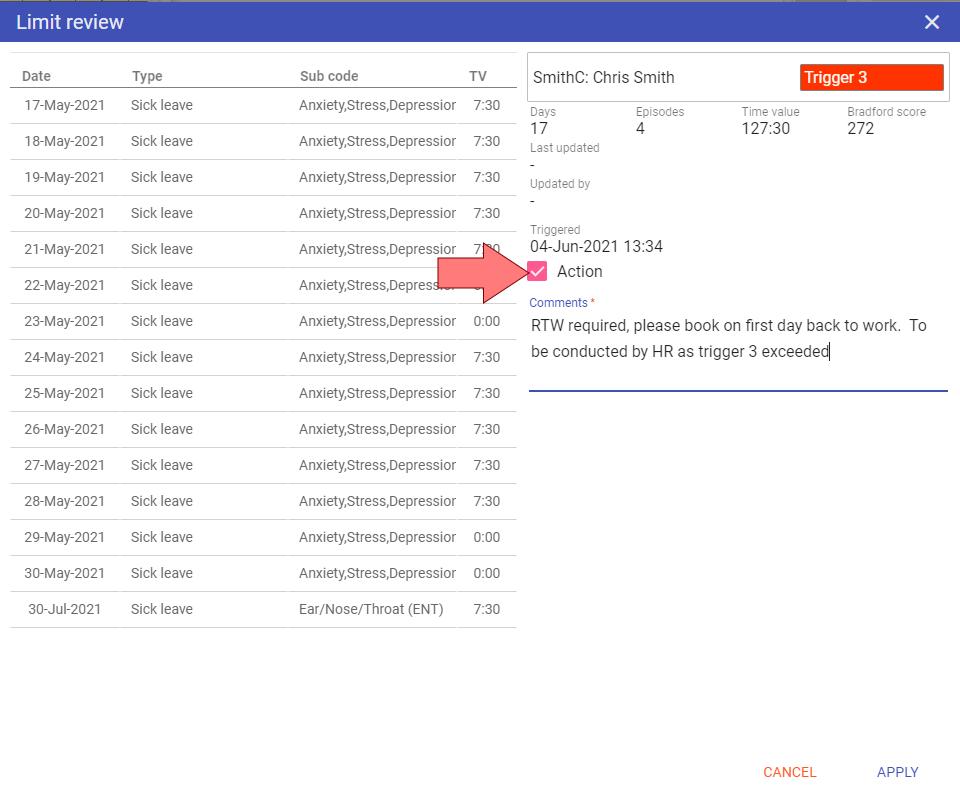
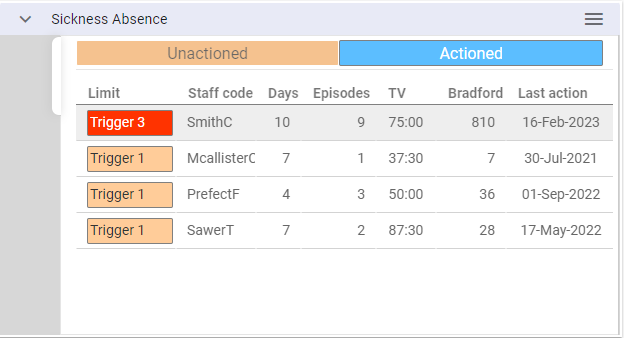
This will move that staff member to the actioned segment of the graph and list:
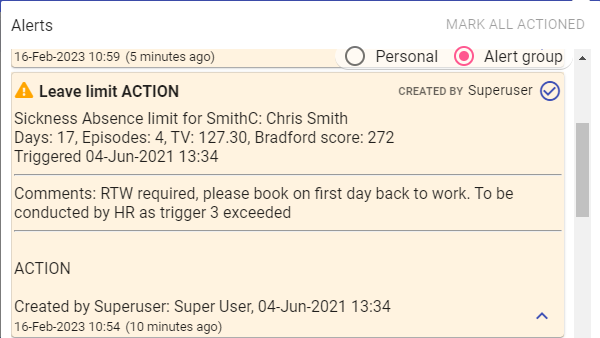
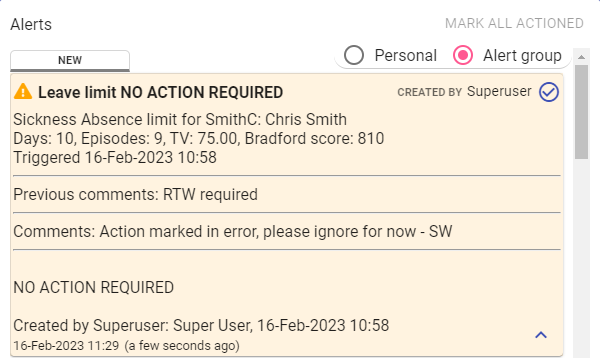
An alert will also be sent to all whom have the staff member's Limits Alert Group:
NOTE: If you made a mistake, you can un-action by removing the tick from the Action box and update the comments accordingly:
This in turn updates the alert sent:
NOTE: Any leave limits left un-actioned will remain in their respective list until they are actioned. If the action is nothing further at this time, this should be noted in comments
and marked as action.
PRINTING
Within the Sickness Absence dashboard options, there is a Report to CSV button ![]() :
:
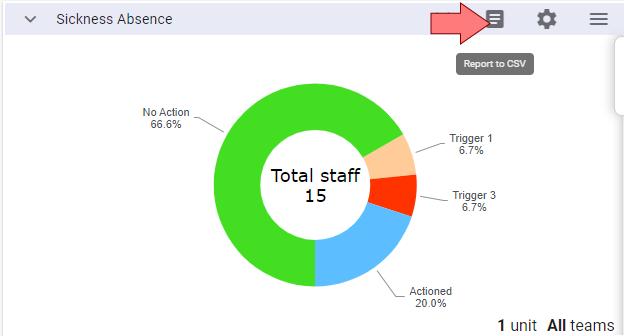
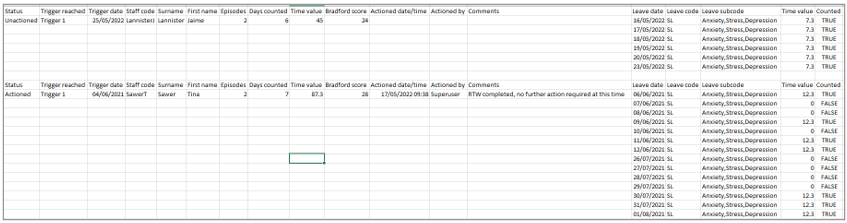
Clicking this will generate a CSV output of the data directly from the dashboard. Once completed, click OPEN FILE to open the report:
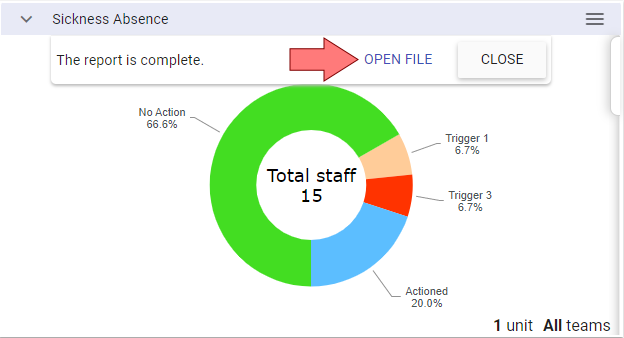
The output contains only those staff which have hit a trigger point, whether the trigger has been actioned or not, details of the sickness days included:
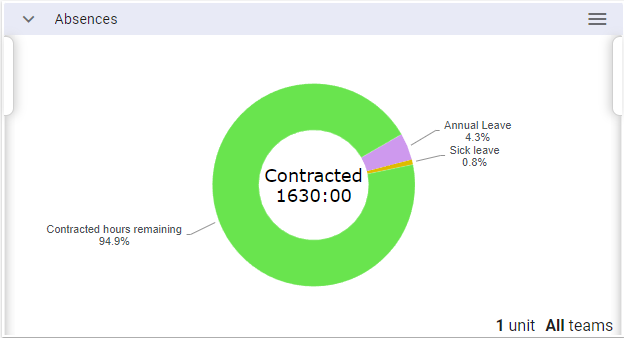
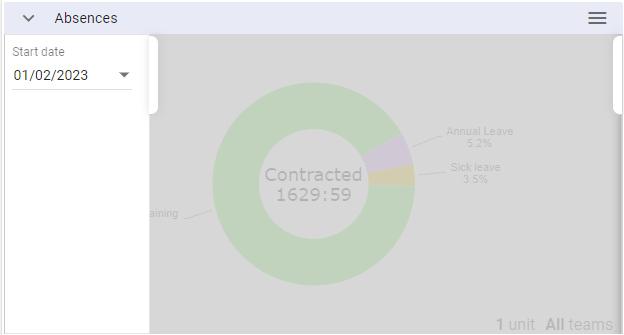
2. Absences
The Absences dashboard displays the number of contracted hours versus the number of leave hours over your chosen time period:
Options - Choose the options you require and
press APPLY:
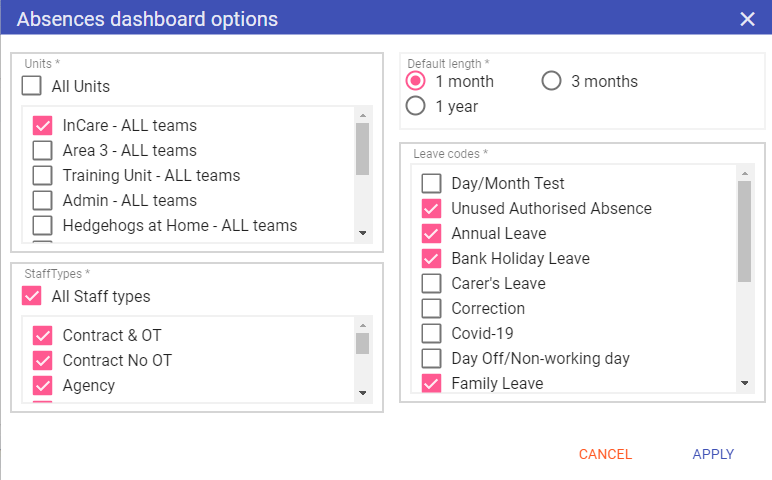
Units: The list of units to which you have access, only those selected will be displayed.
Default length: Time period over which the contract hours and leave are displayed.
Staff Types: Which staff types are included within the dashboard (you can exclude any staff types which do not have contracted hours).
Leave Codes: Only leave codes selected will be displayed in the dashboard (again exclude any leaves with no time value and other leaves you do not wish to show).
Click APPLY once completed.
There is a tab on the left of the dashboard screen which allows you to select a date from which to view forward from:
NOTE: This always defaults to today's date, but can be used to show past history or future leave.
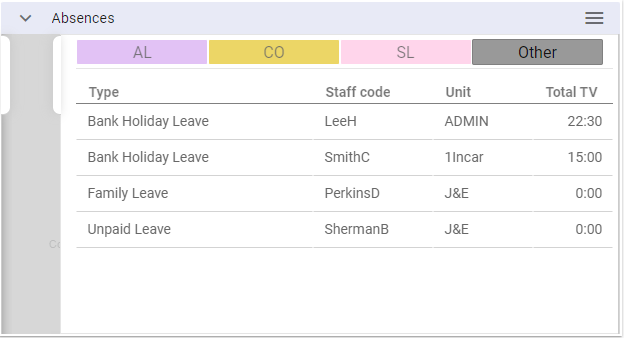
Features - Clicking on the graph brings up a simple table of the leave codes selected, the 3 leaves with the highest percentage are displayed separately:
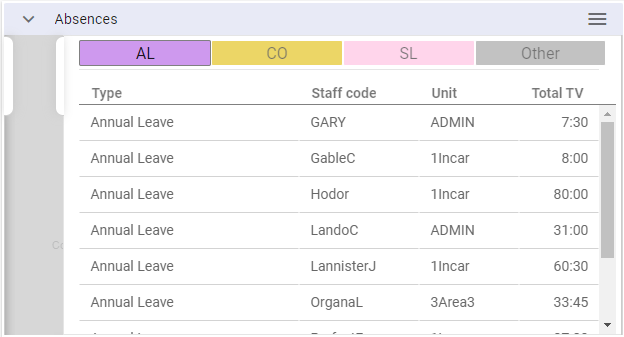
The rest are grouped together as other:
3. Clock-in/Clock-out
This dashboard is only for those organisations where staff clock-in and out through Staff.Care (either via external terminals
or using the clock-in and clock-out buttons on the login screen):
Options - This dashboard is a special case in that you can have multiple clocking dashboards for every unit to which you have access, by clicking on the Duplicate icon
![]() :
:
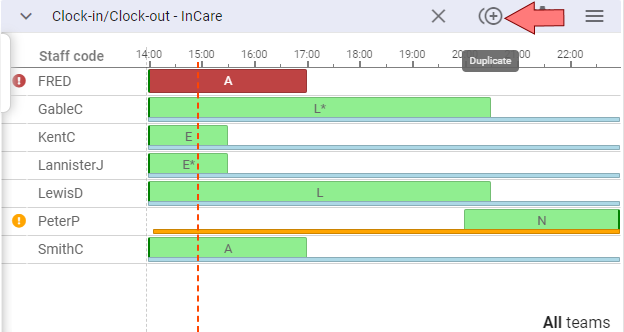
Once you have clicked on this you can choose a unit to display and click APPLY:

You will now have 2 clocking dashboards:
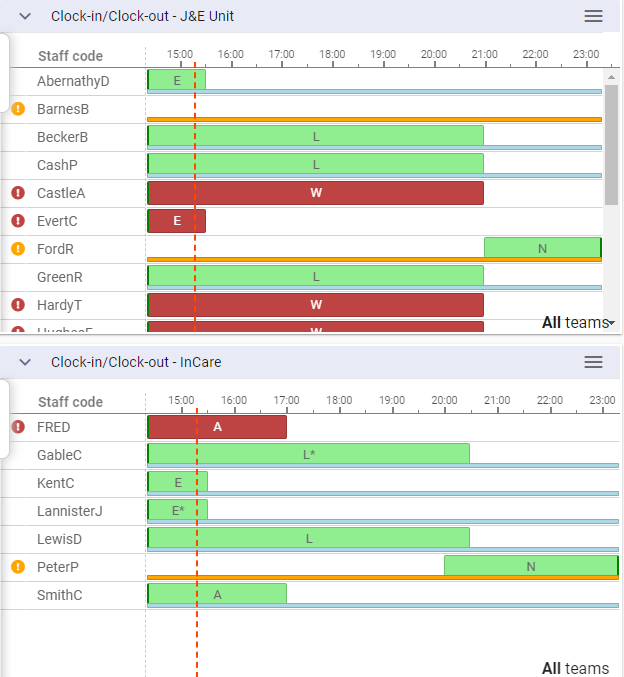
NOTE: In the add/remove dashboards list, both of these will now be displayed:
Within the options cog you have the following options:
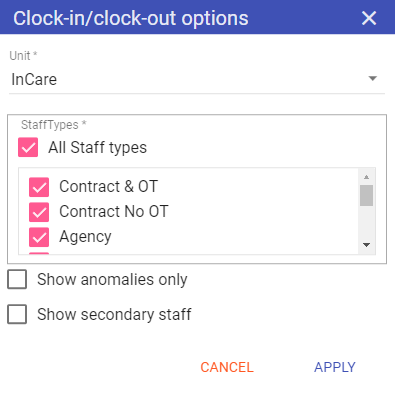
Unit: The unit you wish to display.
Staff Types: The staff types you wish to view on the clocking dashboard.
Show anomalies: Will only display staff that have not clocked in but have a shift, or staff that are clocked in, and do not have a shift.
NOTE: Agency staff may not have the ability to clock-in or out.
The left tab menu gives you the following options:
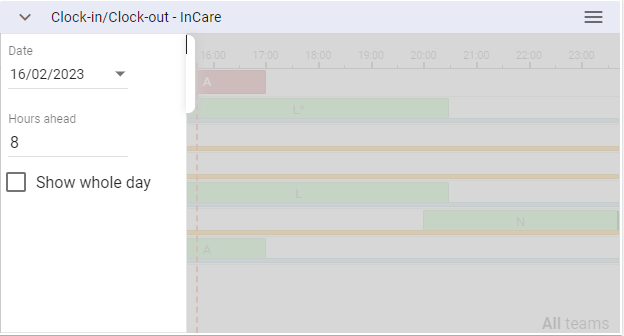
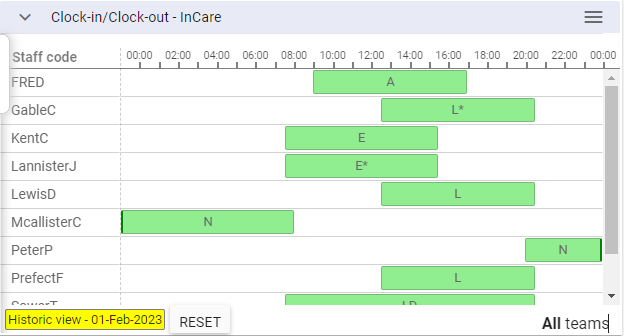
Date: Always defaults to today, but can be changed to view prior history of clocking-in and out.
Hours ahead: Always defaults to 8, but can be set anywhere between 1 and 24 hours.
Show whole day: Shows the whole of the selected date from midnight to midnight.
NOTE: When past days are chosen the dashboard states this and allows you to RESET to today:
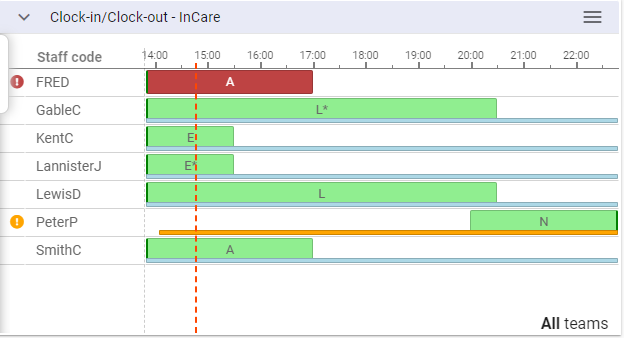
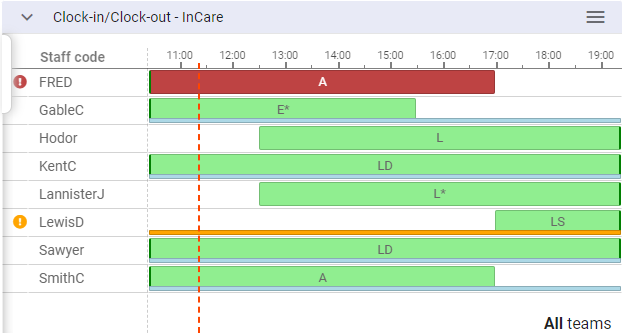
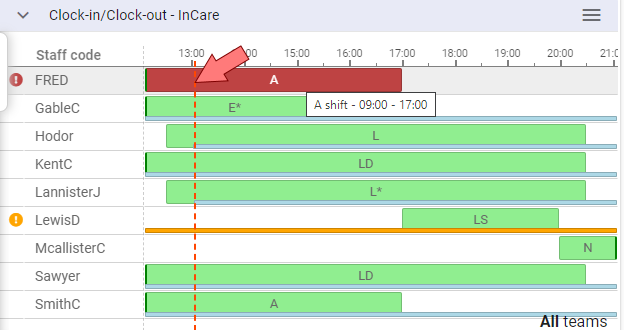
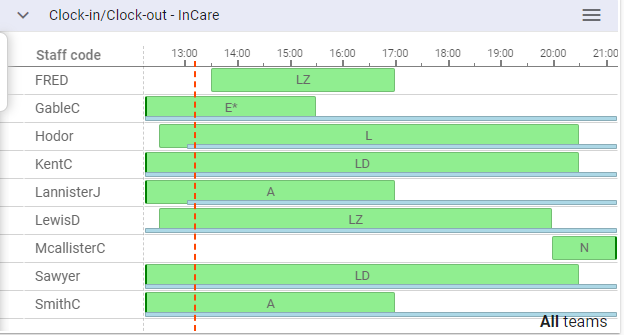
Features - Shifts are shown in blocks with the shift code in the middle, hovering over the shift shows the shift times:
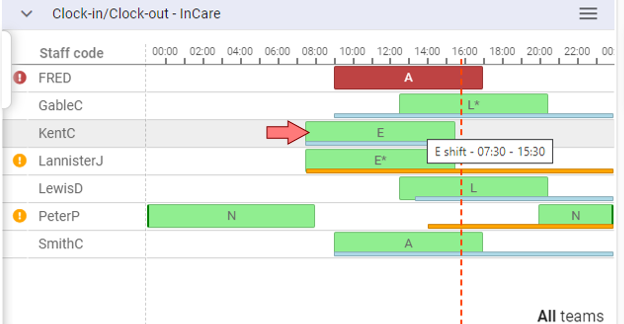
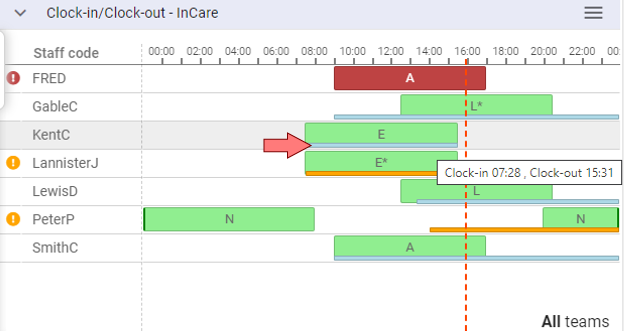
Clocked-in times are shown by a line underneath the shift, hovering over the clocked-in line shows the times:
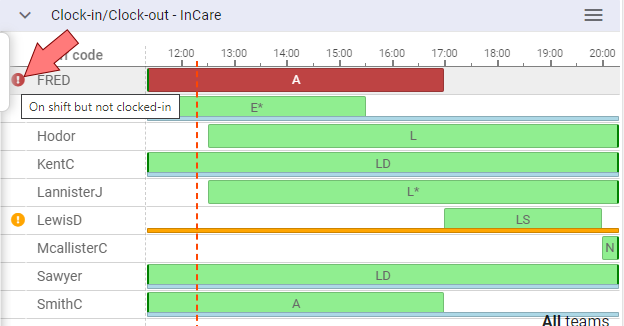
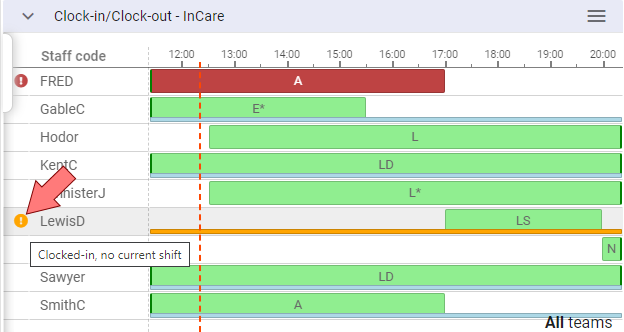
If someone has a shift as of now but is not clocked-in, the shift will display as RED, and if someone is clocked in but has no shift, the line will show as AMBER:
Hover over the red warning icon to display the message:
Hover over the yellow warning icon to display the message:
You can also make updates to the rota from here. For example, Fred has a shift but has not clocked in and LewisD has clocked in and can cover this shift. Click on
Fred on the dashboard:
You are taken straight to Day by Day > Shift Control for that shift - all other staff are faded out:
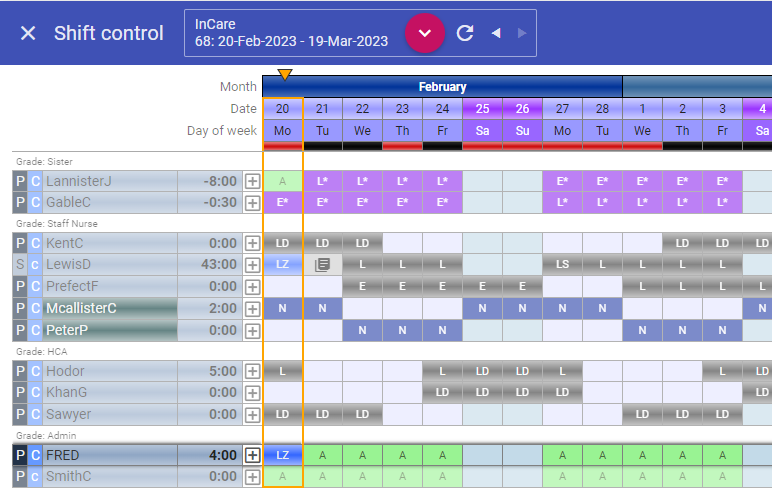
You can swap the shift, save the rota and return to the dashboard which has updated with the change that's been made:
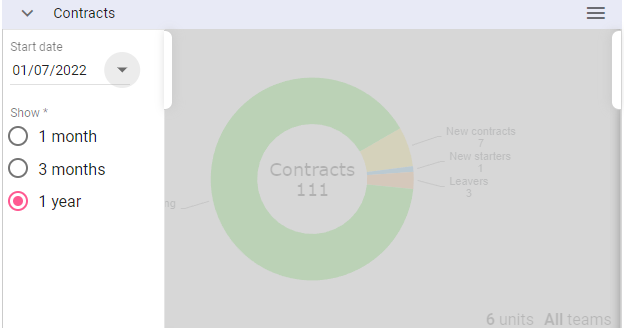
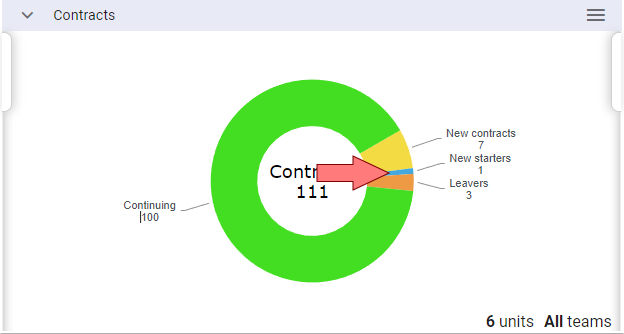
4. Contracts
The Contracts dashboard is designed primarily for HR and Payroll so new starters, leavers and contract changes can be viewed and
processed accordingly.

Continuing: Staff who have the same contract throughout the displayed period.
New contracts: Staff who have either a new contract or a contract change within the displayed period.
New starters: Staff who have a start date within the displayed period.
Leavers: Staff who have a leaving date within the displayed period.
NOTE: A staff member who has a start date, 2 contracts and a leaving date within the displayed period will be under new starters, new contracts and leavers.
A staff member who has a start date with a single contract in the displayed dates will show as just a new starter.
Options - Clicking on the options gives you the following selections:
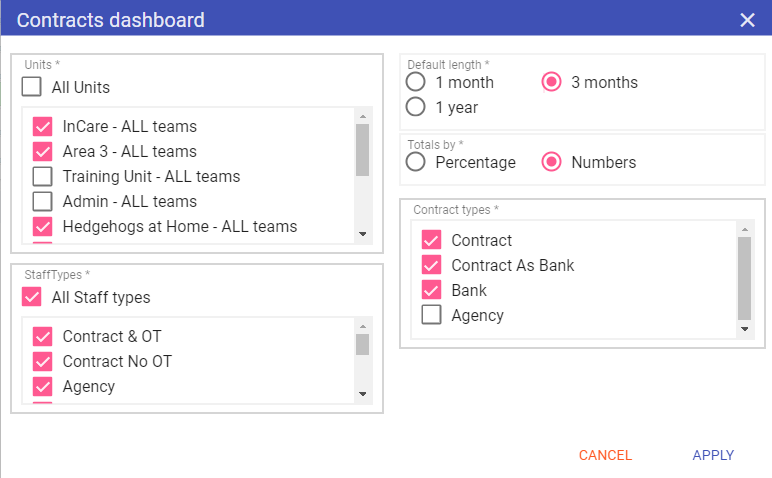
Units: The list of units to which you have access, only those selected will be displayed.
Default length: Time period over which the contract hours and leave are displayed.
Totals by: Gives you the option to display totals on the graph by number of contracts or percentage.
Staff types: Which staff types are included within the dashboard (you can exclude any staff types which do not have contracted hours).
Contract types: Allows you to display only the contract types you are interested in (agency contracts can be cut out for line managers).
Once you have chosen your options, click APPLY and these will become your default settings.
There is a tab on the left of the dashboard screen which allows you to select a date from which to view forward and the ability to increase or decrease the time
period displayed:
NOTE: Today's date and the period set in the dashboard options are always the default.
Features - Clicking on one of the segments in the dashboard will display a list of the staff under that segment, for example, if you click on New Starters:
The table of staff loads and the New starters tab is selected, or you can select
the other tabs to view the staff from here:
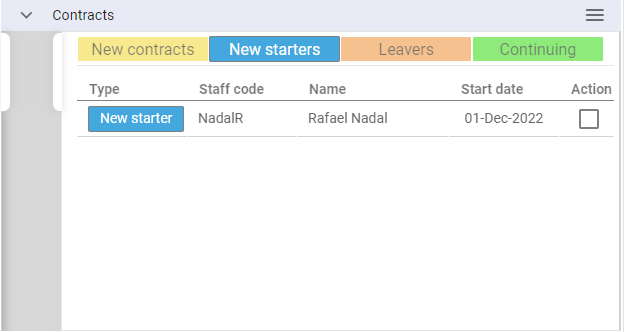
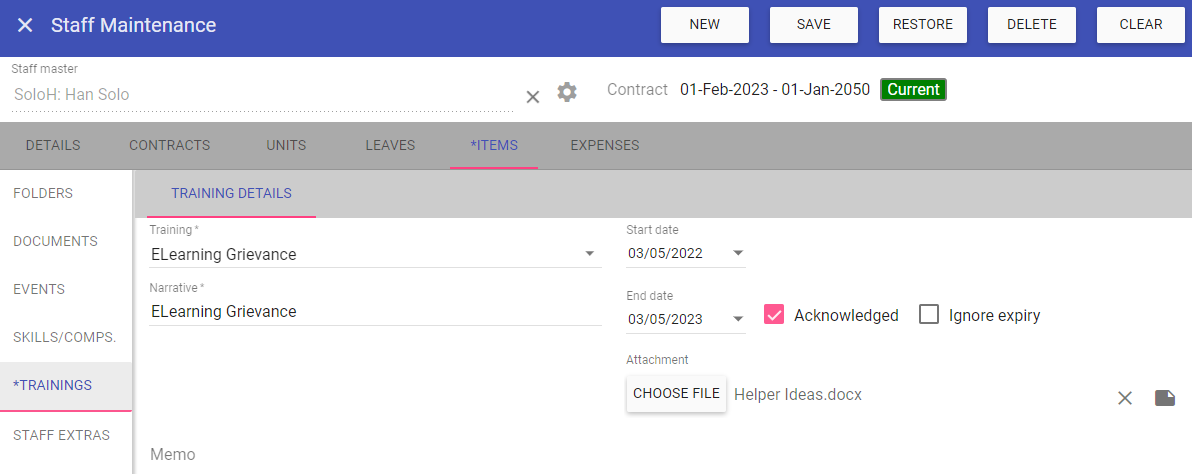
Clicking on a staff member from the list takes you to their Staff Maintenance record where you can check and complete any pre-employment tasks, add items to their
records and make sure payroll is setup before marking the new starter as Actioned:
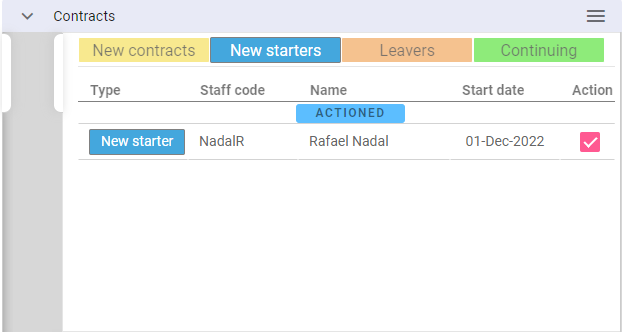
Actioned records will still show on the graph under the respective segments, however, they will show under an actioned heading in the dashboard:
NOTE: You can access all staff records to which you have access via this dashboard.
5. Documents
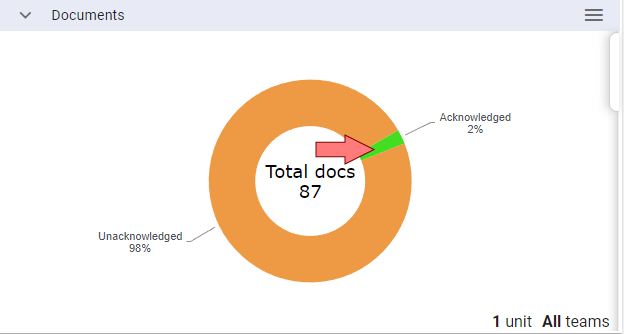
The Documents dashboard displays a simple breakdown of documents associated to staff and how many have been digitally signed as Acknowledged.
NOTE: Only documents set to “Require Acknowledgement” will display in this dashboard.
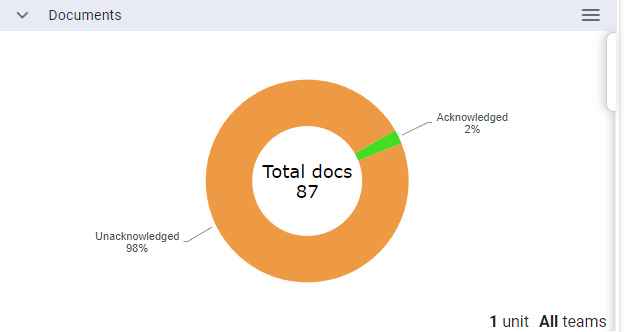
The count is out of the total number of documents requiring acknowledgement associated to staff to which you have access.
Options - The options for this dashboard allow you to filter from the staff to which you have access and the documents on which you wish to check:
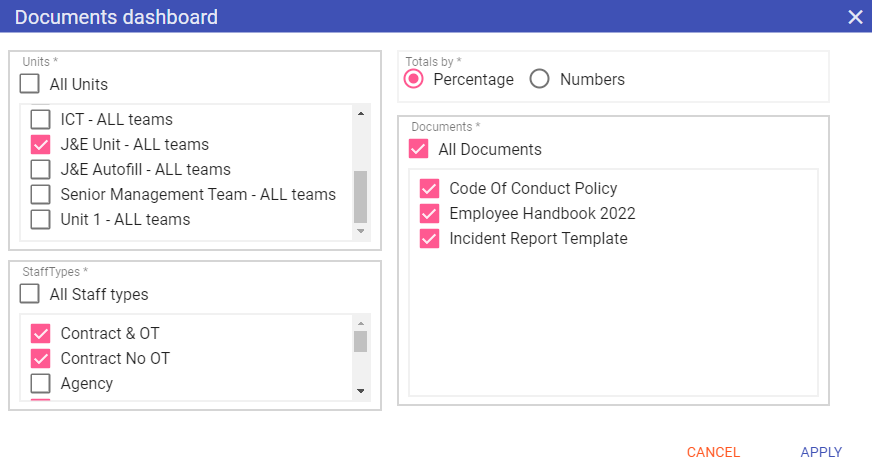
Units: The list of units to which you have access, only those selected will be displayed.
Totals by: Gives you the option to display totals on the graph by number of contracts or percentage.
Staff Types: Which staff types are included within the dashboard (you can exclude any staff types which do not have contracted hours).
Documents: Allows you to filter by the list of documents which require acknowledgement.
Once you have made your changes, click APPLY and these will become your default settings.
NOTE: SMI recommend having All Documents selected in this dashboard, that way any new ones created or updated will be displayed.
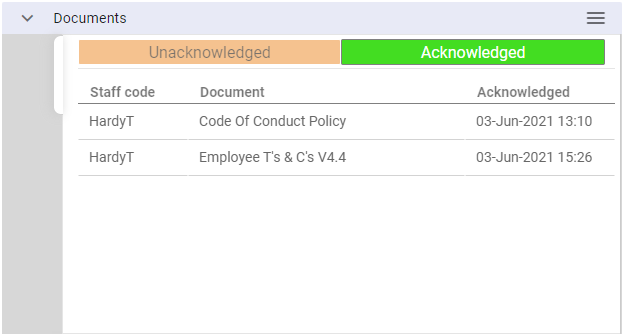
Features - Clicking on a portion of the graph will load up the staff lists for both Acknowledged and Unacknowledged documents. If we click on the Acknowledged
portion of the graph:
The list of documents acknowledged by staff will be displayed:
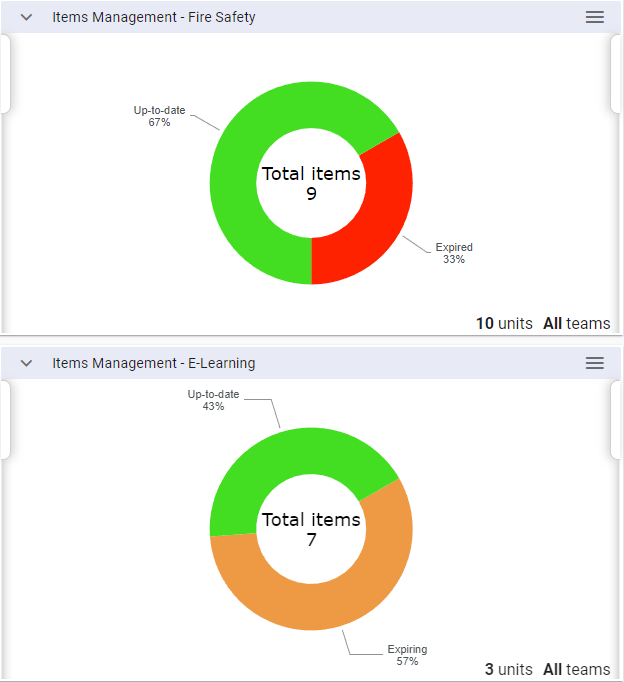
6. Items Management
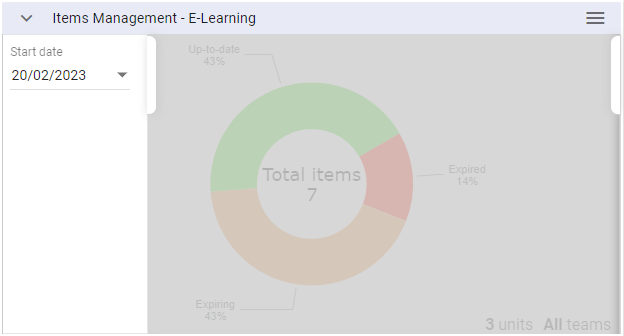
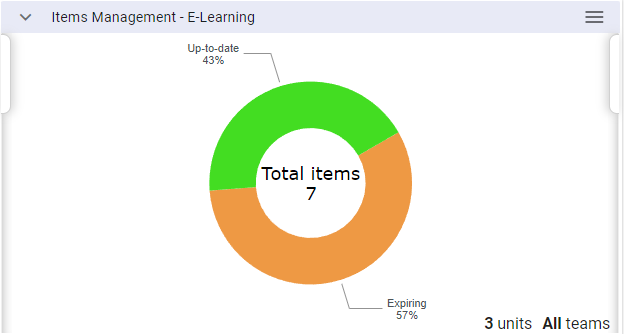
The Items Management dashboard gives you a breakdown of staff items (Events/Skills/Trainings/Staff Extras) which require renewal and their status as
of today:
The dashboard displays as a graph showing items that have expired, expiring or are up-to-date:
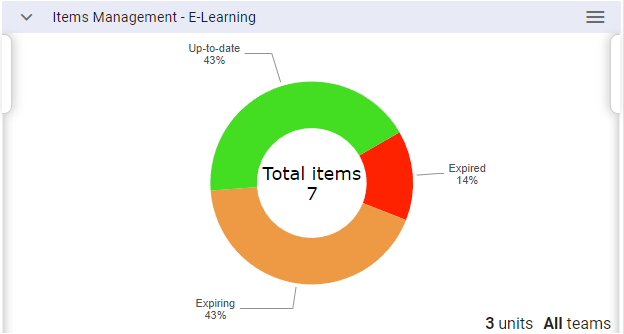
Up-to-date: These items are current to today and have not yet reached their expiry reminder period (warning days set in Admin).
Expiring: These items have reached the warning days limit set in Admin and renewal action is required.
Expired: These items have passed their expiry date and require renewal.
By clicking on the graph it shows more detail relating to the item, and by selecting a user it will open directly into the relevant Staff Maintenance
screen (Events, Skills/Competencies, Trainings or Extras):
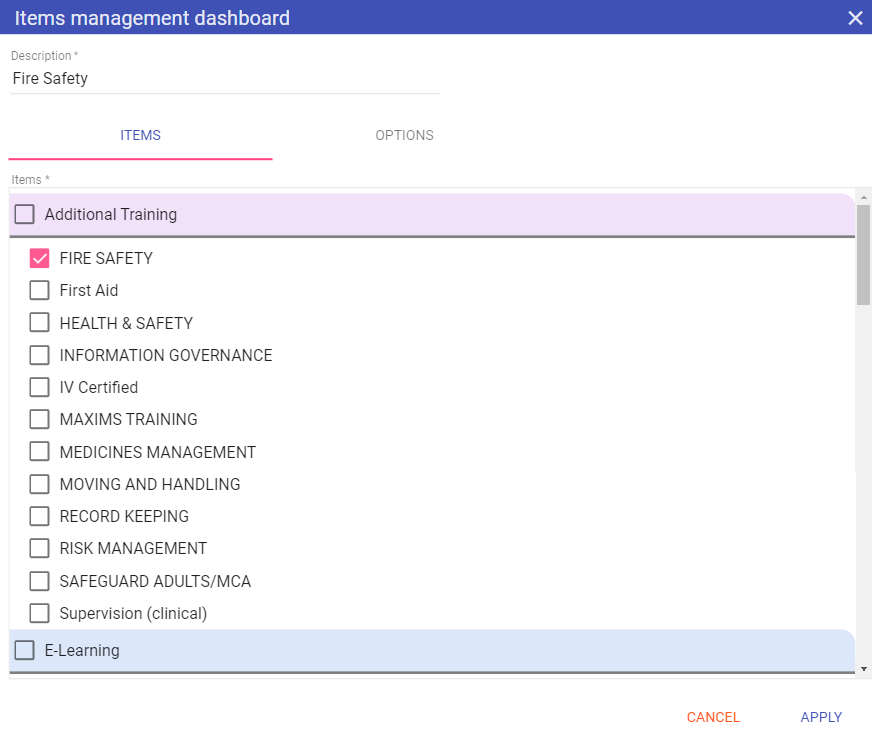
Options - The options for the Items Management dashboard has 2 screens to complete - Items and Options. You must give the dashboard a Description name at the top of this screen and select which items you require:
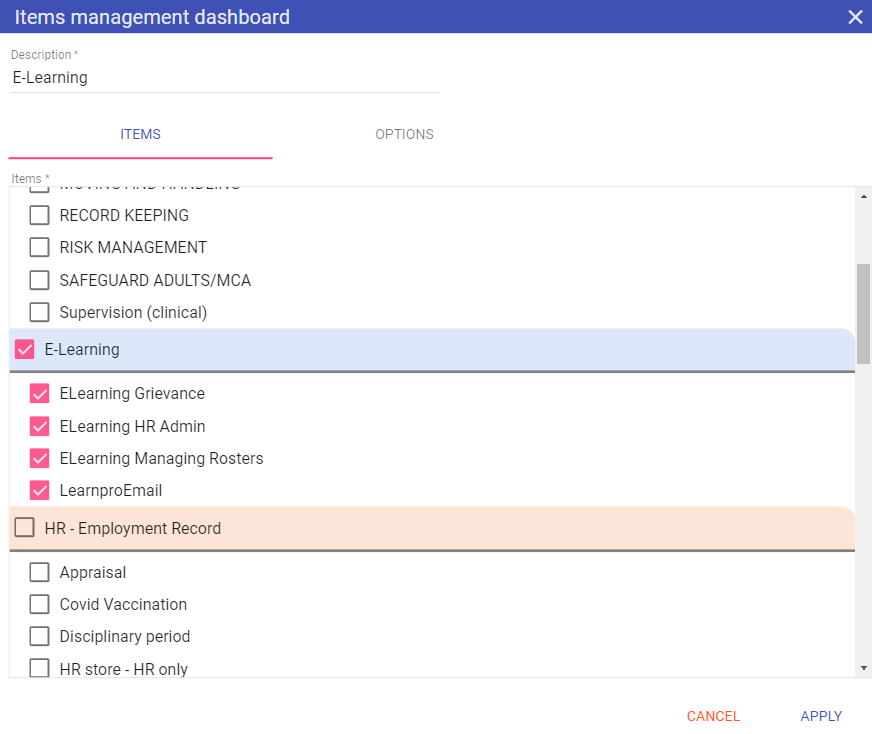
Description: Unique name given to the dashboard filters you apply for items and folders you have access to.
Items: Allows you to filter from the list of folders and items to which you have access to created in Admin > Folders).
Once this screen is completed, press the Options tab and choose the unit(s) and staff types:
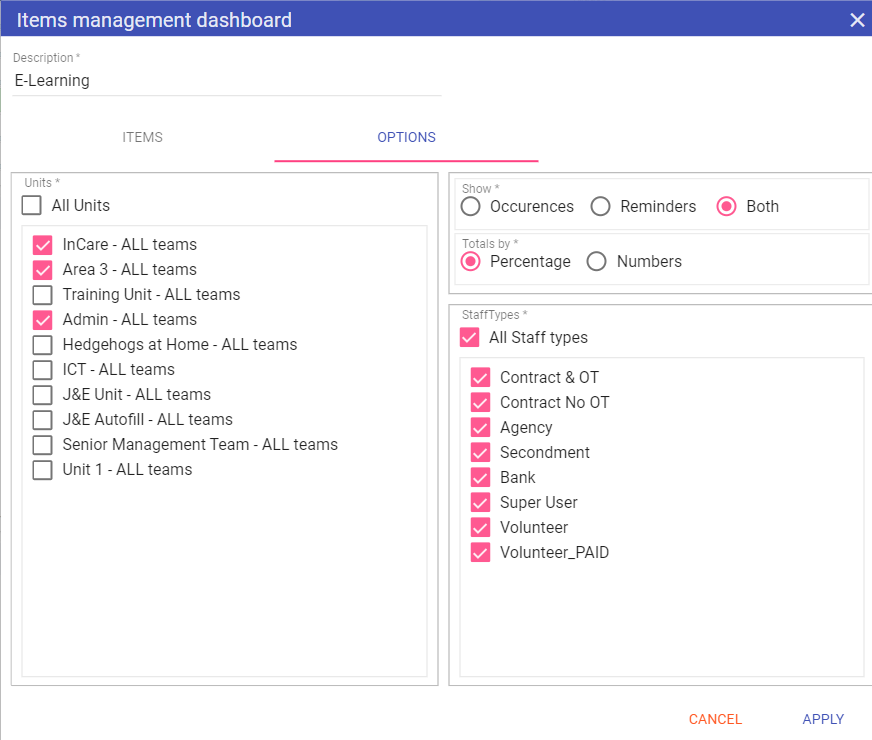
Units: The list of units to which you have access, only those selected will be displayed.
Show: Allows you to differentiate from items setup as occurrences or reminders or choose to show both.
Totals by: Gives you the option to display totals on the graph by number of contracts or percentage.
Staff Types: Which staff types are included within the dashboard (you can exclude any staff types which do not have contracted hours).
Click APPLY to set these as your default options.
There is a left side tab on this dashboard which allows you to select a date from which to view this information from, this always defaults to today’s date:
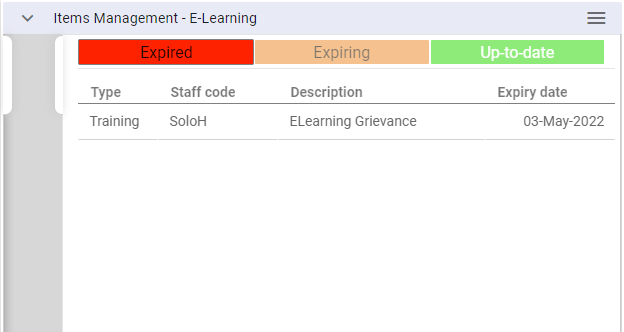
Features - Clicking on a segment on the graph opens up the staff lists. If we click on the Expired segment:
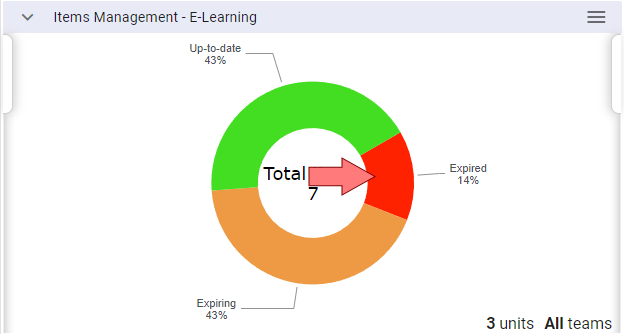
The list displays with the Expired list on screen. From here we can see which items require updating and act accordingly, booking training/setting a date for an appraisal etc:
You can add the new item from this Dashboard directly by clicking on a staff member in either the expired/expiring lists.
NOTE: You cannot click in on the Up-to-date list.
Clicking on the staff member’s item to be updated automatically takes you to their Staff Maintenance record on the correct items tab AND selects the item to add:
NOTE: A new start and end date can be added. Although if you prefer today’s date to automatically be added as the start date, please contact SMI
as this can be set as the new default option.
Once completed click SAVE, this will then update the dashboard:
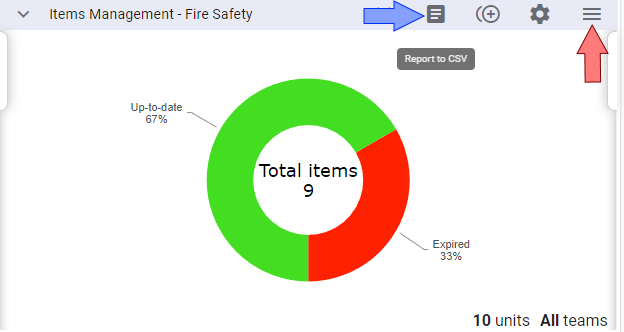
You have the ability to have multiple Items dashboards and can print from these too. Select the Menu icon ![]() at the top of the dashboard and click the Duplicate icon
at the top of the dashboard and click the Duplicate icon ![]() :
:
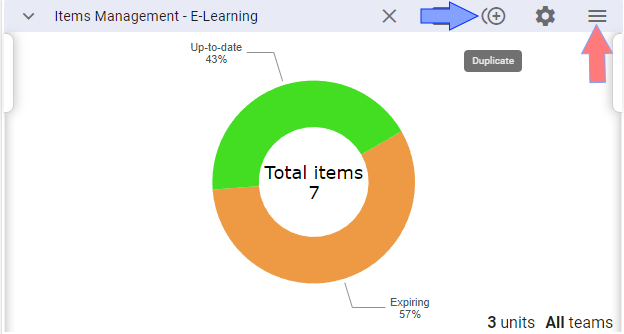
Upon clicking the Duplicate icon, you will again be prompted to name your subsequent Items dashboards, you can pick the required items and options then click APPLY:
Once completed you will now have a second Items dashboard:
PRINTING
Click on the menu icon ![]() then select the Report to CSV icon
then select the Report to CSV icon ![]() .
This will output all items and their statuses from the dashboard itself to CSV which means only the latest of each item for each staff member is output, great for expiry checking:
.
This will output all items and their statuses from the dashboard itself to CSV which means only the latest of each item for each staff member is output, great for expiry checking:
Once completed you will be able to open the file:
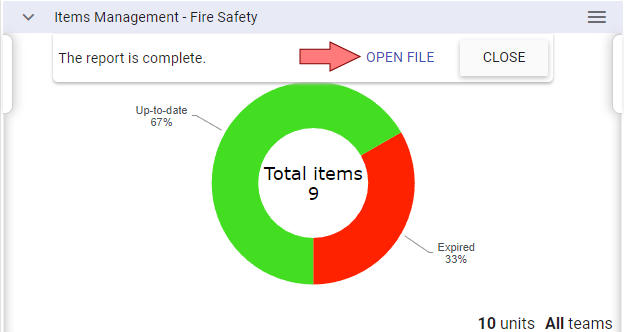
The output contains the following information:

NOTE: Items are ordered by status with expired at the top, followed by expiring and up-to-date last.
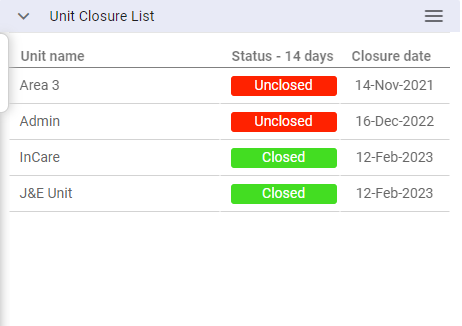
7. Unit Closure List
This is a simple list of all the units selected and their closure status as of X time period before today. This dashboard
was designed specifically with Payroll in mind as, at a glance, your payroll team can check to make sure all rotas have been confirmed ready for payroll:
Options - The options allow you to choose from all units to which you have access, and how far to look back from today's date, to see if the unit is closed as expected:
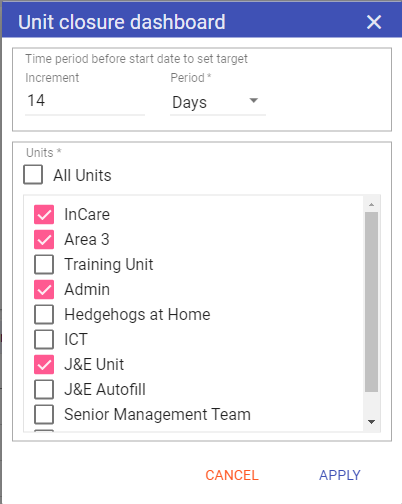
Click APPLY to set these as your default settings.
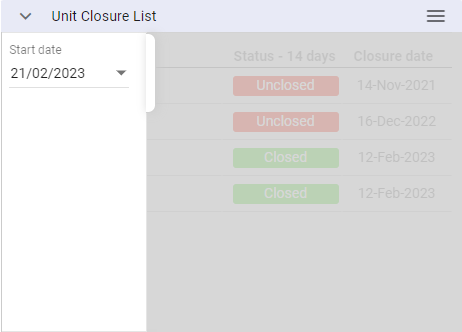
The left tab allows you to select a date from which to view, this will always default to today:
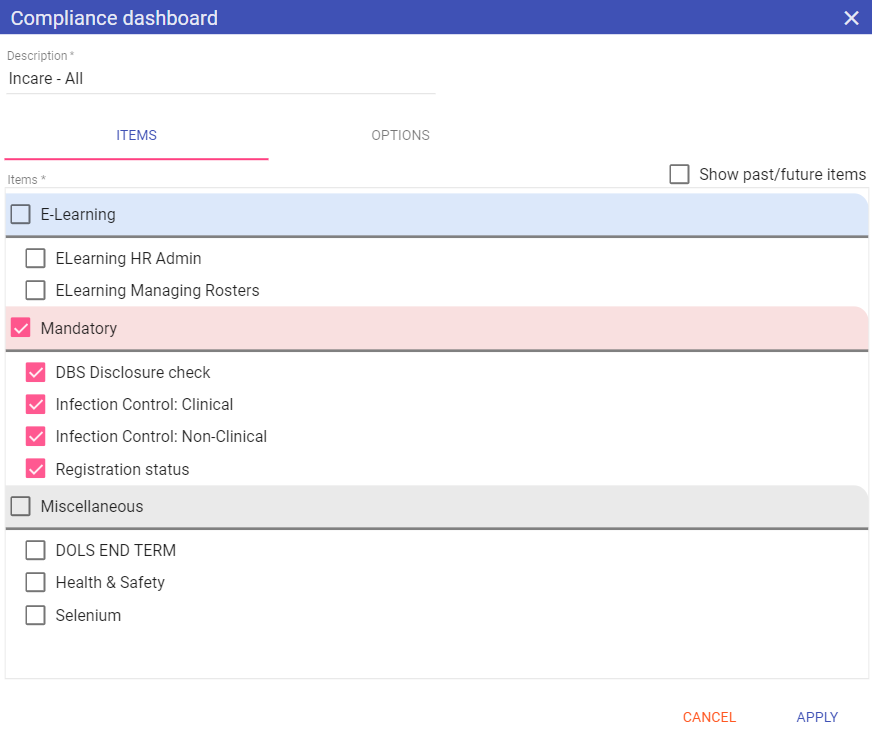
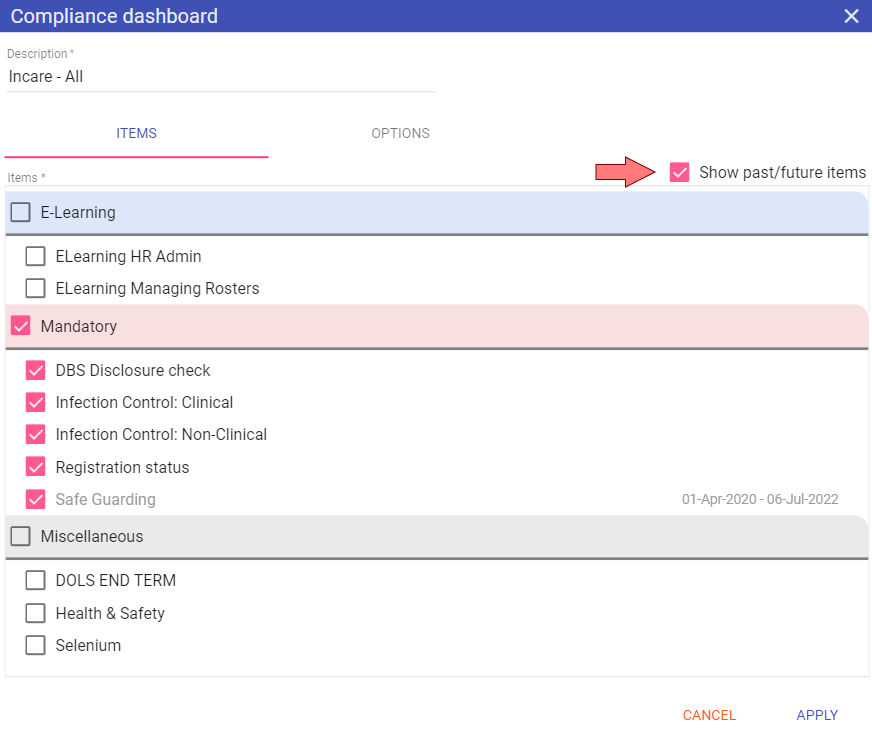
8. Compliance
Only items setup in the Items Matrix are selectable within this dashboard.

In the Options menu you will be required to give the dashboard a Description (as you can have multiple Compliance dashboards) and select which items to output
from the Items list:
The option to show past/future items allows you to select items which are not currently valid as of today. This means when completing compliance checks for different dates, you can select all the items:
Then under the Options sub menu, setup the Units, Grades, Staff Types, how to sort and whether to show percentage or numbers for the totals:
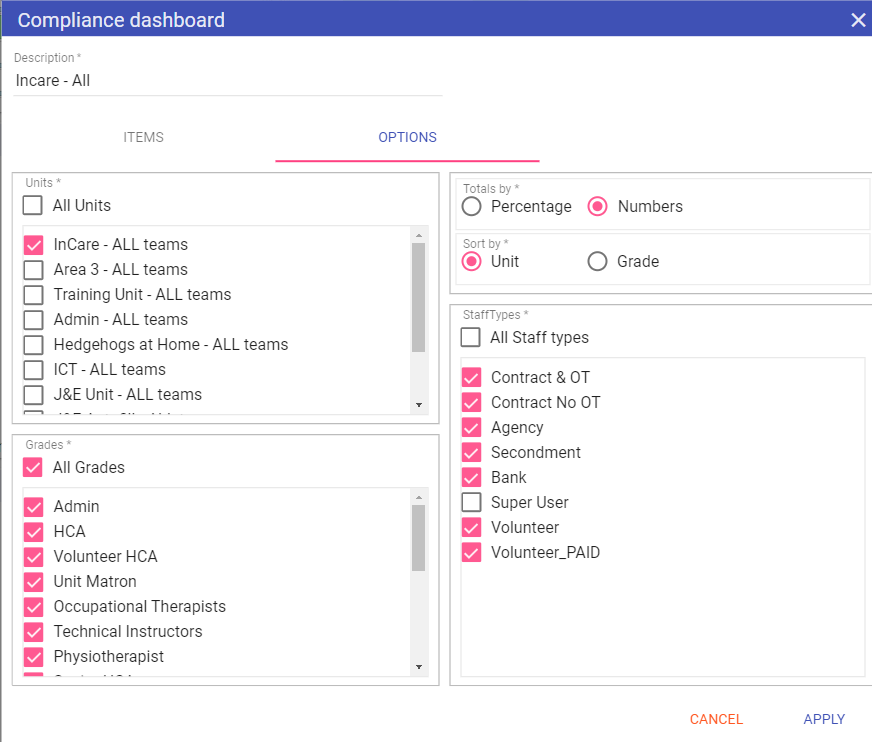
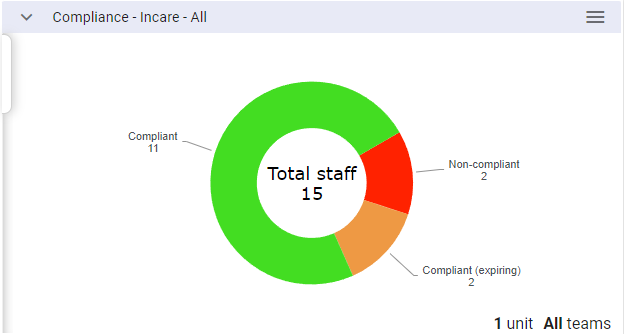
Once completed click APPLY. The dashboard now shows the relevant information:
If you wish to add more Compliance dashboards, click the menu icon ![]() and pick Duplicate
and pick Duplicate ![]() :
:
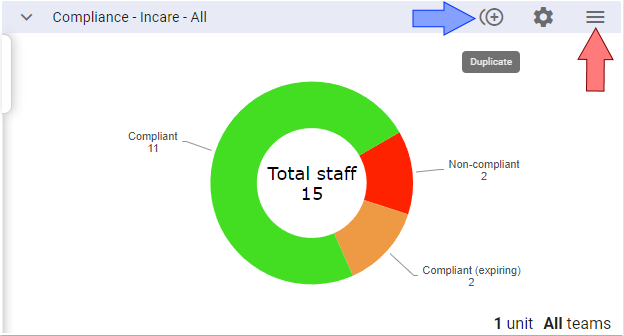
This will open the Options menu for another Compliance dashboard as this will require a unique name.
NOTE: As with all dashboards, your Compliance dashboard settings are for your account only.
You can set a past or future date to look at by clicking the tab on the left of the dashboard,
this will temporarily set the dashboard to look at this date (with figures matching the selected date):
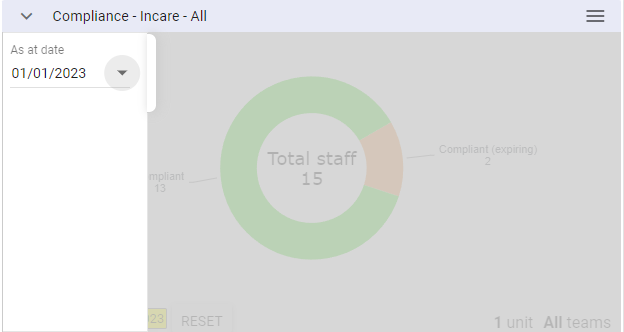
NOTE: Even if all past/future items are selected in the Options, the dashboard will only display information for items valid on the chosen date.
Unlike other dashboards, clicking on the Compliance dashboard does not open a table, instead it takes you to the Staff > Items Matrix View screen with the settings chosen:
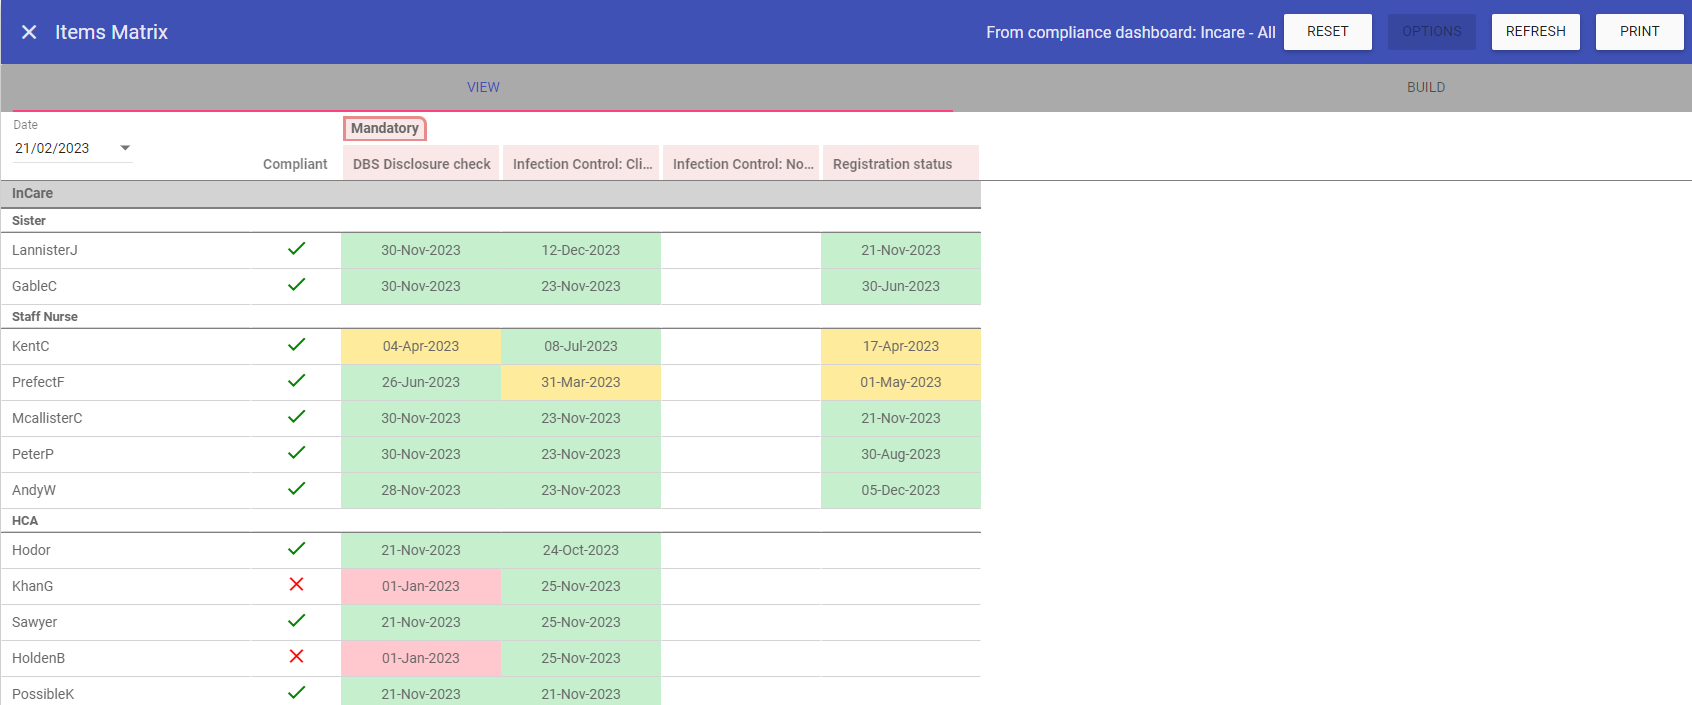 NOTE: The message at the top tells you the screen is set to a dashboard’s options, clicking reset will clear these options.